20.109(S17):Confirm cell lines and practice tissue culture techniques (Day1)

Contents
Introduction
To be confident of your findings related to DNA repair, you will first validate the cell lines you are using to assess the effect of drug treatment following DNA damage on NHEJ. It is important to confirm the cells you are using are indeed mutants in the BRCA2 protein to interpret the data you collect in this module. You will do this by completing a Western blot. A Western blot allows researchers to detect specific proteins within a mixed sample, such as cell lysate.

You will work with these cells, mostly, in our tissue culture room. Tissue culture was developed ~100 years ago as a means to study mammalian biology, and since that time we have learned a tremendous amount by observing the behavior of mammalian cells maintained in the laboratory. The term tissue culture was originally coined because researchers were doing exactly that, extracting tissue and letting it live in a dish for a short time. Today, most tissue culture experiments are done using cells rather than tissues. Much of what we know about cancer, heritable diseases, and the effects of the environment on human health has been derived from studies of cultured cells.
What types of cells do people study, and from where do they come? Cells acquired directly from animal tissue are called primary cells. They are difficult to culture, largely because primary cells in this context divide only a limited number of times. This limitation on the lifespan of cultured primary cells, called the Hayflick limit, is a problem because it requires a researcher to repeatedly remove tissues from animals to complete a study. Cell isolation processes can be quite labor-intensive, and also can complicate data analysis due to inherent animal-to-animal variation. To get around this problem, researchers study cells that are immortal, which means the cells are able to divide indefinitely. Though using immortal cells is preferable for many reasons, some inherent cell-to-cell variation still exists in such populations and the genetic changes that cause immortality may affect experimental outcomes.
The art of tissue culture lies in the ability to create conditions that are similar to what a cell would experience in an animal, namely 37°C and neutral pH. Blood nourishes the cells in an animal, and blood components are therfore used to feed cells in culture. Serum, the cell-free (and clotting-factor free) component of blood, contains many of the factors necessary to support the growth of cells outside the animal. Consequently, serum is frequently added to tissue culture medium, although serum-free media (also called chemically defined media) exist and support some types of cultured cells.
Cultured mammalian cells must grow in a germ-free environment and researchers using tissue culture must be skilled in sterile or asceptic technique. Bacteria double very quickly relative to mammalian cells. An average mammalian cell doubles about once per day whereas many common bacteria can double every 20 minutes under optimal conditions. Consequently, if you were to co-culture 100 mammalian cells and 1 bacteria together in a flask, within 24 hours you would have ~200 unhappy mammalian cells, and about 100 million happy bacteria! Needless to say, you would not find it very useful to continue to study the behavior of your mammalian cells under these conditions.
Today you will learn and practice asceptic technique to collect and count cells that were previously cultured by the teaching faculty. You will use the cells you collect to seed (or culture) cells for a survival assay that will assess the affect of drug treatment following DNA damage. To ensure you are well-prepared for your work in the tissue culture room, your instructor will provide a demonstration before you begin. Because the tissue culture room is not large enough to accommodate the entire class at once, we will be split into two groups today...and all subsequent days that involve tissue culture. Half of the class will begin in tissue culture with Part 1 and the other half of the class will begin by preparing previously seeded DLD-1 and BRCA2- cells for Western blot analysis. Your instructor will designate the groups.
Protocols
Part 1: Practice tissue culture techniques
As you prepare to work in the tissue culture room, review the following resource:
Part 1a: Demonstration of best practices
The teaching faculty will show you several key techniques that will be important to your success in tissue culture. Please carefully observe the following procedures, take notes, and ask questions!
- Prepare the tissue culture hood.
- Observe your cells.
- Trypsinization of cultured cells.
- Calculate cell culture density.
- Seed cells.
- Clean tissue culture hood.
Part 1b: Seed cells for survival assay
You will use the techniques you learned during the demonstration to seed a 12-well dish with cells. These cells will be used to assess the effect of drugs that target the NHEJ pathway following DNA damage. More specifically, you will examine this effect in the BRCA2- mutant cells compared to the DLD-1 wild-type cells.

Each team will receive two T25 culture flasks: one with DLD-1 (wild-type) cells, and one with BRCA2- mutant cells. You will enzymatically detach these adherent cells, count them, and sedd them at specific densities in a 12-well culture dish.
It is essential that you do not mix up or cross-contaminate the DLD-1 and BRCA2- cell lines! We suggest that one partner is responsible for each flask, and that partners do not share Pasteur pipets or other equipment.
Preparing tissue culture hood
- The tissue culture hood is partly set up for you. Finish preparing your hood according to the demonstration, first bringing in any remaining supplies you will need, then obtaining the pre-warmed reagents from the water bath, and finally retrieving your cells from the 37 °C incubator.
- Don't forget to spray everything down with 70% ethanol!
- One of the greatest sources for tissue culture contamination is moving materials in and out of the hood because this disturbs the air flow that maintains a sterile environment inside the hood. Think about what you will need during your experiment to avoid moving your arms in and out of the hood while you are handling your cells.
Collecting cells
- Examine your cell cultures as you remove the flasks from the incubator.
- Look first at the color and clarity of the media. Fresh media is reddish-orange in color and if the media in your flask is yellow or cloudy, it could mean that the cells are overgrown, contaminated, or starved for CO2.
- Next, look at the cells using the inverted microscope. Note their shape, arrangement, and how densely the cells cover the surface of the flask.
- After you look at your cells, take the flask to your tissue culture hood to begin the seeding procedure.
- Aspirate the media from the cells using a sterile Pasteur pipet.
- Wash the cells by adding 3 mL PBS using a 5 mL pipet. Slightly tip the flask back and forth to rinse the cells then aspirate the PBS with a fresh Pasteur pipet.
- To dislodge the cells from the flask, you will add trypsin, a proteolytic enzyme.
- With a 2 mL pipet, add 1 mL of trypsin to the flask.
- 2 mL pipets are tricky! They fill up quickly. Be careful not to pull up the liquid too quickly or it will go all the way up your pipet into the pipet-aid! If this happens, please alert the teaching faculty rather than returning the pipet-aid to the rack.
- Tip the flask in each direction to distribute the trypsin evenly then incubate the cells at 37°C for 10 minutes using a timer.
- While you are waiting, label your 12-well plate. Include your group color and today’s date. Then note which cell line is in each well.
- Finally, this is a great time to clear out your trash!
- Retrieve your flasks from the incubator and firmly tap the bottom 5 times to dislodge the cells.
- Check your cells using the microscope to ensure they are dislodged. They should appear round and move freely.
- If your cells are not detached from the flask, incubate at 37°C for an additional minute.
- When your cells are dislodged, move your flask back into the tissue culture hood and add 3 mL of media to the cells then pipet the liquid up and down (“triturate”) to break up cells that are clumped together and suspend them in the liquid.
- Note: do not take up or release all the liquid, in order to avoid bubbles.
- Transfer the suspended cells into a labeled 15 mL conical tube
- Transfer 90 μL of your cell suspension from the 15 mL conical tube into a labeled eppendorf tube.
- Be sure to cap your conical tube and eppendorf tube after you transfer your cells.
Counting and seeding cells
- Remove the eppendorf with your cells from the TC hood.
- Add 10 μL of Trypan blue to the eppendorf tube and pipet up and down to mix.
- With a new pipet tip, transfer 10 μL of the cell/dye suspension to a hemocytometer, as shown to you by the teaching faculty. Keep M059K on 'top' and M059J on the 'bottom', so you don't forget which is which.
 Counting cells using a hemocytometer.
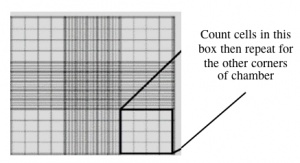
- Count the cells within two diagonal corners, as shown to you by the teaching faculty. If the values are within 10% of each other, continue. If they are more different than that, count the other two corners. Be sure to record all of your raw data.
- To obtain your actual cell count, take the average of either the two or the four values.
- The hemocytometer has an etched grid of nine large squares. The concentration of cells in a sample can be determined by counting the cells that fall within one such square and then multiplying by 10,000 to determine the number of cells/mL in the solution measured. (Always remember to account for the dilution to cell stock at the end!)
- Note that different squares are sub-divided into different grids. Very dense cells could be counted in the fine grids. In your case, the 4 x 4 grids and a 10x magnification will be most convenient for counting.
- Calculate the volume of cells you need to seed 100,000 cells in your 60 mm dish.
- For example, if your concentration is 1 million (1 M) cells/mL, you would take 0.1 mL of cells and 2.9 mL of media.
- Make this new cell suspension in the 60 mm plate -- first add your cells and then add fresh media to a total volume of 3 mL.
- You should mix your original cell suspension by pipetting before distributing the small volume of cells to the new dish as the cells likely settled to the bottom of the conical while you were counting.
- Finally, tilt your 60 mm dish back and forth to distribute the cells evenly.
Cleaning the tissue culture hood
The next group who uses your hood should find the surfaces wiped down and free of equipment. Please leave the equipment that was already there.
- Aspirate any remaining cell suspensions.
- Dispose of all vessels that held cells in the biohazard waste box and be sure that all sharps are in the mayo jar.
- Remove any equipment that you transferred into the hood and return it to the appropriate location.
- Spray the TC hood surface with 70% ethanol and wipe with paper towels.
- Be sure the paper towels are disposed of in the biohazard waste box!
- Empty the benchtop biohazard bucket into the biohazard waste box.

- Use a hemacytometer to calculate the density of your cell suspension.
- Transfer 90 μL of the cell suspension to a 1.5 mL eppendorf tube. Cap the tube.
- Carry the tube to the center microscope bench and add 10 μL of trypan blue cell stain. Mix by pipetting up and down.
- Carefully pipet 10 μL of the stained cells between the hemocytometer and (weighted) glass cover slip.
- Count the cells that fall within the four corner squares (with a 4x4 etched grid pattern), average (i.e. divide by 4), and then multiply by 10,000 to determine the number of cells/mL.
Part 2: Begin Western blot

Part 2a: Prepare cell lysates
In this exercise you will prepare your samples for Western blot analysis. It is very important that you keep the cell lysate cold throughout the procedure.
- You have an ice bucket at your bench with the following pre-chilled items inside: two empty eppendorfs, RIPA buffer, protease inhibitors, and PBS.
- Label the eppendorf tubes as DLD-1 and BRCA2- (plus your section information).
- Retrieve two 60 mm dishes from the small 37 °C incubator: one that contains DLD-1 cells and one that contains BRCA2- cells.
- Place the dishes at a 30-45° angle in your ice bucket.
- You may find it helpful to push the ice such that you build a ramp in the bucket that you can use to hold the plate steady.
- Add 2.5 μL of protease inhibitors to your 250 μL of aliquotted RIPA buffer and return this mixture to the ice.
- Aspirate the media from each well by holding the tip of the pasteur pipet (be sure to cap the pasteur pipet with a clean yellow tip!) at the bottom of the well.
- Add 2 mL of ice-cold PBS to each dish.
- Obtain two scrapers from the instructors' bench.
- Aspirate the ice-cold PBS – be sure to remove ALL of the PBS after this wash.
- Add 100 μL of RIPA lysis buffer to the top of each dish and allow it to run down the dish to the bottom.
- Dislodge the cells from the dish by scraping each well with a fresh cell scraper.
- First tilt the plate back and forth to coat the cells with lysis buffer.
- Then go from top to bottom 'windshield wiper style' to pool the cells at the bottom of each well in the tilted plate.
- Transfer the cells from each dish to the appropriate eppendorf tube.
- At this step it is important to make sure there are no aggregates or clumps of cell lysate remaining in the dish. Do this by tilting the plate so that light reflects off the bottom. If you see any 'chunks', pipette your lysate back into the dish to dissolve the chunk, then re-transfer everything into the eppendorf tube.
- Incubate the eppendorf tubes with your cell lysates on ice for 10 min.
- Meanwhile, label two fresh eppendorf tubes and add them to your ice bucket to chill for a later step.
- Spin the cell lysate at maximum speed in the cold room centrifuge for 10 min to pellet insoluble material.
- The teaching faculty will show take you to the centrifuge when you are ready.
- This step is typically referred to as "clearing" the lysate. The pellet at the bottom contains the DNA from the cell, and genomic DNA can get very soupy making it difficult to load your lysate on the SDS-PAGE gel.
- Transfer the supernatant to the fresh eppendorf tubes – be careful not to disturb the pellet at the bottom!
- Keep your samples on ice when not in use.
Part 2b: Measure protein concentration
You will now measure the total protein concentration in each cell lysate to determine the volume that you will use for the polyacrylamide gel separation.
- Immediately before it is your turn to use the spectrophotometer, add 10 μL of each cell lysate to a plastic cuvette.
- Prepare a 'blank' by adding 10μL of your leftover RIPA buffer to a cuvette.
- Be careful not to allow 10 μL of lysate to sit in the cuvettes for more than a couple minutes before starting the next step -- the liquid will evaporate!
- Carefully take your cuvettes to the spectrophotometer and add 990 μL of Precision Red reagent.
- Mix by pipetting up and down a 2-3x without introducing bubbles.
- Wait 1 minute, then measure each sample at 600 nm.
- Use the RIPA sample to blank the spectrophotometer.
- Calculate the two stock protein concentrations of your M059K and M059J cell lysate using the following information:
- 1 absorbance unit = 100 ug protein/mL reagent / cm
- The path length of the cuvette is precisely 1 cm.
- Remember to account for the dilution factor!
- Next, calculate the volumes of lysate and water required to add 20 - 40 μg of total protein to the polyacrylamide gel in a total volume of 20 μL, per lysate sample.
- If your concentration is greater than 1μg/μL, use water to make up the remaining volume.
- If your concentration is less than 1μg/μL for at least one sample, scale both samples down to a lower protein amount, such as 10 μg.
- Do not throw away the remainder of your cell lysate! We will store these samples at -80 °C in case your Western blot needs to be repeated.
Part 2c: Separate proteins using polyacrylamide gel electrophoresis (PAGE)
You will now prepare your cell lysate samples for separation using PAGE. Two teams will share one gel.
- Add 4 μL of 6X Laemmli sample buffer to both of your cell lysates.
- Briefly vortex each tube, then centrifuge to collect the samples at the bottom of the tubes.
- Put lid locks on the eppendorf tubes and boil for 5 minutes in the water bath that is in the fume hood.
- Load your samples according to the scheme below.
- In your notebook, document the start and stop time of electrophoresis.
- The teaching faculty will begin electrophoresis after both groups load their samples.
- The proteins will be separated using 200 V for 35 minutes.
| Lane | Sample | Volume to load |
|---|---|---|
| 1 | EMPTY | N/A |
| 2 | Team 1, DLD-1 | 20 μL |
| 3 | Team 1, BRCA2- | 20 μL |
| 4 | HiMark ladder | 10 μL |
| 5 | EMPTY | N/A |
| 6 | HiMark ladder | 10 μL |
| 7 | Team 2, DLD-1 | 20 μL |
| 8 | Team 2, BRCA2- | 20 μL |
| 9 | HiMark ladder | 10 μL |
| 10 | EMPTY | N/A |
Part 2d: Transfer proteins onto nitrocellulose membrane
After the electrophoresis procedure, the teaching faculty will assist you in assembling the transfer cassette according the below protocol. If we run short on time, the teaching faculty will complete this part for you.
- Wearing gloves, carefully disassemble the electrophoresis chamber.
- Assemble the transfer cassette in the following order:
- Place the black side of the transfer cassette in a tupperware container with transfer buffer. The transfer cassette is color-coded so the black side should face the cathode (black electrode) and the clear side should face the anode (red electrode).
- Place a ScotchBrite pad pre-soaked in transfer buffer on the black side of the cassette.
- Place 1 piece of filter paper on top of the ScotchBrite pad.
- Place your gel on top of the filter paper.
- Lightly press out any air bubbles that form between the filter paper and your gel.
- Place a piece of nitrocellulose membrane on top of the gel.
- The nitrocellulose membrane is white and should be kept between the blue protective paper sheets until use. Wear gloves when handling the membrane to avoid transferring proteins from your fingers to the membrane.
- Again, lightly press out any air bubbles that form between the gel and the nitrocellulose membrane.
- Place another piece of filter paper on top of the nitrocellulose.
- Place a second ScotchBrite pad pre-soaked in transfer buffer on top of the filter paper.
- Close the cassette, then push the clasp down and slide it along the top to hold it together.
- Place the transfer cassette into the blotting tank so that the clear side faces the red electrode and the black side faces the black electrode.
- Two blots can be run in each tank. When both are in place, insert a magnetic stir bar and an ice compartment into the tank and fill the tank with transfer buffer.
- Connect the power supply and transfer at 100 V for 60 min.
- After the transfer is complete, turn off the current, disconnect the blotting tank from the power supply, and remove the transfer cassettes.
- Disassemble the transfer cassette to retrieve the nitrocellulose membrane and confirm that the pre-stained standard markers transferred from the gel to the membrane.
- Cut the membrane such that each team has a membrane with only their samples, and then transfer each membrane to a separate plastic tupperware.
- Add enough Odyssey blocking buffer to the plastic dish to just cover the membrane.
- Your membranes will be stored at 4°C.
Reagents
Next day: Complete Western blot and induce DNA damage for survival and quantitative PCR assays
Previous day: Last day of M1