|
|
| (31 intermediate revisions by 3 users not shown) |
| Line 5: |
Line 5: |
| | __NOTOC__ | | __NOTOC__ |
| | | | |
| − | [[File:Mens et Manus.jpg|center|350 px]]
| |
| − | <center>
| |
| − | <blockquote>
| |
| − | <div>
| |
| − | ''[https://www.youtube.com/watch?v=O7oD_oX-Gio You got your ''mens'' in my ''manus.]''
| |
| − | <blockquote>
| |
| − | ''—[http://latin-dictionary.net/search/latin/manus Manus]''
| |
| − | </blockquote>
| |
| − | </div>
| |
| − | </blockquote>
| |
| | | | |
| − | <blockquote>
| |
| − | <div>
| |
| − | ''[https://www.youtube.com/watch?v=GuENAWds5B0 You got your ''manus'' in my ''mens.]''
| |
| − | <blockquote>
| |
| − | ''—[http://latin-dictionary.net/search/latin/mens Mens]''
| |
| − | </blockquote>
| |
| − | </div>
| |
| − | </blockquote>
| |
| − | </center>
| |
| | | | |
| | ==Introduction== | | ==Introduction== |
| | [[Image:20.309 130905 InstructorMicroscope1.png|300 px|thumb|right|20.309 microscope|Example 20.309 microscope.]] | | [[Image:20.309 130905 InstructorMicroscope1.png|300 px|thumb|right|20.309 microscope|Example 20.309 microscope.]] |
| − | Over the next few weeks, you will build an optical microscope using lenses, mirrors, filters, optical mounts, CCD cameras, lasers, and other components in the lab. The work is divided into 5 assignments. Each assignment requires some lab work, some analysis, lots of clear thinking, and an individually written report turned in on Stellar. | + | Over the next few weeks, you will build an optical microscope using lenses, mirrors, filters, optical mounts, a CMOS camera, LEDs, and other components in the lab. The work is divided into 5 assignments. Each assignment requires some problem solving, some lab work, some analysis, lots of clear thinking, and an individually written answer sheet turned in on Stellar. All of the items you are expected to turn in are indicated by a pencil symbol in the lab manual. |
| | | | |
| − | ===Assignment 1===
| + | {{Template:Assignment Turn In|message =This symbol means that you have to turn something in.}} |
| − | In this first assignment, you will build a compound microscope, determine its magnification, and attempt to measure the size of microscopic objects. The instrument you create will have a great deal in common with the microscope Robert Hooke built in the mid-1660s. Hooke meticulously documented his microscopic observations and published them in a popular volume called [http://www.gutenberg.org/ebooks/15491 ''Micrographia''] in 1665. The measurements you make in part 1 will call to mind Hooke's early quantification of the size of plant cells (see quote at top of page). You will grapple with many of the same challenges Hooke faced: resolution, contrast, field of view, optical aberrations, and obscurity of thick samples. (To overcome the thick sample problem, Hooke used a very sharp knife to cut an "exceeding thin" slice of cork — a technique [http://www.wired.com/wiredscience/2014/01/hm-brain-closeup/ still in everyday use].)
| + | |
| | | | |
| − | [[Image:Hooke-Microscope.png|thumb|left|Robert Hooke's drawing of his microscope apparatus.]]
| + | ==Background reading and resources== |
| − | [[Image:Hooke-Flea.jpg|thumb|right|Robert Hooke's drawing of a flea.]] | + | You will work with log-log plots in this assignment and future ones. These seem to confuse everybody. [[Understanding log plots|Read this page]] to remind yourself how log-log plots work. |
| − | Hooke spent countless hours hand drawing the breathtaking illustrations for ''Micrographia''. A CCD camera in the image plane of your microscope will provide a huge advantage. You will be able to record micrographs nearly as spectacular as Hooke's in a fraction of a second and with far less skill. (As a young man, Hooke apprenticed as a painter. The guy could draw.)
| + | |
| | | | |
| − | Specimens in Assignment 1 will be illuminated by an LED that shines light through the sample plane. The illumination will show up as a bright background in your images. The unsurprising name of this method is: transilluminated, bright field microscopy. Transillumination works well for samples that absorb or scatter a lot of light. Most biological samples have low contrast when imaged this way. Despite the limitations of bright field microscopy, many important discoveries were made with this simple method. Hooke was an early discoverer of plant cells, but he was mostly interested in how the cell structure of his cork sample explained the material's unique mechanical properties. He soon trained his microscope on other things (like glass canes, a bloodsucking louse, and feathers).
| + | Several microscope manufacturers maintain educational websites, including Nikon's [http://www.microscopyu.com MicroscopyU], Olympus' [http://www.olympusmicro.com/primer/index.html Microscopy Primer], and the Zeiss [http://zeiss-campus.magnet.fsu.edu/index.html online microscopy campus]. The content on these sites ranges from basic concepts like [http://www.microscopyu.com/articles/formulas/formulasri.html Snell's law] and [http://www.microscopyu.com/articles/formulas/formulasresolution.html Resolution] to advanced techniques like [https://www.microscopyu.com/tutorials/stochastic-optical-reconstruction-microscopy-storm-imaging super resolution imaging]. |
| − | | + | |
| − | Likely inspired by ''Micrographia'', a Dutch draper named Anton van Leeuwenhoek honed his lens-making skills and developed his own microscope. Van Leeuwenhoek was intensely interested in the tiny creatures he dubbed "animalcules" that he observed in water, blood, semen, and other specimens. Looking at samples of plaque from his own mouth, van Leeuwenhoek recorded: "I then most always saw, with great wonder, that in the said matter there were many very little living animalcules, very prettily a-moving. The biggest sort. . . had a very strong and swift motion, and shot through the water (or spittle) like a pike does through the water. Looking at the second sort. . . oft-times spun round like a top. . . and these were far more in number." (Sadly, the colorful term "animalcule" did not have as much staying power as "cell.") Van Leeuwenhoek discovered bacteria, protozoa, spermatozoa, rotifers, ''Hydra'', ''Volvox'', and parthenogenesis in aphids. He was truly the first microbiologist.
| + | |
| − | | + | |
| − | [[Image:Barbara McClintock with Microscope.jpg|thumb|Barbara McClintock with her microscope]]
| + | |
| − | Perhaps the most remarkable discovery ever made with nothing but a simple light microscope was genetic transposition. Barbara McClintock was a talented microscopist who developed a technique that enabled her to distinguish individual chromosomes in ''Zea mays'' (corn) plant cells. One important element of her method was that she prepared her samples by squashing them instead of cutting thin slices as Hooke did 300 years earlier. Squashing tended to preserve the chromosomal structure better than slicing. She observed genetic transposition through an optical microscope in 1944, nearly 10 years before the chemical structure of DNA was deciphered. Several decades elapsed before molecular techniques sufficiently sophisticated to confirm her discovery were developed.<ref>See, for example: McClintock, B. ''The origin and behavior of mutable loci in maize.'' PNAS. 1950; 36:344-355. [http://library.cshl.edu/archives/archives/bmcbio.htm], [http://library.cshl.edu/archives/archives/bmcres.htm], and Endersby, Jim. ''A Guinea Pig's History of Biology.'' Cambridge, Massachusetts: Harvard University Press; 2007.</ref> McClintock was awarded the Nobel Prize in Physiology or Medicine in 1983 for her discovery.
| + | |
| − | | + | |
| − | An example microscope made by the instructors will be available in the lab for you to examine. Make sure to construct your microscope well. Mechanical stability will be crucial for the particle tracking experiments in the last part of the lab. The required stability specification will be achieved through good design and careful construction — not by indiscriminate over-tightening of screws.
| + | |
| | | | |
| | ==Assignment details == | | ==Assignment details == |
| | This assignment has 4 parts: | | This assignment has 4 parts: |
| | | | |
| − | # Part 1: [[Assignment 1, Part 1: Pre-lab questions|Learn about optics and answer a few questions to answer before you start your lab work]]; | + | # Part 1: [[Assignment 1, Part 1: Pre-lab questions|Learn about optics and answer a few questions before you start your lab work]]; |
| | # Part 2: [[Assignment 1, Part 2: Optics bootcamp|Some warm-up lab exercises]]; | | # Part 2: [[Assignment 1, Part 2: Optics bootcamp|Some warm-up lab exercises]]; |
| | # Part 3: You will [[Assignment 1, Part 3: Building your transillumination microscope|build a microscope]]; and finally you will | | # Part 3: You will [[Assignment 1, Part 3: Building your transillumination microscope|build a microscope]]; and finally you will |
| − | # Part 4: [[Assignment 1, Part 4: Measuring magnification and bead size|measure its magnification and the size of some small beads]]. | + | # Part 4: [[Assignment 1, Part 4: Measuring magnification and bead size|Measure its magnification and the size of some small beads]]. |
| | | | |
| | You will add fluorescence capability in the next part of the lab. | | You will add fluorescence capability in the next part of the lab. |
| | | | |
| − | Turn in all of your work on Stellar in a single PDF file named <lastname><firstname>Assignment1.pdf.
| + | Submit your work in on Stellar in a single PDF file with the naming convention <Lastname><Firstname>Assignment1.pdf. Here is a checklist of all things you have to turn in: |
| | + | {{Template:Assignment Turn In|message= |
| | + | |
| | + | Make sure to include answers to all the following questions: |
| | + | |
| | + | Part 1: |
| | + | # Answers to the pre-lab questions [[Assignment 1, Part 1: Pre-lab questions|listed at the bottom of the Part 1 page]]. |
| | + | Part 2: |
| | + | # Turn in your measured focal lengths for each lens A through D. |
| | + | # Make a block diagram of the apparatus (a sketch is fine). You do not need to detail the mechanical construction, but be sure to include any optical elements (light sources, lenses, cameras), as well as the object being measured. Label each component as well as the distances you will be varying (<math>S_i</math> and <math>S_o</math>). Do not label distances that are irrelevant. |
| | + | # List up to three predominant sources of error that affected your measurements of <math> S_o</math> and <math> S_i </math> (i.e. What factors prevented you from making a more accurate or more precise measurement? The answer "human error" does not describe anything specific nor useful, and will not earn you any points.) Estimate the magnitude of each error that you listed. |
| | + | # List one or two predominant sources of error that affected your measurements of <math> h_i </math>. Estimate the magnitude of each error that you listed. |
| | + | # Turn in your table of measured values for <math> S_o, S_i, h_o, h_i, </math> and <math> M </math>. |
| | + | # Turn in your plot of <math>{1 \over S_i}</math> as a function of <math> {1 \over f} - {1 \over S_o}</math>. |
| | + | # Turn in your plot of <math>{h_i \over h_o}</math> as a function of <math>{S_i \over S_o}</math>. |
| | + | # What did you expect each plot to look like based on the theory you learned in class? Did your plots meet your expectations? Why or why not? |
| | + | # Plot pixel variance ''vs.'' mean. |
| | + | # Describe how noise varies as a function of light intensity. (Notice that the axes of this plot are in log scale. [[Understanding log plots|Click here]] if you'd like a refresher how to interpret log-log plots.) Did the plot look the way you expected? |
| | | | |
| − | ==Background reading==
| + | Parts 3 and 4: |
| | | | |
| − | In this part of the lab you will jump right in to building a full-fledged microscope. The following online materials provide useful background.
| + | # Display an example image of the ruler at each magnification, and |
| | + | # Make a table of displaying the nominal magnification (i.e. the printed number on the objective), the expected magnification (based on the 125 mm tube lens), the object height, the image height, the actual (i.e. measured) magnification and the FOV (see example). Don't forget to include appropriate units. Report the length and width of the FOV (in distance units), not its area (in distance units squared) |
| | + | # Display an example image of each bead size. |
| | + | # Report the average size and uncertainty of the spheres in each sample, (be sure to include the number of samples measured). |
| | + | # Discuss how the measured bead sizes compared to the nominal size. |
| | + | # In one or two sentences, explain how you chose the number of samples to measure. |
| | + | }} |
| | | | |
| − | * [https://stellar.mit.edu/S/course/20/fa13/20.309/materials.html Lectures 1 through 9 of the 20.309 class]
| + | {{Template:Assignment 1 navigation}} |
| − | * From [http://www.microscopyu.com Nikon MicroscopyU]
| + | |
| − | ** [http://www.microscopyu.com/articles/formulas/formulasconjugate.html Conjugate planes in optical microscopy] (includes transmitted and reflected (epi) illumination)
| + | |
| − | ** [http://www.microscopyu.com/articles/formulas/formulasri.html Snell's law]
| + | |
| − | ** [http://www.microscopyu.com/articles/formulas/formulasresolution.html Resolution]
| + | |
| − | * [[Understanding log plots]]
| + | |
| | | | |
| | ==References== | | ==References== |
Introduction
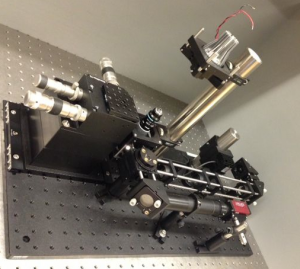
Example 20.309 microscope.
Over the next few weeks, you will build an optical microscope using lenses, mirrors, filters, optical mounts, a CMOS camera, LEDs, and other components in the lab. The work is divided into 5 assignments. Each assignment requires some problem solving, some lab work, some analysis, lots of clear thinking, and an individually written answer sheet turned in on Stellar. All of the items you are expected to turn in are indicated by a pencil symbol in the lab manual.

|
This symbol means that you have to turn something in.
|
Background reading and resources
You will work with log-log plots in this assignment and future ones. These seem to confuse everybody. Read this page to remind yourself how log-log plots work.
Several microscope manufacturers maintain educational websites, including Nikon's MicroscopyU, Olympus' Microscopy Primer, and the Zeiss online microscopy campus. The content on these sites ranges from basic concepts like Snell's law and Resolution to advanced techniques like super resolution imaging.
Assignment details
This assignment has 4 parts:
- Part 1: Learn about optics and answer a few questions before you start your lab work;
- Part 2: Some warm-up lab exercises;
- Part 3: You will build a microscope; and finally you will
- Part 4: Measure its magnification and the size of some small beads.
You will add fluorescence capability in the next part of the lab.
Submit your work in on Stellar in a single PDF file with the naming convention <Lastname><Firstname>Assignment1.pdf. Here is a checklist of all things you have to turn in:
|
|
Make sure to include answers to all the following questions:
Part 1:
- Answers to the pre-lab questions listed at the bottom of the Part 1 page.
Part 2:
- Turn in your measured focal lengths for each lens A through D.
- Make a block diagram of the apparatus (a sketch is fine). You do not need to detail the mechanical construction, but be sure to include any optical elements (light sources, lenses, cameras), as well as the object being measured. Label each component as well as the distances you will be varying ($ S_i $ and $ S_o $). Do not label distances that are irrelevant.
- List up to three predominant sources of error that affected your measurements of $ S_o $ and $ S_i $ (i.e. What factors prevented you from making a more accurate or more precise measurement? The answer "human error" does not describe anything specific nor useful, and will not earn you any points.) Estimate the magnitude of each error that you listed.
- List one or two predominant sources of error that affected your measurements of $ h_i $. Estimate the magnitude of each error that you listed.
- Turn in your table of measured values for $ S_o, S_i, h_o, h_i, $ and $ M $.
- Turn in your plot of $ {1 \over S_i} $ as a function of $ {1 \over f} - {1 \over S_o} $.
- Turn in your plot of $ {h_i \over h_o} $ as a function of $ {S_i \over S_o} $.
- What did you expect each plot to look like based on the theory you learned in class? Did your plots meet your expectations? Why or why not?
- Plot pixel variance vs. mean.
- Describe how noise varies as a function of light intensity. (Notice that the axes of this plot are in log scale. Click here if you'd like a refresher how to interpret log-log plots.) Did the plot look the way you expected?
Parts 3 and 4:
- Display an example image of the ruler at each magnification, and
- Make a table of displaying the nominal magnification (i.e. the printed number on the objective), the expected magnification (based on the 125 mm tube lens), the object height, the image height, the actual (i.e. measured) magnification and the FOV (see example). Don't forget to include appropriate units. Report the length and width of the FOV (in distance units), not its area (in distance units squared)
- Display an example image of each bead size.
- Report the average size and uncertainty of the spheres in each sample, (be sure to include the number of samples measured).
- Discuss how the measured bead sizes compared to the nominal size.
- In one or two sentences, explain how you chose the number of samples to measure.
|
Navigation
Back to 20.309 Main Page
References

