Difference between revisions of "20.109(F20):M1D5"
Noreen Lyell (Talk | contribs) (→Part 2: Prepare CometChip) |
Becky Meyer (Talk | contribs) (→Part 3: Prepare CometChip) |
||
| (36 intermediate revisions by one user not shown) | |||
| Line 8: | Line 8: | ||
For the next experiment in this module you will use the CometChip assay developed in the Engelward Laboratory. The CometChip assay is used to assess various types of DNA lesions, including base excisions, abasic sites, strand breaks, and crosslinks. | For the next experiment in this module you will use the CometChip assay developed in the Engelward Laboratory. The CometChip assay is used to assess various types of DNA lesions, including base excisions, abasic sites, strand breaks, and crosslinks. | ||
| − | [[Image:Fa16 M1D1 introduction.png|thumb|right|350px|'''CometChip assay | + | [[Image:Fa16 M1D1 introduction.png|thumb|right|350px|'''Microscopy images showing results from CometChip assay.''' A. In the CometChip assay DNA damage is measured by determining the amount of DNA in the head versus the tail of the comet. B. Cells not treated with DNA damaging agent (left) have visibly less DNA damage that cells treated with DNA damaging agent (right) as evidenced by the amount of DNA in the tail.]]To measure DNA damage, the CometChip assay relies on gel electrophoresis. Electrophoresis is a technique used to separate molecules by size using an applied electrical field and a sieving matrix. DNA, RNA and proteins are often studied with this technique; agarose and acrylamide gels are the two most common sieves. The molecules to be separated enter the matrix through a well at one end and are pulled through the matrix when a current is applied. Because DNA and RNA are negatively charged molecules due to their phosphate backbone, they naturally travel toward the positive charge at the far end of the gel. Larger molecules are entwined in the matrix and are stalled; smaller molecules wind through the matrix more easily and travel further from the well. Over time fragments of similar length accumulate into 'bands' in the gel. The CometChip assay is based upon the principle that damaged DNA travels more readily compared to undamaged DNA. |
In the CometChip assay, cells are loaded into microwells that are 'stamped' onto an agarose gel sieving matrix. Specific treatments can then be applied to the cells within these microwells that induce DNA damage. The cells are then lysed to release the DNA into the microwell. Following cell lysis, the CometChip is incubated in an alkaline buffer that unwinds the DNA. This step allows for all types of DNA damage to be detected. Lastly, gel electrophoresis is used to separate the DNA fragments. DNA fragments migrate away from the microwell and generate a comet tail as shown in the image to the right (panel A). The distance that the DNA migrates (''i.e.'' the length of the comet tail) is proportional to the amount of damage. For example, with cells not treated with a DNA damaging agent, there are no evident comet tails to the right of the microwell or 'head' (panel B, image on the left); however, in cells treated with a DNA damaging agent there are comet tails apparent (panel B, image on the right). Comet tail lengths can be compared across experimental treatments to determine the deleterious effects of chemicals and toxins on DNA stability. In addition, the CometChip assay can be used to study the rate and efficiency of repair in response to specific treatments. | In the CometChip assay, cells are loaded into microwells that are 'stamped' onto an agarose gel sieving matrix. Specific treatments can then be applied to the cells within these microwells that induce DNA damage. The cells are then lysed to release the DNA into the microwell. Following cell lysis, the CometChip is incubated in an alkaline buffer that unwinds the DNA. This step allows for all types of DNA damage to be detected. Lastly, gel electrophoresis is used to separate the DNA fragments. DNA fragments migrate away from the microwell and generate a comet tail as shown in the image to the right (panel A). The distance that the DNA migrates (''i.e.'' the length of the comet tail) is proportional to the amount of damage. For example, with cells not treated with a DNA damaging agent, there are no evident comet tails to the right of the microwell or 'head' (panel B, image on the left); however, in cells treated with a DNA damaging agent there are comet tails apparent (panel B, image on the right). Comet tail lengths can be compared across experimental treatments to determine the deleterious effects of chemicals and toxins on DNA stability. In addition, the CometChip assay can be used to study the rate and efficiency of repair in response to specific treatments. | ||
| Line 15: | Line 15: | ||
==Protocols== | ==Protocols== | ||
| − | ===Part 1: | + | ===Part 1: Participate in Comm Lab workshop=== |
| − | As discussed in the prelab lecture, you will use two methods to assess DNA damage: the γH2AX assay and the CometChip. | + | Our communication instructors, Dr. Prerna Bhargava and Dr. Sean Clarke, will join us today for a discussion on crafting Figures and Captions. |
| + | |||
| + | ===Part 2: Learn about the CometChip=== | ||
| + | |||
| + | As discussed in the prelab lecture, you will use two methods to assess DNA damage: the γH2AX assay and the CometChip. Before we review the CometChip experimental details, it is best to familiarize yourself with the procedure and assay. | ||
Read the Abstract and Introduction in the following publication: | Read the Abstract and Introduction in the following publication: | ||
| Line 24: | Line 28: | ||
<font color = #4a9152 >'''In your laboratory notebook,'''</font color> answer the following questions: | <font color = #4a9152 >'''In your laboratory notebook,'''</font color> answer the following questions: | ||
| − | + | *Why is it important to study DNA damage? | |
| − | + | **You can consider the information provided in lecture / prelab to answer this question. | |
| − | + | *How does the CometChip estimate the level of DNA damage within cells? | |
| − | + | *List two issues / problems with the comet assay? | |
| − | + | *List two improvements provided by the CometChip assay? | |
| − | ===Part | + | ===Part 3: Prepare CometChip=== |
| − | [[Image:Fa18 M1D2 macrowell vs microwell.png|thumb|250px|right| | + | [[Image:Fa18 M1D2 macrowell vs microwell.png|thumb|250px|right|'''Image of CometChip''' showing distinction between (A) 'macrowell' and (B) 'microwell'.]]The CometChip is simply a thin layer of agarose with microwells. It is important to differentiate between the terms 'macrowell' and 'microwell' for your experiments. A bottomless 96-well plate is placed on top of the agarose CometChip to create the macrowells for the CometChip assay (panel A). This enables researchers to control which cells are exposed to which treatment. The microwells were stamped into the agarose when you made your CometChip (panel B). Within each well are ~ 300 microwells, which are ~40 μm in diameter and 40 μm in depth. |
<font color = #0d368e>'''To ensure the steps required for preparing a CometChip are clear, the Instructor will provide a live demonstration of this process. You should provide a written description of the procedure in your laboratory notebook!'''</font color> | <font color = #0d368e>'''To ensure the steps required for preparing a CometChip are clear, the Instructor will provide a live demonstration of this process. You should provide a written description of the procedure in your laboratory notebook!'''</font color> | ||
<font color = #4a9152 >'''In your laboratory notebook,'''</font color> complete the following: | <font color = #4a9152 >'''In your laboratory notebook,'''</font color> complete the following: | ||
| − | + | *Provide a written overview / description of the the procedure used to prepare a CometChip (from the live demonstration). | |
| + | *Onto which side of the GelBond is the agarose poured to make a CometChip? | ||
| + | *How are the microwells generated in the agarose of the CometChip? | ||
| − | + | A video demonstrating the finishing procedure to make a CometChip is linked here: [https://www.dropbox.com/s/nufmtrashmu4160/%20Finishing%20the%20CometChip.mp4?dl=0 Making the CometChip] | |
| − | + | <br style="clear:both" /> | |
| + | |||
| + | ===Part 4: Perform CometChip experiment=== | ||
| − | + | As with the γH2AX experiment, the MCL-5 cells with be treated with H2O2 +/- As exposure. The treatments will be applied in two parts. First, cells will be incubated in As for 24 hrs to mimic exposure to the toxic metal. Second, the cells will be incubated in H2O2 for 20 min to induce DNA damage. Following treatment with H2O2 the cells will be visualized at the different timepoints to assess DNA repair. | |
<font color = #0d368e>'''To ensure the steps included below are clear, please watch the video tutorial (linked [http://www.jove.com/video/50607/cometchip-high-throughput-96-well-platform-for-measuring-dna-damage here]). The steps are detailed below so you can follow along!'''</font color> Please note that the video shows the general steps for completing an experiment using the CometChip assay. The specific procedure used to generate the data you will analyze are written below. Furthermore, the video shows two version of the CometChip assay: the alkaline and the neutral. In this module, the alkaline CometChip assay was used. | <font color = #0d368e>'''To ensure the steps included below are clear, please watch the video tutorial (linked [http://www.jove.com/video/50607/cometchip-high-throughput-96-well-platform-for-measuring-dna-damage here]). The steps are detailed below so you can follow along!'''</font color> Please note that the video shows the general steps for completing an experiment using the CometChip assay. The specific procedure used to generate the data you will analyze are written below. Furthermore, the video shows two version of the CometChip assay: the alkaline and the neutral. In this module, the alkaline CometChip assay was used. | ||
| − | + | '''Expose cells to As''' | |
| + | |||
| + | #For each As treatment concentration, harvest and pellet 2 M cells by centrifuging at 200 g for 5 min at room temperature. | ||
| + | #Prepare 2 μM and 10 μM As treatment concentrations in media. | ||
| + | #Resuspend each cell pellet in 6 mL of the As-containing media. | ||
| + | #Transfer cell suspensions to fresh T25 flasks and incubate at 37 °C for 24 hrs. | ||
| + | |||
| + | '''Load cells into CometChip''' | ||
#Remove your CometChip from the 1x PBS and place it, gelbond side down, on the glass plate. | #Remove your CometChip from the 1x PBS and place it, gelbond side down, on the glass plate. | ||
| Line 77: | Line 92: | ||
#Use a microscope to ensure you have cells loaded into your CometChip (see image below). | #Use a microscope to ensure you have cells loaded into your CometChip (see image below). | ||
| − | [[Image:Fa20 M1D5 CometChip loading image v2.png|center|700px|thumb|Microscopy image of loaded CometChip. (A) Bottom of macrowell showing evenly spaced microwells. (B) Close-up of empty microwell. (C) Close-up of microwell loaded with cells.]] | + | [[Image:Fa20 M1D5 CometChip loading image v2.png|center|700px|thumb|'''Microscopy image of loaded CometChip.''' (A) Bottom of macrowell showing evenly spaced microwells. (B) Close-up of empty microwell. (C) Close-up of microwell loaded with cells.]] |
| − | <font color = #4a9152 >'''In your laboratory notebook,'''</font color> complete the following | + | <font color = #4a9152 >'''In your laboratory notebook,'''</font color> complete the following: |
| − | + | *Calculate the volume of cell suspension added to each macrowell for the CometChip assay. | |
| − | + | **The cell suspension is 500K cells / mL and 25,000 cells were added into each well. | |
| − | + | *Given the number of cells that were loaded into each macrowell, estimate the number of cells per microwell. | |
| − | + | **Consider the likelihood that every cell you add to the well will fall into a microwell. | |
| − | + | **Perhaps calculate the surface area of the bottom of a well (of diameter 6.35 mm) and compare this to the size of the cells (~10 μm). | |
| − | + | **Also, remember that within each macrowell there are ~ 300 microwells, which are ~40 μm in diameter and 40 μm in depth. | |
| − | + | '''Treat cells with H<sub>2</sub>O<sub>2</sub>''' | |
| − | + | #While the LMP agar is solidifying at 4 °C, prepare the 20 μM treatment concentration of H<sub>2</sub>O<sub>2</sub> in DPBS. | |
| − | + | #*Be sure to prepare with DPBS as the diluent because the serum in media will inactivate H<sub>2</sub>O<sub>2</sub>. | |
| − | #While the LMP agar is solidifying at 4 °C, | + | #*For the H<sub>2</sub>O<sub>2</sub> treatment conditions, As should also be included at the concentrations previously used for the exposure step. |
| − | + | #Retrieve your CometChip from the 4 °C and carefully attach a fresh bottomless 96-well plate to recreate the wells that you used for cell loading. | |
| − | + | ||
| − | #* | + | |
| − | + | ||
| − | #* | + | |
| − | #Retrieve your CometChip from the 4 °C and carefully | + | |
#*Secure the bottomless 96-well plate with binder clips as before. | #*Secure the bottomless 96-well plate with binder clips as before. | ||
| − | #Add | + | #Add 50 μL of either DPBS or DPBS + 20 μM H<sub>2</sub>O<sub>2</sub> to the appropriate wells. |
| − | #Carefully transport your CometChip to the | + | #Carefully transport your CometChip to the 4 °C cooler and incubate for 20 min. |
| − | + | #Retrieve the CometChip from the cooler. | |
| − | + | #Remove the bottomless 96-well plate and quickly rinse the CometChip. | |
| − | + | #Immediately transfer the no H<sub>2</sub>O<sub>2</sub>-treatment macrowells and the 0 min macrowells to alkaline lysis buffer to stop the cellular response. | |
| − | # | + | #For the remaining macrowells, thoroughly rinse by washing DPBS over the CometChip a total of 3 times. |
| − | # | + | #Secure a bottomless 96-well plate onto the CometChip and add fresh media to the remaining macrowells (15 min, 30 min, and 60 min). |
| − | + | #*Again, As should also be included at the concentrations previously used for the exposure step. | |
| − | + | #Carefully transfer the CometChip to the 37 °C incubator. | |
| − | # | + | #At the designated timepoints, retrieve your CometChip and transfer the appropriate macrowells to alkaline lysis buffer. |
| − | # | + | #To ensure cell lysis is complete, incubate the CometChip macrowells in the 4 °C cooler for 24 hrs. |
| − | # | + | |
| − | + | ||
| − | + | ||
| − | # | + | |
| − | + | ||
| − | #Carefully | + | |
| − | # | + | |
| − | + | ||
| − | + | ||
| − | + | ||
| − | + | ||
| − | # | + | |
| − | + | ||
| − | + | ||
| − | + | ||
| − | + | '''Electrophorese CometChip macrowells''' | |
#Remove your CometChip from the alkaline lysis buffer and wash in 1X PBS. | #Remove your CometChip from the alkaline lysis buffer and wash in 1X PBS. | ||
| Line 143: | Line 138: | ||
#Add the SYBR gold DNA stain to your CometChip and carefully move it to the 4 °C cooler. | #Add the SYBR gold DNA stain to your CometChip and carefully move it to the 4 °C cooler. | ||
#*Stain CometChip overnight. | #*Stain CometChip overnight. | ||
| + | |||
| + | ===Part 5: Edit homework assignment=== | ||
| + | |||
| + | Using the pointers from the Comm Lab workshop, edit the figure (not the bullet text!) you prepared for the homework assignment due today. You can submit the updated figure by 10 pm tonight for grading. You will get a grade for submitting the original figure on-time and the updated figure will be graded for content. If you choose not to update your homework, the figure already submitted will be graded for content. | ||
==Reagents list== | ==Reagents list== | ||
*agar, normal melting point (from Invitrogen) | *agar, normal melting point (from Invitrogen) | ||
| + | *GelBond film (from Lonza) | ||
| + | *agar, low melting point (from Invitrogen) | ||
*phosphate buffered saline (PBS) (from VWR) | *phosphate buffered saline (PBS) (from VWR) | ||
| − | * | + | *Dulbecco's phosphate buffered saline (DPBS) (from Sigma) |
| − | + | ||
*alkaline lysis solution: 2.5 M NaCl, 100 mM Na<sub>2</sub>EDTA, 10 mM Tris, 1% Trition-X | *alkaline lysis solution: 2.5 M NaCl, 100 mM Na<sub>2</sub>EDTA, 10 mM Tris, 1% Trition-X | ||
*alkaline electrophoresis solution: 0.3 M NaOH, 1 mM Na<sub>2</sub>EDTA, pH 13.5 (from Sigma) | *alkaline electrophoresis solution: 0.3 M NaOH, 1 mM Na<sub>2</sub>EDTA, pH 13.5 (from Sigma) | ||
*neutralization buffer: 0.4 M Tris, pH 7.5 (from Sigma) | *neutralization buffer: 0.4 M Tris, pH 7.5 (from Sigma) | ||
| − | *SYBR gold DNA stain (from ThermoFisher | + | *SYBR gold DNA stain (from ThermoFisher) |
==Navigation links== | ==Navigation links== | ||
Next day: [[20.109(F20):M1D6 | Image and analyze high-throughput genome damage assay]]<br> | Next day: [[20.109(F20):M1D6 | Image and analyze high-throughput genome damage assay]]<br> | ||
Previous day: [[20.109(F20):M1D4 | Image repair foci experiment and quantify results]]<br> | Previous day: [[20.109(F20):M1D4 | Image repair foci experiment and quantify results]]<br> | ||
Latest revision as of 22:13, 17 September 2020

Contents
Introduction
For the next experiment in this module you will use the CometChip assay developed in the Engelward Laboratory. The CometChip assay is used to assess various types of DNA lesions, including base excisions, abasic sites, strand breaks, and crosslinks.

In the CometChip assay, cells are loaded into microwells that are 'stamped' onto an agarose gel sieving matrix. Specific treatments can then be applied to the cells within these microwells that induce DNA damage. The cells are then lysed to release the DNA into the microwell. Following cell lysis, the CometChip is incubated in an alkaline buffer that unwinds the DNA. This step allows for all types of DNA damage to be detected. Lastly, gel electrophoresis is used to separate the DNA fragments. DNA fragments migrate away from the microwell and generate a comet tail as shown in the image to the right (panel A). The distance that the DNA migrates (i.e. the length of the comet tail) is proportional to the amount of damage. For example, with cells not treated with a DNA damaging agent, there are no evident comet tails to the right of the microwell or 'head' (panel B, image on the left); however, in cells treated with a DNA damaging agent there are comet tails apparent (panel B, image on the right). Comet tail lengths can be compared across experimental treatments to determine the deleterious effects of chemicals and toxins on DNA stability. In addition, the CometChip assay can be used to study the rate and efficiency of repair in response to specific treatments.
Protocols
Part 1: Participate in Comm Lab workshop
Our communication instructors, Dr. Prerna Bhargava and Dr. Sean Clarke, will join us today for a discussion on crafting Figures and Captions.
Part 2: Learn about the CometChip
As discussed in the prelab lecture, you will use two methods to assess DNA damage: the γH2AX assay and the CometChip. Before we review the CometChip experimental details, it is best to familiarize yourself with the procedure and assay.
Read the Abstract and Introduction in the following publication:
CometChip: A high-throughput 96-well platform for measuring DNA damage in microarrayed human cells. Journal of Visualized Experiments. (2014) 92: 1-11.
In your laboratory notebook, answer the following questions:
- Why is it important to study DNA damage?
- You can consider the information provided in lecture / prelab to answer this question.
- How does the CometChip estimate the level of DNA damage within cells?
- List two issues / problems with the comet assay?
- List two improvements provided by the CometChip assay?
Part 3: Prepare CometChip

To ensure the steps required for preparing a CometChip are clear, the Instructor will provide a live demonstration of this process. You should provide a written description of the procedure in your laboratory notebook!
In your laboratory notebook, complete the following:
- Provide a written overview / description of the the procedure used to prepare a CometChip (from the live demonstration).
- Onto which side of the GelBond is the agarose poured to make a CometChip?
- How are the microwells generated in the agarose of the CometChip?
A video demonstrating the finishing procedure to make a CometChip is linked here: Making the CometChip
Part 4: Perform CometChip experiment
As with the γH2AX experiment, the MCL-5 cells with be treated with H2O2 +/- As exposure. The treatments will be applied in two parts. First, cells will be incubated in As for 24 hrs to mimic exposure to the toxic metal. Second, the cells will be incubated in H2O2 for 20 min to induce DNA damage. Following treatment with H2O2 the cells will be visualized at the different timepoints to assess DNA repair.
To ensure the steps included below are clear, please watch the video tutorial (linked here). The steps are detailed below so you can follow along! Please note that the video shows the general steps for completing an experiment using the CometChip assay. The specific procedure used to generate the data you will analyze are written below. Furthermore, the video shows two version of the CometChip assay: the alkaline and the neutral. In this module, the alkaline CometChip assay was used.
Expose cells to As
- For each As treatment concentration, harvest and pellet 2 M cells by centrifuging at 200 g for 5 min at room temperature.
- Prepare 2 μM and 10 μM As treatment concentrations in media.
- Resuspend each cell pellet in 6 mL of the As-containing media.
- Transfer cell suspensions to fresh T25 flasks and incubate at 37 °C for 24 hrs.
Load cells into CometChip
- Remove your CometChip from the 1x PBS and place it, gelbond side down, on the glass plate.
- Press the 96-well bottomless plate upside-down onto the CometChip.
- Be sure to press the top of the 96-well bottomless plate onto the CometChip.
- Do not move the 96-well bottomless plate while it is on the CometChip as you will damage the agarose and the microwells.
- Use the binder clips to secure the 96-well bottomless plate to the glass plate, thus creating a 'sandwich' with your CometChip in the center.
- Fasten the binder clips to the very edge of 96-well bottomless plate as shown in the image below.
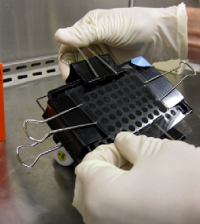 Binder clip placement for CometChip sandwich.
- Fasten the binder clips to the very edge of 96-well bottomless plate as shown in the image below.
- Add 25,000 cells into each of the macrowells.
- Cover the top of your CometChip with plastic wrap then incubate in the 37 °C incubator in the main laboratory for 15 min.
- After the incubation, complete a wash step to remove excess cells that are not within the microwells of your CometChip. Read all the bullets below before proceeding!
- Carefully remove the binder clips and the 96-well bottomless plate.
- With the CometChip on the glass plate, 'waterfall' ~5 mL of 1x PBS over the wells.
- Hold the glass plate at a 45° angle over the dish that you used to store your CometChip.
- Pipet up ~5 mL of 1x PBS.
- Press the pipet tip onto the glass plate above your CometChip.
- As you expel the 1x PBS, move the pipet tip from left-to-right.
- The 1x PBS should pass over the top of the CometChip and fall into the dish.
- Use a P200 tip attached to the pasteur pipet to aspirate the excess liquid from your CometChip wells.
- Lightly touch the tip to the bottom of each imprinted well on the CometChip and immediately lift the tip from the agarose.
- Use the molten 1% low melting point (LMP) agarose is located in the 42 °C waterbath on the front laboratory bench to 'trap' the cells in your CometChip.
- You will need to work quickly from this point as the LMP agarose will solidify as it cools.
- Using the P1000, pipet up 1000 μL of molten agarose from the bottle.
- Hold the pipet tip over the top left well of your CometChip and as you expel the agarose move the pipet tip from left to right. Ensure that each row of your CometChip gets covered.
- The goal is to lightly cover the wells that contain cells, which will 'trap' the cells into the microwells.
- If the LMP agar 'fell' off the CometChip in any areas during this process, it is important to 'fill in' those portions of the CometChip.
- Leave your CometChip undisturbed on the benchtop for 3 min then carefully move it to the 4 °C cooler for 5 min to ensure the LMP agarose solidifies.
- Use a microscope to ensure you have cells loaded into your CometChip (see image below).


In your laboratory notebook, complete the following:
- Calculate the volume of cell suspension added to each macrowell for the CometChip assay.
- The cell suspension is 500K cells / mL and 25,000 cells were added into each well.
- Given the number of cells that were loaded into each macrowell, estimate the number of cells per microwell.
- Consider the likelihood that every cell you add to the well will fall into a microwell.
- Perhaps calculate the surface area of the bottom of a well (of diameter 6.35 mm) and compare this to the size of the cells (~10 μm).
- Also, remember that within each macrowell there are ~ 300 microwells, which are ~40 μm in diameter and 40 μm in depth.
Treat cells with H2O2
- While the LMP agar is solidifying at 4 °C, prepare the 20 μM treatment concentration of H2O2 in DPBS.
- Be sure to prepare with DPBS as the diluent because the serum in media will inactivate H2O2.
- For the H2O2 treatment conditions, As should also be included at the concentrations previously used for the exposure step.
- Retrieve your CometChip from the 4 °C and carefully attach a fresh bottomless 96-well plate to recreate the wells that you used for cell loading.
- Secure the bottomless 96-well plate with binder clips as before.
- Add 50 μL of either DPBS or DPBS + 20 μM H2O2 to the appropriate wells.
- Carefully transport your CometChip to the 4 °C cooler and incubate for 20 min.
- Retrieve the CometChip from the cooler.
- Remove the bottomless 96-well plate and quickly rinse the CometChip.
- Immediately transfer the no H2O2-treatment macrowells and the 0 min macrowells to alkaline lysis buffer to stop the cellular response.
- For the remaining macrowells, thoroughly rinse by washing DPBS over the CometChip a total of 3 times.
- Secure a bottomless 96-well plate onto the CometChip and add fresh media to the remaining macrowells (15 min, 30 min, and 60 min).
- Again, As should also be included at the concentrations previously used for the exposure step.
- Carefully transfer the CometChip to the 37 °C incubator.
- At the designated timepoints, retrieve your CometChip and transfer the appropriate macrowells to alkaline lysis buffer.
- To ensure cell lysis is complete, incubate the CometChip macrowells in the 4 °C cooler for 24 hrs.
Electrophorese CometChip macrowells
- Remove your CometChip from the alkaline lysis buffer and wash in 1X PBS.
- Use a kimwipe to dry the GelBond side.
- Carefully move your CometChip to the gel electrophoresis station in the 4 °C cold room.
- Place your CometChip on the raised center region of an electrophoresis box.
- Double-sided tape was applied to the gel electrophoresis box. Be sure you lay your CometChip on the tape strips and lightly press down with a pipet tip to ensure it is secure.
- Add enough of the alkaline electrophoresis buffer to the gel electrophoresis box to cover your CometChip.
- Leave the CometChip in the alkaline electrophoresis buffer (aka unwinding buffer) for 45 minutes.
- To separate the damaged DNA into 'comets', electrophorese for 40 min (at 16 V, or 1 V/cm).
- It is important that the electrophoresis occur at 300 mA. To maintain the appropriate current, the volume of electrophoresis buffer may need to be adjusted. The teaching faculty will assist you in adding/removing electrophoresis buffer such that this value is reached.
- Carefully remove your CometChip from the electrophoresis box and place it in a dish.
- Obtain an aliquot of neutralization buffer from the front laboratory bench.
- Wash your CometChip by adding enough neutralization buffer to cover (~10-12 mL) and incubate for 5 min at room temperature.
- Repeat this step for a total of 3 washes.
- Add the SYBR gold DNA stain to your CometChip and carefully move it to the 4 °C cooler.
- Stain CometChip overnight.
Part 5: Edit homework assignment
Using the pointers from the Comm Lab workshop, edit the figure (not the bullet text!) you prepared for the homework assignment due today. You can submit the updated figure by 10 pm tonight for grading. You will get a grade for submitting the original figure on-time and the updated figure will be graded for content. If you choose not to update your homework, the figure already submitted will be graded for content.
Reagents list
- agar, normal melting point (from Invitrogen)
- GelBond film (from Lonza)
- agar, low melting point (from Invitrogen)
- phosphate buffered saline (PBS) (from VWR)
- Dulbecco's phosphate buffered saline (DPBS) (from Sigma)
- alkaline lysis solution: 2.5 M NaCl, 100 mM Na2EDTA, 10 mM Tris, 1% Trition-X
- alkaline electrophoresis solution: 0.3 M NaOH, 1 mM Na2EDTA, pH 13.5 (from Sigma)
- neutralization buffer: 0.4 M Tris, pH 7.5 (from Sigma)
- SYBR gold DNA stain (from ThermoFisher)
Next day: Image and analyze high-throughput genome damage assay