20.109(S21):M3D5
Part 3: Primer design for mutagenesis
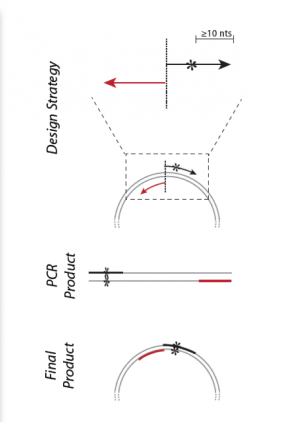
It wouldn’t be very experimentally efficient to somehow pick out and modify a single residue on inverse pericam post-translationally. Instead, researchers genetically encode desired mutations, by making mutated copies of a plasmid that contains the inverse pericam DNA sequence. In addition to non-mutagenic amplification of a specific piece of DNA, synthetic primers can be used to incorporate desired mutations into the DNA. Primer design for site-directed mutagenesis is quite straightforward: the forward primer introduces a mutation into the coding strand. Both non-mutagenic and mutagenic amplification require cycles of DNA melting, annealing, and extension.
Remember from Day 1 that primers used in PCR amplification must meet several design criteria in order to ensure specificity and efficiency. Consider the following design guidelines for mutagenesis primers and think about how these differ from the guidelines for non-mutagenic amplification:
- The desired mutation (1-2 bp) must be present in the middle of the forward primer.
- The forward and reverse primers should 'face' away from the mutation and be 'back-to-back' when annealed to the template.
- The primers should be 25-45 bp long.
- A G/C content of > 40% is desired.
- Both primers should terminate in at least one G or C base.
- The melting temperature should exceed 78°C, according to:
- Tm = 81.5 + 0.41 (%GC) – 675/N - %mismatch
- where N is primer length, and the two percentages should be integers.
To demonstrate primer design, the illustration below uses S101L, which is an uninteresting mutation but is a straightforward teaching example.
Residue 101 of calmodulin is serine, encoded by the AGC codon. This is residue 379 with respect to the entire inverse pericam construct, and we can find it and some flanking code in the DNA sequence from Part 2:
361 (5') GAG GAA ATC CGA GAA GCA TTC CGT GTT TTT GAC AAG GAT GGG AAC GGC TAC ATC AGC GCT (3')
381 (5') GCT CAG TTA CGT CAC GTC ATG ACA AAC CTC GGG GAG AAG TTA ACA GAT GAA GAA GTT GAT (3')
To change from serine to leucine, one might choose TTA, TTG, or CTN (wherer N = T, A, G, or C). Because CTC requires only two mutations (rather than three as for the other options), we choose this codon.
Now we must keep >10 bp of sequence on each side in a way that meets all our requirements. To quickly find G/C content and see secondary structures, look at the IDT website. (Note that the Tm listed at this site is not one that is relevant for mutagenesis.)
Ultimately, your forward primer might look like the following, which has a Tm of almost 81°C, and a G/C content of ~58%.
5’ GG AAC GGC TAC ATC CTC GCT GCT CAG TTA CGT CAC G 3'
The reverse primer is the inverse complement of a sequence just preceding the forward primer in the IPC gene. The forward and reverse primers are set up back-to-back.
Lucky for us, NEB has a tool that can design our mutagenic primers.
- Go to the NEBaseChanger site and click 'Please enter a new sequence to begin.'
- A new window will open. Copy and paste the wild-type IPC sequence.
- Confirm that the 'Substitution' option is selected.
- Highlight the basepairs you want to mutate using by scrolling through the sequence, or you can search the sequence by typing the basepairs into the 'Find' box.
- Type the new DNA sequence (the basepair(s) you want your forward mutagenic primer to incorporate into the IPC sequence) in the 'Desired Sequence' box.
- Under the Result header, a diagram showing where your primers will anneal is provided.
- Under the Required Primers header, the sequences for your forward primer and reverse primer are shown with the characteristics for each.
- Screen capture the information provided in the Result and Required Primers sections.
- Embed the images in your notebook.
- Print the screen capture and submit it to the teaching faculty before you leave today. In addition, record your primer sequences in the table on the Discussion page.
- It is very important that you submit your primer sequences before you leave! The teaching faculty will order your primers from IDT DNA tonight to ensure they arrive by your next class.
- Use the guidelines above to examine the mutagenesis primers designed by NEBaseChanger. Include your thoughts in your notebook.
- Do NOT alter the primers provided by NEB.

