20.109(S23):M1D4

Contents
Introduction
It if often useful to know if a specific protein is present in a sample. A common method for this is the western blot, which leverages molecular biology and immunogenetics to detect a protein of interest. As shown in the schematic below, the western blot method uses three key steps: 1. proteins are separated by size using gel electrophoresis, 2. proteins are transferred to membrane, and 3. the protein of interest is labelled using antibodies such that it can be visualized.
The first step is achieved using SDS-PAGE, a technique you are familiar with from work completed to check the quality of the purified protein. In the second step the proteins that were separated using gel electrophoresis are transferred to a nitrocellulose membrane. A transfer apparatus is used to apply a current that travels through the polyacrylamide gel causing the proteins embedded in the gel to migrate out of the gel and onto a membrane. Because polyacrylamide gels are fragile, the proteins must be transferred onto a more stable nitrocellulose membrane so the protein of interest can be labelled and visualized. The final step is to probe the nitrocellulose membrane using an antibody that is specific to the protein of interest. Then a fluoreophore-conjugated secondary antibody that is specific to the primary antibody is used to visualize the protein of interest.

Protocols
Part 1: Participate in Communication Lab workshop
Our communication instructor, Dr. Chiara Ricci-Tam, will join us today for a discussion on writing figure titles and captions.
Part 2: Electrophorese cellular proteins for Western blot experiment
To complete the Western blot experiment, the purified MAX-6xHis protein solution will be electrophoresed so that antibodies can be used to detect MAX and the 6xHis tag. Several steps need to be completed as part of this assay. First, steps similar to those completed previously in this module will be used. Recall that cellular proteins were separated using SDS-PAGE to examine the purity of the MAX-6xHis protein. Here we will again use SDS-PAGE to separate the proteins present after purification. Unlike the previous application of SDS-PAGE, we will now use antibodies to specifically confirm the presence just MAX-6xHis. To do this we will an antibody specific for TDP43. Because we are probing for the presence of MAX and the 6xHis tag using an antibodies, the proteins from the polyacrylamide gel must be transferred onto a nitrocellulose membrane that can be manipulated.
Electrophorese cellular proteins
- Aliquot 30 μL of the concentrated MAX-6xHis protein solution into a fresh microcentrifuge tube.
- Add 6 μL of Laemmli sample buffer.
- Heat for 5 min at 100 °C using the heatblock on the front laboratory bench.
- Briefly centrifuge your sample to collect the liquid.
- You will load your sample and include a molecular weight standard on either side in the gel.
- Two pre-stained ladders will be used: one will track the migration of your samples through the polyacrylamide gel and the second will provide better visualization during imaging.
- To avoid waste, multiple teams will share one gel. Your Instructor will tell you what lanes to use when loading your samples.
- Load 2 μL of the ChameleonTM Duo Pre-stained Protein Ladder in the first lane of the polyacrylamid gel assigned to your team.
- Load 35 μL of your sample into the second lane of the polyacrylamide gel assigned to your team.
- Load 10 μL of the Precision Plus Dual Color Standard Ladder in the third lane of the polyacrylamide gel assigned to you team.
- Your samples will be electrophoresed at 200 V for ~20 min.
- Following electrophoresis, use the green Bio-rad tool to carefully pry apart the plates that encase your polyacrylamide gel.
- Using wet gloves, transfer your polyacrylamide gel to a dish and add enough dH2O to cover the gel.
- Wash the gel for 5 min at room temperature on the rotating table.
- Empty the water from the dish in the sink.
- Be careful that the gel does not fall into the sink!
- Repeat Steps #9-10 a total of 3 times.
In your laboratory notebook, complete the following:
- Which proteins are electrophoresed in the polyacrylamide gel? Is only MAX-6xHis present in the sample? Are other cellular proteins present in the sample?
Transfer proteins to membrane
To ensure the steps included below are clear, please watch the video tutorial linked here: [Protein Gel Transfer]. The steps are detailed below so you can follow along!
- Carefully open the iBlot transfer stack and separate the top stack from the bottom stack (see image to right for iBlot transfer stack setup).
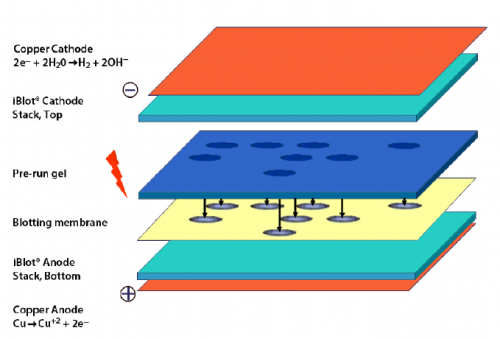

- Set it aside with the transfer gel layer facing upward.
- Keep the bottom stack in the plastic tray.
- Place the bottom stack with the plastic tray on the blotting surface of the iBlot device.
- Use the blotting roller to remove any air bubbles that are between the transfer stack and the membrane.
- Carefully place your polyacrylamide gel on the membrane.
- Two gels can fit onto one membrane, place each gel such that the ladder lane is along the bottom of the membrane and the top of the gel on the right.
- Use the blotting roller to remove any air bubbles that are between the membrane and the gel.
- Wet the filter paper in dH2O, then place on the gel.
- Use the blotting roller to remove any air bubbles that are between the gel and filter paper.
- Remove the plastic separator from the top stack.
- Place the top stack on the filter paper with the copper electrode facing upward.
- Place the absorbent pad on top of the transfer stack.
- Position the pad such that the electrical contacts (silver tabs) are aligned with the contacts on the blotting surface of the iBlot device.
- Close the iBlot device by gently pressing down on the two sides of the lid.
- Complete the transfer at 23 V for 5 min.
- Settings are saved as program P2 in the iBlot device.
- Carefully remove the transfer stack from the iBlot device and retrieve the membrane.
- Remember, the transfer step moves the proteins from the polyacrylamide gel onto the membrane!
- Place the membrane in a dish.
- Use one of your colored dot stickers to label the dish.
- Collect an aliquot of blocking buffer from the front laboratory bench and pour it over the membrane.
- Move the dish to the designated space in the 4 °C cooler.

In your laboratory notebook, complete the following:
- Why is it necessary to transfer the proteins electrophoresed in the polyacrylamide gel onto a nitrocellulose membrane?
Part 3: Discuss journal article
To further help you in preparing your Data summary, we will discuss how similar data are presented in a publication from the Koehler laboratory.
Chen et al. titled "Small molecule microarrays enable the discovery of compounds that bind the Alzheimer's Aβ peptide" (2010) J Am Chem Soc 132:17015-17022.
The initial experiment presented by Chen et. al. was an SMM that identified ligands binders of the amyloid-β (Aβ) petptide. This first step is very similar to what was done to identify the hits you are testing in this module! To further assess the results of the SMM, the authors completed several follow-up experiments to test the effect of the small molecule on functionality of the Aβ petptide.
In the context of your research, this article focuses on the next step experiments that can be performed after a drug candidate is discovered from a screen. Though you can use this article as guidance as you consider the experiments that could follow your screen, remember that the specific next step experiments should be related to the protein target and drug candidate(s) identified in your project. For this exercise, the focus in on how the data are organized and presented.
From the Introduction
Consider the key components of an introduction:
- What is the big picture?
- Is the importance of this research clear?
- Are you provided with the information you need to understand the research?
- Do the authors include a preview of the key results?
From the Results
Carefully examine the figures. First, read the captions and use the information to 'interpret' the data presented within the image. Second, read the text within the results section that describes the figure.
- Do you agree with the conclusion(s) reached by the authors?
- What controls were included and are they appropriate for the experiment performed?
- Are you convinced that the data are accurate and/or representative?
From the Discussion
Consider the following components of a discussion:
- Are the results summarized?
- Did the authors 'tie' the data together into a cohesive and well-interpreted story?
- Do the authors overreach when interpreting the data?
- Are the data linked back to the big picture from the introduction?
In your laboratory notebook, complete the following:
- Based on your reading and the group discussion of the article, answer the questions above.
Reagents list
- 4-20% polyacrylamide gels in Tris-HCl (from Bio-Rad)
- TGS buffer: 5 mM Tris, 192 mM glycine, 0.1% (w/v) SDS (pH 8.3) (from Bio-Rad)
- ChameleonTM Duo Pre-stained Protein Ladder (from LI-COR)
- Molecular weights of ladder bands (linked here).
- Precision Plus Dual Color Standard Ladder (from Bio-Rad)
- Molecular weights of ladder bands (linked here).
- 6x Reducing Laemmli Sample Buffer (from Boston BioProducts)
- iBlot 2 transfer stack (from ThermoFischer)
- Odyssey blocking buffer (from LI-COR)
Next day: Image Western blot of purified protein