Difference between revisions of "Spring 11:QRT-PCR"
Kristin Kuhn (Talk | contribs) |
Kristin Kuhn (Talk | contribs) |
||
| Line 1: | Line 1: | ||
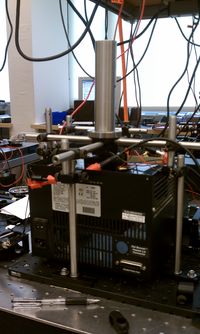
| − | [[File:Pcr-setup.jpg|center| | + | [[File:Pcr-setup.jpg|center|200px]] |
<big><center>QRT-PCR: 20.345 Spring 2011</center></big> | <big><center>QRT-PCR: 20.345 Spring 2011</center></big> | ||
| Line 20: | Line 20: | ||
===Heated Lid=== | ===Heated Lid=== | ||
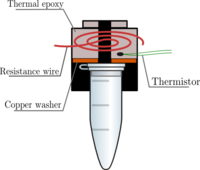
| − | [[File:Heated_lid.png|right| | + | [[File:Heated_lid.png|right|200px]] |
A heated lid, to reduce condensation and rescue the efficacy of the PCR machine, was designed, constructed, and implemented. | A heated lid, to reduce condensation and rescue the efficacy of the PCR machine, was designed, constructed, and implemented. | ||
| Line 32: | Line 32: | ||
To ensure contact between the lid and its heater, pressure must be applied to the lid heater. To provide this pressure, my first design involved screwing the lid heater onto the heating block. Unfortunately, this created a great deal of thermal coupling – so much so, that to appropriately model the sample temperature, I had to introduce into the Labview VI a gain term proportional to the | To ensure contact between the lid and its heater, pressure must be applied to the lid heater. To provide this pressure, my first design involved screwing the lid heater onto the heating block. Unfortunately, this created a great deal of thermal coupling – so much so, that to appropriately model the sample temperature, I had to introduce into the Labview VI a gain term proportional to the | ||
| + | |||
| + | ==Links== | ||
| + | |||
| + | [[QRT-PCR | QRT-PCR project overview page]]. <br /> | ||
| + | [[QRT-PCR:Get Started | Quickstart guide]]. <br /> | ||
| + | [[Spring_11:QRT-PCR:_Progress_Notes | Detailed progress notes]]. <br /> | ||
| + | [[Spring 11:QRT-PCR weekly reports | Weekly reports]]. <br /> | ||
| + | [[QRT-PCR:LabView-versions | Notes on QRT-PCR Labview VI versions]]. <br /> | ||
| + | [[QRT-PCR:Heated Lid | Research notes on the heated lid]]. <br /> | ||
Revision as of 17:01, 19 May 2011
Contents
Goal
The ultimate goal of this project is to create an inexpensive QRT-PCR kit for teaching laboratories at the undergraduate, or even high school, level. At the beginning of term, I had hoped to have a functional QRT-PCR machine by this time. Part way through term, it became clear that this would not happen, so I lowered my sights to traditional PCR alone. Unfortunately, even more setbacks occurred, and not even this early milestone was achieved.
Progress
Some progress, however, has been made, which should be of some use to Steven, or future students.
Optics
At the start of term, I worked to increase the signal-to-noise ratio of the optics. After constructing and investigating several model systems of a green LED and neutral density filters, I determined that the autofluorescence of the fiber optic was producing a prohibitive amount of noise. The replacement fiber optic that was acquired also exhibited autofluorescence, so it seems that we will not be able to use a fiber optic in our design.
Electronics
A bug was discovered in the H-bridge circuit: its dynamic range is now limited to 1-5 V, instead of 0-10 V. Not even a replacement H-bridge solved the problem, so the issue is somewhere beyond the basic electrical connections.
Labview VI
Version 2.712 was updated to calculate the temperature properly from the thermistors. When thermal coupling between the block and the lid was a problem, a Tlid gain term was added to the model temperature to account for the extra power coming from the lid. When this part of the code was no longer needed, it was removed.
Heated Lid
A heated lid, to reduce condensation and rescue the efficacy of the PCR machine, was designed, constructed, and implemented.
The lid design (see right) consists of 29-gauge resistance wire, thermal epoxy, a copper wire, and a thermistor to measure the temperature. All of these are encased by a half-inch lens tube. 1.03 A of current through the resistance wire generates about 100C of heat, which is transferred to the tube lid via the thermal epoxy and the copper washer.
29-gauge wire was chosen to minimize the current needed to heat the wire, while still being thick enough to work with. The thermal epoxy ensures that the resistance wire does not make contact with itself, which could cause dangerously high resistance, and therefore heat, levels.
What Worked, or Not
As could be inferred from the above, not everything I tried this semester worked as I expected.
To ensure contact between the lid and its heater, pressure must be applied to the lid heater. To provide this pressure, my first design involved screwing the lid heater onto the heating block. Unfortunately, this created a great deal of thermal coupling – so much so, that to appropriately model the sample temperature, I had to introduce into the Labview VI a gain term proportional to the
Links
QRT-PCR project overview page.
Quickstart guide.
Detailed progress notes.
Weekly reports.
Notes on QRT-PCR Labview VI versions.
Research notes on the heated lid.

