Difference between revisions of "20.109(S24):M1D5"
Noreen Lyell (Talk | contribs) (→Part 2: Prepare DSF experiment) |
Noreen Lyell (Talk | contribs) (→Part 2: Prepare DSF experiment) |
||
| Line 24: | Line 24: | ||
#Label 5 microcentrifuge tubes according to the small molecule assingments below: | #Label 5 microcentrifuge tubes according to the small molecule assingments below: | ||
| − | #*'TR Section:' | + | #*'''TR Section:''' |
#**Orange Team: #1, #6, #9, #10 | #**Orange Team: #1, #6, #9, #10 | ||
#**Yellow Team: #2, #10, #11, #13 | #**Yellow Team: #2, #10, #11, #13 | ||
#**Green Team: #2, #9, #10 | #**Green Team: #2, #9, #10 | ||
#**Blue Team: #1, #2, #4, #10 | #**Blue Team: #1, #2, #4, #10 | ||
| − | + | #**Pink Team: #1, #2, #10, #11 | |
| + | #*'''WF Section:''' | ||
| + | #**Red Team: #3, #4, #5, #8 | ||
| + | #**Orange Team: #1, #2, #10, #13 | ||
| + | #**Yellow Team: #2, #10, #11, #13 | ||
| + | #**Green Team: #2, #9, #10, #13 | ||
| + | #**Blue Team: #5, #9, #10, #13 | ||
| + | #**Pink Team: #5, #9, #10, #13 | ||
| + | #**Purple Team: #5, #9, #10, #13 | ||
| + | #**Teal Team: #1, #2, #10, #11 | ||
#*Please note that in some cases you may be testing small molecules different than those selected in the previous laboratory section. To ensure that all small molecules were included and to ensure that replicates were completed for all small molecules, some changes were made to enhance the class data. Everyone will have access to all of the class data. | #*Please note that in some cases you may be testing small molecules different than those selected in the previous laboratory section. To ensure that all small molecules were included and to ensure that replicates were completed for all small molecules, some changes were made to enhance the class data. Everyone will have access to all of the class data. | ||
#Obtain an aliquot of the purified MAX-6xHis protein from the front laboratory bench. | #Obtain an aliquot of the purified MAX-6xHis protein from the front laboratory bench. | ||
Revision as of 16:18, 27 February 2024
Contents
Introduction
Interactions between low molecular weight ligands, or small molecules, and proteins have been shown to increase the thermostability of proteins. This means that proteins bound to ligand are able to maintain tertiary structure, or resist denaturation, at higher temperatures than unbound proteins. Today we will use differential scanning fluorimetry (DSF) to examine the putative PfFKBP35 small molecule binders.
DSF is a method used to identify low molecular weight ligands that bind and stabilize a protein of interest. In this assay, protein denaturation is measured via a fluorescent dye that has an affinity for hydrophobic regions. When the protein is folded the hydrophobic pockets are inaccessible to the dye and the fluorescent signal is quenched by water in the solution. As the protein unfolds, the dye interacts with the hydrophobic regions and emits a fluorescent signal that can be detected.
When a protein is bound to a ligand, the stability can be increased such that the temperature at which the protein denatures is increased. In the DSF assay, this is measured as a shift in the Tm, or melting temperature; which is defined as the temperature at which 50% of the protein is unfolded. This value represents the midpoint of the transition from structured (folded) to denatured (unfolded).
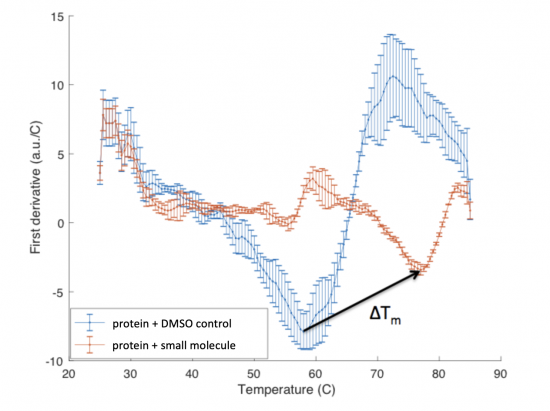
The ΔTm is the difference between the Tm of the unbound protein sample, or protein sample without added ligand, and the bound protein sample, protein sample with added ligand. If the tested ligand binds the protein of interest, the ΔTm can be observed as a shift in the plotted DSF data. For example, the data below show an experiment that resulted in a ΔTm of ~20 degrees.
Protocols
Part 1: Participate in Communication Lab workshop
Our communication instructor, Dr. Chiara Ricci-Tam, will join us today to focus on figure captions and titles.
Part 2: Prepare DSF experiment
The protein you purified in the previous laboratory session was pooled and prepared for use in the DSF assay. Specifically, the purified protein pool was diluted in 1X TBS to a final concentration of 0.25 mg/mL.
- Label 5 microcentrifuge tubes according to the small molecule assingments below:
- TR Section:
- Orange Team: #1, #6, #9, #10
- Yellow Team: #2, #10, #11, #13
- Green Team: #2, #9, #10
- Blue Team: #1, #2, #4, #10
- Pink Team: #1, #2, #10, #11
- WF Section:
- Red Team: #3, #4, #5, #8
- Orange Team: #1, #2, #10, #13
- Yellow Team: #2, #10, #11, #13
- Green Team: #2, #9, #10, #13
- Blue Team: #5, #9, #10, #13
- Pink Team: #5, #9, #10, #13
- Purple Team: #5, #9, #10, #13
- Teal Team: #1, #2, #10, #11
- Please note that in some cases you may be testing small molecules different than those selected in the previous laboratory section. To ensure that all small molecules were included and to ensure that replicates were completed for all small molecules, some changes were made to enhance the class data. Everyone will have access to all of the class data.
- TR Section:
- Obtain an aliquot of the purified MAX-6xHis protein from the front laboratory bench.
- Add 4 μL of Sypro Orange to the protein and mix gently by pipetting.
- Transfer 70 μL of the prepared MAX-6xHis + Sypro Orange into each of the labeled microcentrifuge tubes prepared in Step #1.
- Add 7 μL of DMSO into the appropriately labeled microcentrifuge tube.
- Add 7 μL of each of the small molecules to be tested into the appropriately labeled microcentrifuge tube.
- Small molecule solutions will be kept at the front laboratory bench. To add small molecule to your samples, take your tubes to the front laboratory bench.
- Mix each tube gently by pipetting.
- Do not vortex samples!
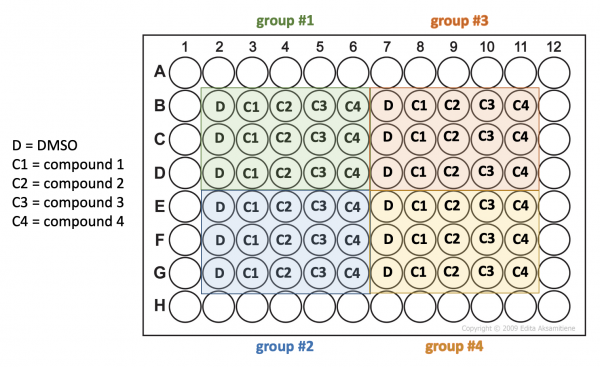
- Transfer 20 μL aliquots from each tube into three wells of a 96-well plate according to the plate map below.
- Your Instructor will tell you your group number when you are ready to load your samples.
In your laboratory notebook, complete the following:
- Calculate the final concentration of protein used in the DSF experiment.
- Concentration of prepared protein = 0.25 mg/mL
- Calculate the final concentration of small molecule used in the DSF experiment.
- Concentration of small molecule stocks = 50 μM
- Why is DMSO included as one of the small molecules in the DSF experiment?
- Are you testing technical replicates or biological replicates in the DSF experiment?
Part 3: Learn cell culture best practices
One major objective for this experimental module is for you to learn best practices for cell culture using correct sterile techniques. Pay close attention to the demonstration provided by the Instructor!
Review the following resource before you complete the tasks detailed in this exercise: Guidelines for working in the tissue culture room
Additionally, to ensure the steps included below are clear, please watch the video tutorial linked here: [Cell Culture].
Preparing tissue culture hood
- The tissue culture hood is partly set up for you. Finish preparing your hood according to the demonstration, first bringing in any remaining supplies you will need, then obtaining the pre-warmed reagents from the water bath, and finally retrieving your cells from the 37 °C incubator.
- Be sure to spray everything (except cells) with 70% ethanol and wipe dry before moving items into the tissue culture hood!
- One of the greatest sources for tissue culture contamination is moving materials in and out of the hood because this disturbs the air flow that maintains a sterile environment inside the hood. Think about what you will need during your experiment to avoid moving your arms in and out of the hood while you are handling your cells.
Collecting cells
- Obtain one ~48 h culture of HeLa cells in T25 flask from the 37 °C incubator.
- Examine your cell cultures after you remove the flask from the incubator.
- Look first at the color and clarity of the media. Fresh media is reddish-orange in color and if the media in your flask is yellow or cloudy, it could mean that the cells are overgrown, contaminated, or starved for CO2.
- Next, look at the cells using the inverted microscope. Note their shape, arrangement, and how densely the cells cover the surface of the flask.
- After you look at your cells, take the flask to your tissue culture hood.
- Using a pasteur pipette attached to the aspirator tube, carefully aspriate the media from your flask.
- Wash the cells by adding 5 mL PBS using a 5 mL pipet. Slightly tip the flask back and forth to rinse the cells then aspirate the PBS with a fresh Pasteur pipet.
- To dislodge the cells from the flask, you will add trypsin which is a proteolytic enzyme.
- With a 2 mL pipet, add 1 mL of trypsin to the flask.
- Be careful with 2 mL pipets as they fill quickly and liquid will go all the way up your pipet into the pipet-aid. If this happens, please alert the teaching faculty rather than returning the pipet-aid to the rack.
- Tip the flask in each direction to distribute the trypsin evenly then incubate the cells at 37 °C for 2 minutes.
- This is a great time to clear out your trash and read ahead!
- Retrieve your flask from the incubator and firmly tap the bottom to dislodge the cells.
- Check your cells using the microscope to ensure they are dislodged. They should appear round and move freely.
- If your cells are not detached from the flask, incubate at 37 °C for an additional minute.
- When your cells are dislodged, move your flask back into the tissue culture hood and add 5 mL of media to the cells then pipet the liquid up and down (“triturate”) to break up cells that are clumped together and suspend them in the liquid.
- Note: do not take up or release all the liquid, in order to avoid bubbles.
- Transfer the suspended cells into a labeled 15 mL conical tube.
- Transfer 90 μL of your cell suspension from the 15 mL conical tube into a labeled eppendorf tube.
Counting cells
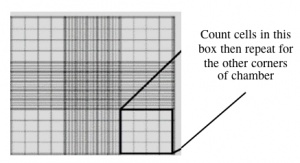
During your work in tissue culture, you will use a hemocytometer to count mammalian cells. More importantly, you will use the cell count information to determine the density of your cultures. A hemocytometer is a modified glass microscope slide that has a chamber engraved with a grid. Stained mammalian cells are loaded into the chamber, which is manufactured such that the area within the gridlines is known and the volume of the chamber is known. These features enable researchers to count the number of cells within a specific volume of liquid.
Using a hemocytometer, you can determine the density (cells per mL) of cell culture.
- Carry the tube with your 90 μL cell suspension aliquot to the center microscope bench and add 10 μL of trypan blue cell stain. Mix by pipetting up and down.
- Carefully pipet 10 μL of the stained cells between the hemocytometer and (weighted) glass cover slip.
- Count the cells that fall within the four corner squares (with a 4 x 4 etched grid pattern), average (i.e. divide by 4), and then multiply by 10,000 to determine the number of cells/mL.
In your laboratory notebook, complete the following:
- Use the information provided to calculate the density of the cell culture.
- Calculate the total number of cells that were collected.
- Hint: use the density calculated and the total volume for this calculation.
- Calculate the volume of cells required to prepare a 5 mL cell suspension at a final density of 100,000 cells/mL.
- You will prepare and use this cell suspension in Part 4.
Part 4: Seed cells for EMSA experiment
In this exercise you will seed the cells you harvested into culture dishes. You will use these cells to start your EMSA experiment in the next laboratory session.
- Obtain one culture dish from the center laboratory bench.
- Clearly label the dish with the date and your team name. Include the name of the cell line you are seeding!
- Prepare your cell suspension using the calculations from Part 2.
- Transfer the appropriate volume of cells to a 15 mL conical tube.
- Cells settle quickly in conical tubes so it is important you mix before adding cells to the conical tube!
- Add fresh media such that the final volume is 5 mL.
- Transfer the appropriate volume of cells to a 15 mL conical tube.
- Transfer all 5 mL of the cell suspension to your culture dish.
- Cells settle quickly in conical tubes so it is important you mix before adding cells to the culture dish!
- Carefully move your plate to the 37 °C incubator
- Clean out the tissue culture hood:
- Aspirate any remaining liquids.
- Dispose of all vessels that held cells in the biohazard waste box and be sure that all sharps are in the sharps jar.
- Remove any equipment or supplies that you transferred into the hood and return to the appropriate location.
- Please leave the equipment that was already there.
- Spray the TC hood surface with 70% ethanol and wipe with paper towels.
- Be sure the paper towels are disposed of in the biohazard waste box!
- Empty the benchtop biohazard bucket into the biohazard waste box.
In your laboratory notebook, complete the following:
- Calculate the total number of cells that were seeded into the culture dish.
Reagents list
DSF:
- MAX-6xHis (concentration = 0.25 mg/mL)
- Sypro Orange dye (from Thermo Fisher)
- small molecule compounds (50 μM) (from Chembridge)
- DMSO (from Sigma)
Cell culture:
- HeLa cells (from Millipore)
- Dulbecco's Modified Eagle Medium (DMEM) (from Gibco), supplemented with:
- 20% fetal bovine serum (FBS) (from Atlanta Biologicals)
- 1% non-essential amino acids (NEAA) (from Gibco)
- 100 U/mL of antibiotic solution, containing penicillin and streptomycin (from Gibco)
- 1X PBS, pH 7.4 (from Gibco)
- 0.25% trypsin-EDTA (from Gibco)
- trypan blue (from VWR)
- incubator maintains 37°C, 5% CO2 and 95% relative humidity
Next day: Prepare cells for electromobility shift assay (EMSA)


