Difference between revisions of "20.109(S20):Identify clones to characterize (Day3)"
(→Part 2: Sequencing scFv clones) |
(→Part 2: Sequencing scFv clones) |
||
| Line 60: | Line 60: | ||
</center> | </center> | ||
| − | Open the [[Media: | Sequence file]] for clone ADI31375 and record the features identified by SnapGene in your laboratory notebook. If you need to review basic tools in SnapGene remember our exercise on [[http://engineerbiology.org/wiki/20.109(S20):Complete_in_silico_cloning_and_induce_TDP43_protein_expression_(Day1)|M1D1]]. | + | Open the [[Media: | Sequence file]] for clone ADI31375 and record the features identified by SnapGene in your laboratory notebook. If you need to review basic tools in SnapGene remember our exercise on [[http://engineerbiology.org/wiki/20.109(S20):Complete_in_silico_cloning_and_induce_TDP43_protein_expression_(Day1) | M1D1]]. |
In addition to the common features, add / label the sequence with the following features specific to your experiment: | In addition to the common features, add / label the sequence with the following features specific to your experiment: | ||
Revision as of 18:27, 28 March 2020

Contents
Introduction
Today you will submit plasmids for sequencing analysis to determine the sequence differences between these clones and our characterized lysozyme binding scFv clone. These newly isolated plasmids encode for unique single-chain antibody fragment (scFv) clones that may show improved binding to our antigen, lysozyme.
The invention of automated sequencing machines has made sequence determination a relatively fast and inexpensive process. The method for sequencing DNA is not new but automation of the process is recent, developed in conjunction with the massive genome sequencing efforts of the 1990s and 2000s. At the heart of sequencing reactions is chemistry worked out by Fred Sanger in the 1970s which uses dideoxynucleotides (image on left, below). These chain-terminating bases can be added to a growing chain of DNA but cannot be further extended. Performing four reactions, each with a different chain-terminating base, generates fragments of different lengths ending at G, A, T, or C. The fragments, once separated by size, reflect the DNA’s sequence. In the “old days” radioactive material was incorporated into the elongating DNA fragments so they could be visualized on X-ray film (image in center, below). More recently fluorescent dyes, one color linked to each dideoxy-base, have been used instead. The four colored fragments can be passed through capillaries to a computer that can read the output and trace the color intensities detected (image on right, below). Your sample was sequenced in this way by Genewiz on an ABI 3730x1 DNA Analyzer.


After we download the DNA sequencing results of the two new scFv clones, you will use SnapGene software to align the two new clone sequences to the original lysozyme binding scFv clone DNA sequence. Once you know the difference(s) in the DNA sequence you can (1) determine where in the scFv the sequence difference occurs, (2) if the change in DNA sequence results in a difference in amino acid sequence and (3) predict how this difference in sequence affects lysozyme binding to the scFv clone.
Protocols
Part 1: Harvest plasmid (Miniprep) from E. coli
Since the last lab session, the transformed E. coli bacteria grew on LB agar plated with ampicillin antibiotic selection overnight at 37°C. Only bacteria that took up plasmid with an ampicillin selection marker during the heat shock were able to grow, the non-transformants died. The next day visible colonies were picked off the LB+amp plates and grown in LB+amp liquid culture overnight. Growing the bacteria in liquid culture allows one to easily harvest plasmid from a high number of cells. Note: The procedure for DNA isolation at this scale (1-2mL) is commonly termed "mini-prep," which distinguishes it from a “maxi-prep” that involves a larger volume (100mL) of cells and additional steps of purification.
- Pick up your two cultures, which are growing in test tubes labeled with your team color. Label two 1.5mL tubes to reflect your samples (scFv_clone#1 and #2).
- Vortex the bacteria and pour ~1.5 mL of each candidate into a 1.5mL tube.
- Balance the tubes in the microfuge, spin them at maximum speed for 2 min, and remove the supernatants with the vacuum aspirator.
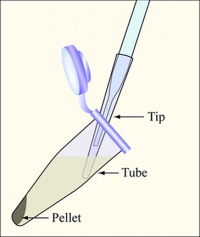 Diagram showing how to aspirate the supernatant. Be careful to remove as few cells as possible.
- Resuspend each cell pellet in 250 μL buffer P1.
- Buffer P1 contains RNase so that we collect only our nucleic acid of interest, DNA.
- Add 250 μL of buffer P2 to each tube, and mix by inversion until the suspension is homogeneous. About 4-6 inversions of the tube should suffice. You may incubate here for up to 5 minutes, but not more.
- Buffer P2 contains sodium hydroxide and SDS for alkaline lysis.
- Add 350 μL buffer N3 to each tube, and mix immediately by inversion (4-10 times).
- Buffer N3 contains acetic acid which neutralizes the pH. The plasmid DNA renatures while chromosomal DNA / proteins / lipids precipitate into visible white aggregates.
- Centrifuge for 10 minutes at maximum speed. Note that you will be saving the supernatant after this step.
- Meanwhile, prepare 2 labeled QIAprep columns, one for each candidate clone. You must add the label directly to the blue column and not the clear tube.
- Transfer the entire supernatant to the column and centrifuge for 1 min. Discard the eluant into a tube labeled 'Qiagen waste'.
- Add 0.5 mL PB to each column, then spin for 1 min and discard the eluant into the Qiagen waste.
- Next wash with 0.75 mL PE, with a 1 min spin step as usual. Discard the ethanol in the Qiagen waste.
- After removing the PE, spin the mostly dry column for 1 more minute.
- It is important to remove all traces of ethanol, as they may interfere with subsequent work with the DNA.
- Transfer each column insert (blue) to a 1.5mL tube with the lid cut off.
- Use the scissors in your drawer to cut the lids off two tubes.
- Add 30 μL of distilled H2O pH ~8 to the top center of the column, wait 1 min, and then spin 1 min to elute your DNA.
- Cap the trimmed tube or transfer elution to new 1.5mL tube.
- You will now take your samples to the Nanodrop to measure the DNA's absorbance to quantify the concentration.

Part 2: Sequencing scFv clones
Just as PCR amplification reactions require a primer for initiation, primers are also needed for sequencing reactions. Distinguishable sequence readout typically begins about 40-50 bases downstream of the primer binding site, and continues for ~1000 bases at most. Thus, usually forward and reverse primers must be used to fully view genes > 1 kb in size. The target sequence for your scFv is shorter than 1000 bp, but we will sequence with both a forward and reverse primer to double-check that we have an accurate representation of the clone sequence.
The primers you will use today are below:
| Primer | Sequence |
|---|---|
| scFv forward primer | 5' - GTTCCAGACTACGCTCTGCAGG- 3' |
| scFv reverse primer | 5' - GATTTTGTTACATCTACACTGTTG- 3' |
Open the [[Media: | Sequence file]] for clone ADI31375 and record the features identified by SnapGene in your laboratory notebook. If you need to review basic tools in SnapGene remember our exercise on [| M1D1].
In addition to the common features, add / label the sequence with the following features specific to your experiment:
- sequence that encompasses variable regions
- sequences to which the scFv forward and reverse primers anneal
The recommended composition of sequencing reactions is ~800 ng of plasmid DNA and 25 pmoles of one sequencing primer in a final volume of 15 μL. The miniprep'd plasmid should have ~200 ng of nucleic acid/μL, so we will estimate the amount appropriate for our reactions.
Because you will examine the sequence of your potential plasmids using both a forward and a reverse primer, you will need to prepare two reactions for each clone. Thus you will have a total of four sequencing reactions. For each reaction, combine the following reagents directly in the appropriate tube within the PCR-tube strip, as noted in the table below:
- 6 μL nuclease-free water
- 4 μL of your plasmid DNA candidate
- 5 μL of the primer stock on the teaching bench (the stock concentration is 5 pmol/μL)
- Please add the forward primer to the odd numbered tubes and the reverse primer to the even numbered tubes (i.e. tube #1 contains scFv#1 plasmid DNA and forward primer, tube #2 contains scFv#1 plasmid DNA and reverse primer, etc).
The side of each tube is numerically labeled and you should use only the four tubes assigned to your group. The teaching faculty submit the samples to the Genewiz company via the drop-off box for sequencing.
Reagents list
Next day: Characterize clone by titration using flow cytometry