20.109(S20):Identify clones to characterize (Day3)
Contents
Introduction
Today you will submit plasmids for sequencing analysis to determine the sequence differences between these clones and our characterized lysozyme binding scFv clone. These newly isolated plasmids encode for unique single-chain antibody fragment (scFv) clones that may show improved binding to our antigen, lysozyme.
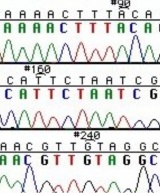
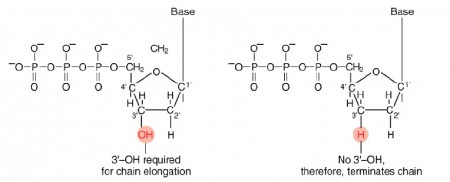
The invention of automated sequencing machines has made sequence determination a relatively fast and inexpensive process. The method for sequencing DNA is not new but automation of the process is recent, developed in conjunction with the massive genome sequencing efforts of the 1990s and 2000s. At the heart of sequencing reactions is chemistry worked out by Fred Sanger in the 1970s which uses dideoxynucleotides (image on left, below). These chain-terminating bases can be added to a growing chain of DNA but cannot be further extended. Performing four reactions, each with a different chain-terminating base, generates fragments of different lengths ending at G, A, T, or C. The fragments, once separated by size, reflect the DNA’s sequence. In the “old days” radioactive material was incorporated into the elongating DNA fragments so they could be visualized on X-ray film (image in center, below). More recently fluorescent dyes, one color linked to each dideoxy-base, have been used instead. The four colored fragments can be passed through capillaries that will separate the DNA based on size and these will be analyzed on a computer that can read the output and trace the color intensities detected (image on right, below). Your sample was sequenced in this way by Genewiz on an ABI 3730x1 DNA Analyzer.
After we download the DNA sequencing results of the two new scFv clones, you will use SnapGene software to align the two new clone sequences to the original lysozyme binding scFv clone DNA sequence. Once you know the difference(s) in the DNA sequence you can (1) determine where in the scFv the sequence difference occurs, (2) if the change in DNA sequence results in a difference in amino acid sequence and (3) predict how this difference in sequence affects lysozyme binding to the scFv clone.
Protocols
To use SnapGene software off campus you must log into a VPN connection prior to opening the SnapGene. Here is the link to the VPN download and installation instructions. Also you will need to update the SnapGene license number if you have not opened the application since March. The new license information can be found here.
We have also posted instructions for DNA alignments using benchling on the class data page.
Part 1: Sequencing scFv clones
Just as PCR amplification reactions require a primer for initiation, primers are also needed for sequencing reactions. Distinguishable sequence readout typically begins about 40-50 bases downstream of the primer binding site, and continues for ~1000 bases at most. Thus, usually forward and reverse primers must be used to fully view genes > 1 kb in size. The target sequence for your scFv is shorter than 1000 bp, but we will sequence with both a forward and reverse primer to double-check that we have an accurate representation of the clone sequence.
The primers you will use today are below:
| Primer | Sequence |
|---|---|
| scFv forward primer | 5' - GTTCCAGACTACGCTCTGCAGG- 3' |
| scFv reverse primer | 5' - GATTTTGTTACATCTACACTGTTG- 3' |
Open the Sequence file for clone Ab31375 and record the features identified by SnapGene in your laboratory notebook. If you need to review basic tools in SnapGene remember our exercise on [M1D1].
In addition to the common features, note the sequence with the following features specific to your experiment:
- sequence that encompasses variable regions
- sequences to which the scFv forward and reverse primers anneal
The recommended composition of sequencing reactions is ~800 ng of plasmid DNA and 25 pmoles of one sequencing primer in a final volume of 15 μL. The miniprep'd plasmid should have ~200 ng of nucleic acid/μL, so we will estimate the amount appropriate for our reactions.
Because you will examine the sequence of your potential plasmids using both a forward and a reverse primer, you will need to prepare two reactions for each clone. Thus you will have a total of four sequencing reactions. For each reaction, combine the following reagents directly in the appropriate tube within the PCR-tube strip, as noted in the table below:
- 6 μL nuclease-free water
- 4 μL of your plasmid DNA candidate
- 5 μL of the primer stock on the teaching bench (the stock concentration is 5 pmol/μL)
- Please add the forward primer to the odd numbered tubes and the reverse primer to the even numbered tubes (i.e. tube #1 contains scFv#1 plasmid DNA and forward primer, tube #2 contains scFv#1 plasmid DNA and reverse primer, etc).
The side of each tube is numerically labeled and you should use only the four tubes assigned to your group. The teaching faculty submit the samples to the Genewiz company via the drop-off box for sequencing.
Part 2: Align scFv sequences
You will analyze sequence of clones that were previously submitted. Your goal before the end of today is to analyze the sequencing data for two potential scFv clones and decide which clone to proceed with for the characterization of lysozyme binding.
Retrieve sequence results from Genewiz
- We retrieve our sequencing data from the Genewiz website. The information was uploaded to the Class data page.
- Download the zip folder with your team sequencing results and confirm that there are 8 files saved in the folder.
- For each sequencing reaction, you should have one .abi file and one .seq file.
- Open one of the .abi files.
- This file contains the chromatogram for your sequencing reaction. Scroll through the sequence and ensure that the peaks are clearly defined and evenly spaced. Low signal (or peaks) or stacked peaks can provide incorrect base assignments in the sequence.
- Open one of the .seq files.
- This file contains the base assignments for your sequencing reaction. The bases are assigned by the software from the chromatogram sequence.
- The start of a sequencing reaction result often contains several Ns, which indicates that the software was unable to assign a base. Given the chromatogram result, why might the software assign Ns in this region of the sequence?
- Include all of your observations in your Benchling notebook. You can also attach the files to your entry.
Confirm svFc sequence using SnapGene
You should align your sequencing data with the known sequence for clone Ab31375. To generate higher affinity binders to lysozyme, we generated a library using error-prone PCR mutagenesis of the scFv region of Ab31375. An error prone library generated with the conditions described on M3D1 should yield one to nine mutations per scFv gene. We will now align our sorted sequences to Ab31375 to see if they have amino acid substitutions which could yield altered binding properties to lysozyme. Watch this tutorial video from Snapgene for an introduction to aligning to a reference DNA sequence.
- Open the annotated clone Ab31375 file that worked on in Part 1.
- From the 'Tools' menu choose 'Align to reference DNA sequence' then 'Align Imported Sequences'
- Select the .ab1 files from both clones.
- In the top left panel check the box next to the two files (the forward and reverse sequence) from one of the clones.
- This populate the sequences and trace data in the lower right panel. Use the grey scroll bar at the bottom of this window to move along the alignment.
- Click the grey triangles to the left of the sequence name to expand the view sequence or trace information.
- Click on the sequence or trace icon to toggle between views.
- Place your cursor in the original sequence just upstream of the first sequencing alignment.
- At the top of the lower left panel, next to the 'Original Sequence' label, is a pink box with arrows on either side.
- Click on the right arrow to advance to the first mismatch or sequence gap.
- Using the sequence or trace file from our sequencing result decide whether this mismatch or gap is a mutation or an unreliable sequencing result.
- Remember distinguishable sequence readout typically begins about 40-50 bases downstream of the primer binding site. It's common to have N included where sequencing results cannot clearly identify a base.
- To determine if the mismatch you see is an unidentified base or mutation use your best judgment comparing the trace profiles of both the forward and reverse sequence.
- Note the location of all gaps or mismatches in the sequence in your benchling notebook.
- Relevant location information includes the bp number in the original sequence (not sequencing result bp number) and the gene annotation associated with the DNA sequence, example Heavy chain.
- You will also need to represent this information in you mini report so consider what representation would make the most informative figure.
- Toggle both sequencing result alignments to the 'sequence with annotations' and determine if the DNA mutation has resulted in a change in the amino acid sequence.
- If yes, look up the properties of the original and new amino acid in this chart.
- Predict the effect this mutation might cause on antigen binding based off the size and charge differences.
- You should save a screenshot of each alignment and attach them to your Benchling notebook.
- Save the sequence alignment using a new file name.
If both scFv clones have interesting sequence changes, choose either clone to use for the titration with lysozyme. If only one is different or interesting, then this is the clone you will use. If neither of your plasmids carry an appropriate change in sequence, talk to the teaching faculty.
Part 3: Research proposal review exercise
To help you focus your ideas and develop the details of your project, you will discuss the project description you submitted today with a classmate from another group. As you listen to your classmate's idea, consider the following criteria proposed for small research project grants by the NIH:
Small Research Grant Program: ...small grant supports discrete, well-defined projects that realistically can be completed in two years and that require limited levels of funding. Because the research project usually is limited, the grant application may not contain extensive detail or discussion. Accordingly, reviewers should evaluate the conceptual framework and general approach to the problem. Appropriate justification for the proposed work can be provided through literature citations, data from other sources, or from investigator-generated data. Preliminary data are not required, particularly in application proposing pilot or feasibility studies.
Use the following exercise to guide your discussion as you consider both your and your classmate's project. Because you are still in the early stages of developing your research topic, it is okay if you do not have all of the answers to the following questions. This is meant to help you critically think about your proposal...not to point out the additional research you need to complete! Furthermore, this is an informal conversation and you should feel free to look up information during this exercise or just make notes so you know what to research later with your co-investigator.
Outline of the peer review exercise:
- Find the partner you were assigned by the teaching faculty and begin by deciding which partner will present first.
- As the presenter, focus on why you believe your topic is important and provide the context needed to convince your listener that it is indeed worth pursuing.
- As the listener, verbally summarize the topic back to the presenter to ensure you understood the proposal. Are you convinced that the topic is important? Why or why not? Discuss this with the presenter.
- Now that you have the needed background information discuss the 'Hows' of the project.
- As the presenter, consider the questions below as you give some details about your proposal.
- As the listener, feel free to ask questions and maybe provide some helpful feedback as the presenter discusses the details of their project.
Questions to guide your discussion:
- What is the novel aspect of your proposal?
- Why do you believe your project is feasible?
- Is there evidence that supports your proposal?
- How will your research advance the field?
- How will you complete your research (what methods might you use)?
- What is the expected result?
- How might you 'double-check' or confirm an expected result?
- What if you do not get the expected result?
- What can be learned if you get the expected result? If you get an unexpected result?
- What are some alternative approaches (methods) for your proposed research?
Once you have completed discussing the presenter's project, switch roles and complete this exercise with the listener's project.
Use the information you gathered during this exercise to drive a discussion with your co-investigator as you further develop your research proposal and prepare the homework assignment due on Day M3D4.
Reagents list
- scFv sequencing primers (Genewiz)
Next day: Characterize clone by titration using flow cytometry


