20.109(F19):Begin Western blot analysis (Day3)

Contents
Introduction
Electrophoresis is a technique that separates large molecules by size using an applied electrical field and a sieving matrix. DNA, RNA and proteins are the molecules most often studied with this technique; agarose and acrylamide gels are the two most common sieves. The molecules to be separated enter the matrix through a well at one end and are pulled through the matrix when a current is applied across it. The larger molecules get entwined in the matrix and are stalled; the smaller molecules wind through the matrix more easily and travel farther away from the well. The distance a nucleic acid or amino acid fragment travels is inversely proportional to the log of its length. Over time fragments of similar length accumulate into “bands” in the gel.

For Western blot analysis, a high quality antibody can have a relatively low affinity for its target protein. This is because the target is localized and concentrated on a blot, allowing the antibody to bind using both antibody “arms” thereby strengthening the association. Even an antibody that is loosely bound to the blot under these circumstances may dissociate then re-associate quickly since the local concentration of the target protein is high. The lower limit for protein detection is approximately 1 ng/lane, a value that varies with the size of the protein to be detected and the Western blotting apparatus that is used. For most polyacrylamide gels, the protein capacity for each lane is 100 to 200 μg (that would be 20 μL of a 5-10 μg/μL protein preparation). Thus, 1 ng represents a protein that is approximately 0.0005-0.001% of the total cellular protein (1 ng out of 100,000-200,000 ng). Proteins that make up a more significant fraction of the total protein population will be easier to detect.
Protocols
In the previous laboratory session, you snap froze your samples which were then stored at -80 °C.
Part 1: Lyse cells
- Retrieve your samples from the front laboratory bench and place them in the 25 °C heatblock.
- Your samples will thaw in the block.
- When thawed, transfer to an ice bucket.
- Vortex your samples, then centrifuge the lysate at 20,000 g for 20 min in the 4 °C cold room.
- Alert the teaching faculty when you are ready to centrifuge.
- This step removes the aggregated protein from your samples!
- Following centrifugation, leave your samples on ice.
- Be careful not to disturb the pellet!
- Transfer 75 μL of the lysate into a fresh 1.5 mL microcentrifuge tube.
- This is the soluble protein fraction from your samples!
Part 2: Electrophorese cellular proteins
- Add 15 μL of Laemmli sample buffer to each of your samples.
- Heat for 10 min at 70 °C using the heatblock on the front laboratory bench.
- If there is significant condensation at the lid of your tubes after heating, spin your samples before loading.
- You will load all samples and include the molecular weight standard on either side of your samples in the gel.
- 2 pre-stained ladders will be used to track the migration of your samples through the polyacrylamide gel
- Record the order in which you will load your samples and molecular weight standards in the polyacrylamide gel.
- When you are ready to load your samples, alert the teaching faculty.
- Please watch the demonstration closely to ensure your samples are correctly loaded and the polyacrylamide gel is not damaged during loading.
- Load 2 μL of the Licor ladder in Lane 1
- Load 40 μL of each sample into the polyacrylamide gel.
- Load 5 μL of the BioRad ladder after the last sample.
- Your samples will be electrophoresed at 200 V for 30-40 min.
- Following electrophoresis, use the green Bio-rad tool to carefully pry apart the plates that encase your polyacrylamide gel.
- Using wet gloves, transfer your polyacrylamide gel to a dish and add enough dH2O to cover the gel.
- Wash the gel for 5 min at room temperature on the rotating table.
- Empty the water from the dish in the sink.
- Be careful that the gel does not fall into the sink!
- Repeat Steps #12-13 a total of 3 times.
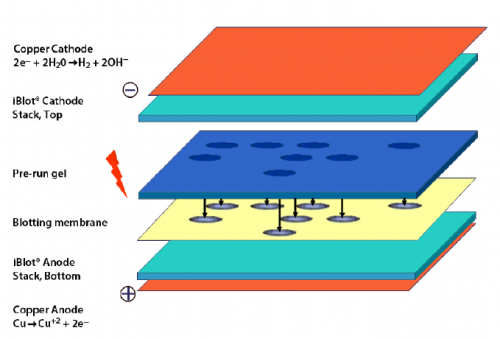
Part 3: Transfer proteins to membrane
The teaching faculty will take two teams at a time to the iBlot in Prof. Griffith's laboratory for the transfer step. Please be patient until it is your turn.
- Carefully open the iBlot transfer stack and separate the top stack from the bottom stack (see image to right for iBlot transfer stack setup).

- Set it aside with the transfer gel layer facing upward.
- Keep the bottom stack in the plastic tray.
- Place the bottom stack with the plastic tray on the blotting surface of the iBlot device.
- Use the blotting roller to remove any air bubbles that are between the transfer stack and the membrane.
- Carefully place your polyacrylamide gel on the membrane.
- Two gels can fit onto one membrane, place each gel such that the ladder lane is along the bottom of the membrane and the top of the gel on the right.
- Use the blotting roller to remove any air bubbles that are between the membrane and the gel.
- Wet the filter paper in dH2O, then place on the gel.
- Use the blotting roller to remove any air bubbles that are between the gel and filter paper.
- Remove the plastic separator from the top stack.
- Place the top stack on the filter paper with the copper electrode facing upward.
- Place the absorbent pad on top of the transfer stack.
- Position the pad such that the electrical contacts (silver tabs) are aligned with the contacts on the blotting surface of the iBlot device.
- Close the iBlot device by gently pressing down on the two sides of the lid.
- Complete the transfer at 20 V for 7 min.
- Settings are saved as program P3 in the iBlot device.
- Carefully remove the transfer stack from the iBlot device and retrieve the membrane.
- Remember, the transfer step moves the proteins from the polyacrylamide gel onto the membrane!
- Place the membrane in a dish.
- Use one of your colored dot stickers to label the dish.
- Collect an aliquot of blocking buffer from the front laboratory bench and pour it over the membrane.
- Move the dish to the designated space in the 4 °C cooler.

Reagents list
- Laemmli sample buffer (from BioRad)
- SDS-PAGE gel, 4-20% polyacrylamide gel in Tris-HCl (from BioRad)
- Tris, glycine, SDS (TGS) buffer: 25 mM Tris, 192 mM glycine, 0.1% (w/v) SDS, pH 8.3 (from BioRad)
- Dual Color marker (from BioRad)
- band information can be found here
- iBlot 2 transfer stack (from ThermoFischer)
- nitrocellulose membrane
- Odyssey blocking buffer (from Licor)
Next day: Complete antibody staining for Western blot analysis