Difference between revisions of "20.109(F20):M3D3"
Noreen Lyell (Talk | contribs) (→Prepare media for ethanol yield experiment) |
Noreen Lyell (Talk | contribs) (→Part 1: Review experimental setup) |
||
| Line 17: | Line 17: | ||
==Protocols== | ==Protocols== | ||
| − | ===Part 1: Review experimental setup=== | + | ===Part 1: Review experimental setup for ethanol yield assay=== |
====Transform CRISPRi system into MG1655 ''E. coli'' cells==== | ====Transform CRISPRi system into MG1655 ''E. coli'' cells==== | ||
Revision as of 13:49, 22 July 2020
Introduction
The CRISPRi system involves three genetic components: the pdCas9 plasmid (1 in image below), the psgRNA_target plasmid (2 in image below), and the targeted gene within the host genome (3 in image below). Though the targeted gene is native to the host genome, the plasmids must be transformed into the cell and maintained using antibiotic selection. Thus far in this module, we have discussed the CRISPRi plasmids as individual units, but now we will consider the system as a whole in the context of engineering gene expression.
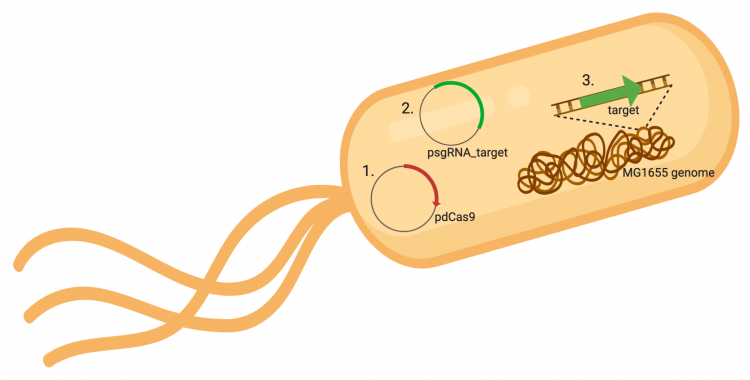
In the previous laboratory session, you reviewed the procedure used to generate the psgRNA_target plasmids. Today we will discuss how the CRISPRi system (pdCasd9 and psgRNA_target) is transformed into E. coli and, once transformed into the bacterial cells, how the psgRNA_target and dCas9 are transcribed from the expression plasmids. Briefly, the promoter (pJ23119) driving expression of the sgRNA sequence in the gRNA_target plasmid is constitutively active. This means that transcription of the gRNA sequence specific to the target in the host genome is constitutive. Therefore, your sgRNA_target is always present in the MG1655 cells.
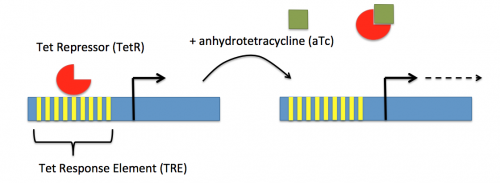
In contrast, expression of the gene encoding dCas9 within pdCas9 is regulated by an inducible promoter (pLtetO-1). An inducible promoter is 'off' unless the appropriate molecule is present to relieve repression. In the case of the CRISPRi system, expression of the gene encoding dCas9 is inhibited due to the use of a tet-based promoter construct. Tet is shorthand for tetracycline, which is an antibiotic that inhibits protein synthesis through preventing the association between charged aminoacyl-tRNA molecules and the A site of ribosomes. Bacterial cells that carry the tet resistance cassette are able to survive exposure to tetracycline by expressing genes that encode an efflux pump that 'flushes' the antibiotic from the bacterial cell. To conserve energy, the tet system is only expressed in the presence of tetracyline. In the absence of tetracycline, a transcription repressor protein (TetR) is bound to the promoter upstream of the tet resistance cassette genes. When tetracycline is present, the molecule binds to TetR causing a confirmational change that results in TetR 'falling off' of the promoter. In the CRISPRi system, the tet-based promoter construct upstream of the gene that encodes dCas9 is 'off' unless anhydrotetracyline (aTc), an analog of tetracyline, is added to the culture media. Why is it important to use an analog rather than the actual antibiotic?Taken together, the sgRNA_target is constitutively transcribed and, as stated above, always present. The dCas9 protein is only present when aTc is added. Thus, gene expression is only altered when aTc is present. In this, when dCas9 is expressed it forms a complex with the sgRNA_target. The sgRNA target then 'seeks out' the target within the host genome. When the targeted sequence is recognized, the complex binds and acts as a 'roadblock' by prohibiting RNAP access to the sequence. Because the targeted gene is not able to be transcribed, the protein encoded by that gene is not synthesized. In our experiments, we hypothesize that the absence of specific proteins, or enzymes, involved in anaerobic fermentative metabolism will increase the yield of ethanol.
Protocols
Part 1: Review experimental setup for ethanol yield assay
Transform CRISPRi system into MG1655 E. coli cells
During transformation, a plasmid enters a competent bacterium, then replicates and expresses the encoded genes. In a co-transformation, the goal is to transform each bacterial cell with two plasmids that each encode a different set of genes. Following the co-transformation procedure, a mixed population of cells exists as shown in the figure to the right: some cells only contain the plasmid that carries the resistance cassette for antibiotic A (blue cells), some cells only contain the plasmid that encodes the resistance cassette for antibiotic B (red cells), and some cells contain both plasmids (purple cells). Because the agar plate used for selection contains both antibiotic A and antibiotic B, only bacterial cells that harbor both plasmids survive and reproduce to form a colony.
Most bacteria do not usually exist in a “transformation ready” state, referred to as competence. Instead bacterial cells are incubated with CaCl2 to promote competency by making the cells permeable to plasmid DNA uptake. Competent cells are extremely fragile and should be handled gently, specifically the cells should be kept cold and not vortexed. The transformation procedure is efficient enough for most lab purposes, with efficiencies as high as 109 transformed cells per microgram of DNA, but it is important to realize that even with high efficiency cells only 1 DNA molecule in about 10,000 is successfully transformed.
Prepare media for ethanol yield experiment
To test the effect of sgRNA_target on increasing the production of ethanol, the co-transformed E. coli MG1655 cells both with and without oxygen. Remember from lecture that cells grown anaerobically should produce more fermentation products; however, the goal of using the CRISPRi system is to further enhance the production of ethanol by manipulating gene expression of an enzyme in the anaerobic fermentative pathway.
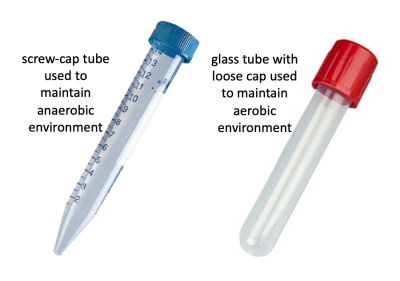
Before we look at the specific conditions that were tested, let's first review how anaerobic and aerobic cultures were maintained. Rather than using anaerobic chambers or gas replacement, a much simpler technique was employed to omit oxygen from the cultures for this experiment. Because screw-cap tubes maintain a tight seal, cultures can be maintained in a low-O2 environment. For this technique cultures are grown at least 24 hrs to ensure the following: 1. that the oxygen present at the time of inoculation is depleted by the growing cells and 2. that the cells grow in the O2-depleted environment long enough to undergo anaerobic fermentative metabolism. Aerobic cultures were maintained using standard glass test tubes with loose-fitting caps. Both culture tubes are shown in the image to the right.In total, eight conditions were tested for each sgRNA_target:
- MG1655 +O2 -aTc (glass tube)
- MG1655 -O2 -aTc (screw-cap tube)
- MG1655 +O2 +aTc (glass tube)
- MG1655 -O2 +aTc (screw-cap tube)
- MG1655 +CRISPRi +O2 -aTc (glass tube)
- MG1655 +CRISPRi -O2 -aTc (screw-cap tube)
- MG1655 +CRISPRi +O2 +aTc (glass tube)
- MG1655 +CRISPRi -O2 +aTc (screw-cap tube)
All cultures were prepared in 5 mL LB broth containing 25 μg/mL of chloramphenicol and 100 μg/mL of ampicillin.
In your laboratory notebook, complete the following:
- For each of the conditions that were tested, answer the following questions:
- Is the cell culture using anaerobic fermentative metabolism?
- Do the cells contain the CRISPRi system?
- Is the CRISPRi system active?
- Which culture conditions provide controls? What does each control indicate / test?
- In which culture condition do you expect to see the lowest yield of ethanol? Why?
- In which culture condition do you expect to see the highest yield of ethanol? Why?
Measure cell density of cultures
Before you prepare your samples to quantify the fermentation product yield, it is important that you measure the optical density (OD) of your cultures. This number will be used to normalize your data, which allows you to more accurately compare your samples. As a reminder, the OD is a measure of culture density and is based on the deflection of light at 600 nm (OD600). In this method of analysis, the higher the OD is the more dense the culture.
- Obtain an aliquot of fresh LB media and 9 plastic cuvettes from the front laboratory bench.
- Pipet 1000 μL of LB into 1 cuvette. This will serve as the blank needed to calibrate the spectrophotometer.
- Pipet 900 μL of LB into each of the 8 remaining cuvettes.
- It may be helpful to label your cuvettes with a simple designation that corresponds to your samples. Be sure that your labels are not in the light path as this will obscure your OD600 readings.
- Transfer 100 μL of each culture into the appropriate plastic cuvette.
- Note: this is a 1:10 dilution of your sample that should be accounted for in your calculations for product yield.
- Use the spectrophotometer to measure the OD600 values according to the instructions from the Orientation exercise.
- This step will be a bottleneck. Please be courteous to your laboratory mates and do not go to the spectrophotometer until your samples are fully prepared and ready to be measured.
Quantify fermentation product yield
Please be sure to follow the appropriate protocol below.
Measuring ethanol yield
Prepare supernatants from overnight cultures
- Transfer the cultures from your aerobic tubes to fresh 15 mL conical tubes.
- Be sure to label your tubes!
- Pellet the bacterial cells in your cultures by centrifugation using the large centrifuge on the teaching faculty laboratory bench.
- Alert the teaching faculty when you are ready for centrifugation.
- Centrifuge your samples at 3000 rpm for 10 min.
- If the media is still ‘cloudy’ repeat the centrifugation step.
- Pipet 1000 μL of the supernatant from each 15 mL conical tube into a fresh 1.5 mL eppendorf tube.
- Be sure to label your tubes!
- Label 8 additional eppendorf tubes and generate 1:15 dilutions of each of your samples in a final volume of 300 μL.
- Use fresh LB as the diluent.
Prepare samples for standard curve
- Prepare a 1 nmole/μL stock ethanol solution:
- In an eppendorf tube labeled A, combine 808.7 μL of the Ethanol Assay Buffer with 50 μL of the 17.15 N Ethanol Standard to generate a 1 μmole/μL solution.
- In an eppendorf tube labeled B, combine 990 μL of Ethanol Assay Buffer with 10 μL of solution A (from tube A) to generate a 10 nmole/μL solution.
- In an eppendorf tube labeled C, combine 900 μL of Ethanol Assay Buffer with 100 μL of solution B (from tube B) to generate a 1 nmole/μL stock ethanol solution.
- Label 5 eppendorf tubes as follows: 2 nmole, 4 nmole, 6 nmole, 8 nmole, and 10 nmole. (These will be the amounts in 50 μL samples, as will make sense in a few minutes.) Use the following steps to prepare samples for your standard curve that contain the specified amounts of ethanol.
- In the 2 nmole tube, combine 144 μL of the Ethanol Assay Buffer with 6 μL of the 1 nmole/μL stock ethanol solution you generated in Step #1.
- In the 4 nmole tube, combine 138 μL of the Ethanol Assay Buffer with 12 μL of the 1 nmole/μL stock ethanol solution you generated in Step #1.
- Prepare the 6 nmole, 8 nmole, and 10 nmole tubes.
- Note: the amount of ethanol in each tube is three times as much as specified by the label because you are preparing enough for duplicate samples (ie the contents of each tube will be divided between two wells in your assay resulting in the appropriate amount of ethanol in each well).
Complete ethanol assay
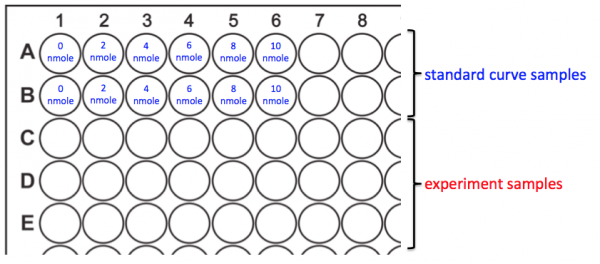
- You will prepare your assay plate according to the map above.
- Add 50 μL of the Ethanol Assay Buffer to wells A1 and B1. This is the 0 nmole/well sample for your standard curve.
- Add 50 μL of each of the remaining standard curve samples to the appropriate wells.
- Add 50 μL of your experimental samples according to the following order:
- To C1, D1 and E1 add MG1655 +O2 -aTc
- To C2, D2 and E2 add MG1655 -O2 -aTc
- To C3, D3 and E3 add MG1655 +O2 +aTc
- To C4, D4 and E4 add MG1655 -O2 +aTc
- To C5, D5 and E5 add MG1655 +CRISPRi +O2 -aTc
- To C6, D6 and E6 add MG1655 +CRISPRi -O2 -aTc
- To C7, D7 and E7 add MG1655 +CRISPRi +O2 +aTc
- To C8, D8 and E8 add MG1655 +CRISPRi -O2 +aTc
- Calculate the amount of Reaction Mix you will need for your assay using the following information:
- To account for pipetting error, you will add an additional 20% of each component to the mixture.
- You will add 50 μL of Reaction Mix to every well (supernatants and standard curve samples).
- The Reaction Mix consists of 46 μL of Ethanol Assay Buffer, 2 μL of Ethanol Probe, and 2 μL of Ethanol Enzyme Mix per 50 μL.
- Confirm your calculations with the teaching faculty before you proceed.
- Combine the appropriate amount of Ethanol Assay Buffer, Ethanol Probe, and Ethanol Enzyme Mix in a fresh, labeled conical tube.
- Add 50 μL of your Reaction Mix to each well in your 96-well plate that contains either standard or experimental samples.
- After each addition, use the pipet to mix the contents of the well.
- Be sure to change pipet tips between additions.
- Cover your 96-well plate tightly with aluminum foil and incubate at room temperature for 60 min.
- Alert the teaching faculty when your samples are ready for the spectrophotometer.
- Because the laboratory spectrophotometer is only able to measure a single sample in a cuvette, we will use a plate reader spectrophotometerto measure the A570 values for your assay.
Part 2: Analyze ethanol yield data
- Prepare a spreadsheet with the spectrophotometer values obtained for your assay.
- Average the technical replicates in your data set.
- Correct for the background ‘noise’ in your data by subtracting the averaged value of your 0 nmole/μL samples from the averaged values of all other samples.
- Plot the corrected values for your standard curve samples with the known concentration on the y-axis and the A570 (for ethanol) or A450 (for acetate) on the x-axis.
- Include the R-squared value and the equation of the best-fit line on your graph.
- Attach the graph to your Benchling laboratory notebook entry.
- Use the equation of the best-fit line to calculate the amount of fermentation produce in your experimental samples.
- For the ethanol and acetate assay: remember that you used a dilution of the supernatant in your assay!
- To calculate the concentration of product, use the following equation: Sa / Sv = C
- Sa = amount of fermentation product in unknown sample (nmole) from standard curve
- Sv = sample volume (μL) added to well
- C = concentration of fermentation product in sample
- The units of this calculation will be nmole/μL. For units of ng/μL use the molecular weight value of ethanol, which is 46.07 g/mol, or acetate, which is 60.05 g/mol.
- Lastly, normalize your data to the OD600 of your initial culture to account for difference in cell number.
- Divide the amount or concentration of fermentation produced by the OD value measured.
Reagents list
- Luria-Bertani (LB) broth: 1% tryptone, 0.5% yeast extract, and 1% NaCl
- chloramphenicol antibiotic (from Sigma)
- ampicillin antibiotic (from Sigma)
- anhydrotetracycline (aTc) (from Sigma)
- Ethanol Assay Kit (from Sigma)
- ethanol assay buffer
- ethanol probe
- ethanol enzyme
Next day: Examine genomic features in gRNA-targeted sequences
