20.109(F20):M1D5
From Course Wiki
Revision as of 17:00, 15 July 2020 by Noreen Lyell (Talk | contribs)

Part 2: Learn about the CometChip
As discussed in the prelab lecture, you will use two methods to assess DNA damage: the γH2AX assay and the CometChip. In the next laboratory session you will construct a CometChip; however, it is best to familiarize yourself with the procedure and assay before then.
Read the Abstract and Introduction in the following publication:
CometChip: A high-throughput 96-well platform for measuring DNA damage in microarrayed human cells. Journal of Visualized Experiments. (2014) 92: 1-11.
Answer the following questions (be sure to transfer the information to your laboratory notebook!):
- Why is it important to study DNA damage?
- You can consider the information provided in lecture / prelab to answer this question.
- How does the CometChip estimate the level of DNA damage within cells?
- List two issues / problems with the comet assay?
- List two improvements provided by the CometChip assay?
Next, watch the following video to help you prepare for the next laboratory session: linked here.
Part 2: Prepare CometChip
- Obtain a sheet of gelbond film from the laboratory bench at the front of the room. The paper is protecting the hydrophilic side of the gelbond film.
- Be sure to keep the paper associated with the gelbond film so you know which side is which.
- Also obtain a special permanent marker from the front bench (Secureline Marker II).
- If you use a marker from your drawer the ink will wash off during a later step in the CometChip assay protocol.
- Use the ruler in your team drawer and the Secureline permanent marker to draw a 4.5 x 3.5 cm rectangle near the center on the hydrophobic side of the gelbond film. Label three rows--'A', 'B', and 'C'--along the outside of the long side of the rectangle.
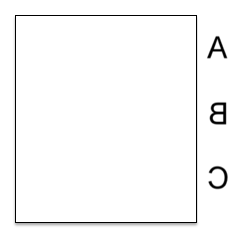 GelBond marking for CometChip
- Note: you are writing on what will be the bottom of the CometChip and may want to write backwards so the labels are clear when you look at the top of your CometChip.
- Prepare 20 mL of 1% normal melting point (NMP) agarose. Be careful as the agarose solution will be very hot!
- Calculate the amount of NMP agarose powder needed for a 1% w/v solution. Check your math with the teaching faculty before you continue.
- Obtain a small milk bottle from the front bench.
- Weigh out the appropriate amount of NMP agarose and add it to the milk bottle.
- Use a cylinder to measure 20 mL of 1x PBS and add it to the milk bottle with the NMP agarose powder.
- Swirl to mix.
- To melt the NMP agarose, microwave the solution for 20 seconds, swirl, then microwave for 3-second intervals until all crystals are in solutions. After each interval, remove the milk bottle and gently swirl while checking for unmelted agarose crystals. It is important that the solution does NOT boil as you will lose water to evaporation and the density of the agarose will be altered. If your solution starts to boil, immediately remove it from the microwave and gently swirl.
- When no more crystals are visible in the solution take the milk bottle to your bench.
- Obtain a small rectangle dish (labeled "scraped lid") and the CometChip 'stamp' from the front bench.
- Add 2.5 mL of the agarose solution to the small dish, then quickly place the gelbond film in the dish with the marked hydrophobic side down. Remove the paper from the film.
- Add 13 mL of the agarose solution on top of the gelbond film.
- Slowly place the CometChip stamp on top of the agarose.
- Lower the bottom left of the stamp first, then slowly allow the stamp to 'roll' into the agarose. Be sure to leave the top right corner of the small dish accessible.
- Be careful not to introduce bubbles into the agarose and work quickly as the agarose will solidify as it cools.
- Allow the agarose to solidify, undisturbed, on your bench for 30 min.
- Add ~5 mL of 1x PBS to the small dish that contains your agarose CometChip.
- Pipet in the 1x PBS using the accessible corner.
- Slowly pull from one corner of the stamp to lift it away from your CometChip in the dish.
- If the CometChip sticks to the stamp, carefully peel it off using tweezers.
- Discard the PBS in the sink.
- Remove excess agarose from the perimeter of your CometChip using a razor blade (obtain and return razor blade to front bench).
- Clean the agarose from the bottom of your CometChip (gelbond side) using a Kimwipe.
- Place your CometChip in the small dish containing 1x PBS for storage at 4 °C until next time.
- Be sure the chip is completely submerged.
- Please return the stamp to the front bench. Never wipe the stamp as that will ruin the microposts!

Part 3: Load CometChip
- Retrieve your CometChip from the 4 °C cooler.
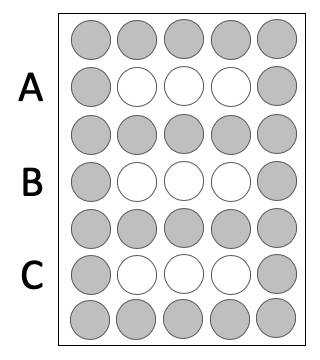 CometChip diagram showing well alignment.
- You will also need to gather one glass plate, one 96-well bottomless plate, and four 1.5" binder clips from the front bench.
- Remove your CometChip from the 1x PBS and place it, gelbond side down, on the glass plate.
- Press the 96-well bottomless plate upside-down onto the CometChip so that the wells line up with your labeling as shown in the diagram on the right.
- Be sure to press the top of the 96-well bottomless plate onto the CometChip. If you are unsure which side is the top, please ask the teaching faculty.
- Do not move the 96-well bottomless plate while it is on the CometChip as you will damage the agarose and the microwells.
- Use the binder clips to secure the 96-well bottomless plate to the glass plate, thus creating a 'sandwich' with your CometChip in the center.
- Fasten the binder clips to the very edge of 96-well bottomless plate as shown in the image below.
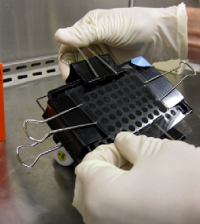 Binder clip placement for CometChip sandwich.
 - You will load into the white wells and the grey wells should remain empty.
- Fasten the binder clips to the very edge of 96-well bottomless plate as shown in the image below.
- Add 50 μL of 1x PBS to the Condition A wells.
- Add the appropriate volume of your cell suspension (calculated in Part #2) to the Condition B and C wells.
- Cover the top of your CometChip with plastic wrap then incubate in the 37 °C incubator in the main laboratory for 15 min.
- After the incubation, complete a wash step to remove excess cells that are not within the microwells of your CometChip. Read all the bullets below before proceeding!
- Carefully remove the binder clips and the 96-well bottomless plate.
- Alert the teaching faculty at this point! The wash step can be very temperamental and it is best to see a demonstration!
- With the CometChip on the glass plate, 'waterfall' ~5 mL of 1x PBS over the wells, which are now imprinted onto the agarose.
- Hold the glass plate with the CometChip such that Condition C is at the bottom.
- To waterfall the 1x PBS, hold the glass plate at a 45° angle over the dish that you used to store your CometChip.
- Pipet up ~5 mL of 1x PBS.
- Press the pipet tip onto the glass plate above your CometChip.
- As you expel the 1x PBS, move the pipet tip from left-to-right.
- The 1x PBS should pass over the top of the CometChip and fall into the dish.
- Use a P200 tip attached to the pasteur pipet to aspirate the excess liquid from your CometChip wells.
- Lightly touch the tip to the bottom of each imprinted well on the CometChip and immediately lift the tip from the agarose.
- Read through Steps #11-14 before continuing with the procedure.
- Retrieve one tube of molten 1% low melting point (LMP) agarose from the 42 °C waterbath.
- You will need to work quickly from this point as the LMP agarose will solidify as it cools.
- Using the P1000, pipet up 1000 μL of molten agarose from the tube.
- Hold the pipet tip over the top left well of your CometChip and as you expel the agarose move the pipet tip from left to right. Ensure that each row of your CometChip gets covered.
- The goal is to lightly cover the wells that contain cells, which will 'trap' the cells into the microwells.
- If the LMP agar 'fell' off the CometChip in any areas during this process, it is important to 'fill in' those portions of the CometChip. Please alert the teaching faculty if you experience any difficulties!
- Leave your CometChip undisturbed on the benchtop for 3 min then carefully move it to the 4 °C cooler for 5 min to ensure the LMP agarose solidifies.
- Use the microscope in the main laboratory to image your CometChip. You will use these images to determine: 1. the number of microwells that are loaded / total number of microwells in the frame and 2. the number of cells / microwell.


CometChip
- agar, low melting point (from Invitrogen)
- phosphate buffered saline (PBS) (from VWR)