20.109(F16):Confirm gRNA sequence (Day5)

Contents
Introduction


The invention of automated sequencing machines has made sequence determination a relatively fast and inexpensive endeavor. The method for sequencing DNA is not new but automation of the process is recent, developed in conjunction with the massive genome sequencing efforts of the 1990s. At the heart of sequencing reactions is chemistry worked out by Fred Sanger in the 1970s which uses dideoxynucleotides (see schematic above left). These chain-terminating bases can be added to a growing chain of DNA but cannot be further extended. Performing four reactions, each with a different chain-terminating base, generates fragments of different lengths ending at G, A, T, or C. The fragments, once separated by size, reflect the DNA’s sequence. In the “old days” (all of 15-20 years ago!) radioactive material was incorporated into the elongating DNA fragments so they could be visualized on X-ray film (image above center). More recently fluorescent dyes, one color linked to each dideoxy-base, have been used instead. The four colored fragments can be passed through capillaries to a computer that can read the output and trace the color intensities detected (image above right). Your sample was sequenced in this way by Genewiz on an ABI 3730x1 DNA Analyzer.
Analysis of sequence data is no small task. “Sequence gazing” can swallow hours of time with little or no results. There are also many web-based programs to decipher patterns. The nucleotide or its translated protein can be examined in this way. Thanks to the genome sequence information that is now available, a new verb, “to BLAST,” has been coined to describe the comparison of your own sequence to sequences from other organisms. BLAST is an acronym for Basic Local Alignment Search Tool, and can be accessed through the National Center for Biotechnology Information (NCBI) home page.
Protocols
Part 1: Mini-prep pgRNA_target clones
The procedure for DNA isolation using small volumes is commonly termed "mini-prep," which distinguishes it from a “maxi-prep” that involves a larger volume of cells and additional steps of purification. The overall goal of each prep is the same -- to separate the plasmid DNA from the chromosomal DNA and cellular debris. In the traditional mini-prep protocol, the media is removed from the cells by centrifugation. The cells are resuspended in a solution that contains Tris to buffer the cells and EDTA to bind divalent cations in the lipid bilayer, thereby weakening the cell envelope. A solution of sodium hydroxide and sodium dodecyl sulfate (SDS) is then added. The base denatures the DNA, both chromosomal and plasmid, while the detergent dissolves the cellular proteins and lipids. The pH of the solution is returned to neutral by adding a mixture of acetic acid and potassium acetate. At neutral pH the SDS precipitates from solution, carrying with it the dissolved proteins and lipids. In addition, the DNA strands renature at neutral pH. The chromosomal DNA, which is much longer than the plasmid DNA, renatures as a tangle that gets trapped in the SDS precipitate. The plasmid DNA renatures normally and stays in solution. Thus plasmid DNA got effectively separated from chromosomal DNA and proteins and lipids of the cell.
Today you will use a kit that relies on a column to collect the renatured plasmid DNA. The silica gel column interacts with the DNA while allowing contaminants to pass through the column. This interaction is aided by chaotropic salts and ethanol, which are added in the buffers. The ethanol dehydrates the DNA backbone allowing the chaotropic salts to form salt bridge between the silica and the DNA.
- Pick up your two cultures, which are growing in test tubes labeled with your team color. Label two eppendorf tubes to reflect your samples (target 1 and 2).
- Vortex the bacteria and pour ~1.5 mL of each candidate into an eppendorf tube.
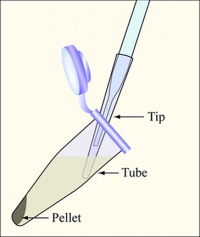 Diagram showing how to aspirate the supernatant. Be careful to remove as few cells as possible.
- Balance the tubes in the microfuge, spin them at maximum speed for 2 min, and remove the supernatants with the vacuum aspirator.
- Pour another 1.5 mL of culture onto the pellet, and repeat the spin step.
- Resuspend each cell pellet in 250 μL buffer P1.
- Buffer P1 contains RNase so that we collect only our nucleic acid of interest, DNA.
- Add 250 μL of buffer P2 to each tube, and mix by inversion until the suspension is homogeneous. About 4-6 inversions of the tube should suffice. You may incubate here for up to 5 minutes, but not more.
- Buffer P2 contains sodium hydroxide for lysing.
- Add 350 μL buffer N3 to each tube, and mix immediately by inversion (4-10 times).
- Buffer N3 contains acetic acid, which will cause the chromosomal DNA to messily precipitate; the faster you invert, the more homogeneous the precipitation will be.
- Buffer N3 also contains a chaotropic salt in preparation for the silica column purification.
- Centrifuge for 10 minutes at maximum speed. Note that you will be saving the supernatant after this step.
- Meanwhile, prepare 2 labeled QIAprep columns, one for each candidate clone, and 2 trimmed eppendorf tubes for the final elution step.
- Transfer the entire supernatant to the column and centrifuge for 1 min. Discard the eluant into a tube labeled 'Qiagen waste'.
- Add 0.5 mL PB to each column, then spin for 1 min and discard the eluant into the Qiagen waste tube.
- Next wash with 0.75 mL PE, with a 1 min spin step as usual. Discard the ethanol in the Qiagen waste tube.
- After removing the PE, spin the mostly dry column for 1 more minute.
- It is important to remove all traces of ethanol, as they may interfere with subsequent work with the DNA.
- Add 30 μL of distilled H2O pH ~8 to the top center of the column, wait 1 min, and then spin 1 min to collect your DNA.

Part 2: Transform CRIPSRi system into MG1655 E. coli cells
Part 3: Prepare pgRNA clones for sequencing analysis
Just like amplification reactions require a primer for initiation, primers are also needed for sequencing reactions. Legible readout of the gene typically begins about 40-50 bp downstream of the primer site, and continues for ~1000 bp at most. Thus, multiple primers must be used to fully view genes > 1 kbp in size. How many basepairs long is inverse pericam? Luckily, we only care about the back end of IPC, i.e. the part containing calmodulin, and therefore only need two primers to confirm our mutations: one primer will sequence in the forward direction and the second in the reverse direction to ensure complete coverage of the CaM gene.
The primers you will use today are below:
| Primer | Sequence (5' - 3') |
|---|---|
| gRNA confirmation forward primer | 5' - GGG TTA TTG TCT CAT GAG CGG ATA CAT ATT TG - 3' |
| gRNA confirmation reverse primer | 5' - CGC GGC CCT TTT TAC GGT TC - 3' |
Use your APE file of IPC from M1D1 to determine where these primers anneal within the sequence. How many basepairs upstream and downstream of CaM do IPC_F and IPC_R, respectively, anneal?
The recommended composition of sequencing reactions is ~800 ng of plasmid DNA and 25 pmoles of sequencing primer in a final volume of 15 μL. The miniprep'd plasmid should have ~300 ng of nucleic acid/μL but that will be a mixture of RNA and DNA, so we will estimate the amount appropriate for our reactions.
Because you will examine the sequence of your potential mutants with both the IPC_F and IPC_R primers, you will need to prepare two reactions for each candidate. Thus you will have a total of four sequencing reactions. For each reaction, combine the following reagents directly in the appropriate tube within the 8-PCR-tube strip, as noted in the table below:
- 6 μL nuclease-free water
- 4 μL of your plasmid DNA candidate
- 5 μL of the primer stock on the teaching bench (the stock concentration is 5 pmol / μL)
- Please add the forward primer to the odd numbered tubes and the reverse primer to the even numbered tubes (i.e. tube #1 contains mutant #1 plasmid DNA and IPC_F primer, tube #2 contains mutant #1 plasmid DNA and IPC_R primer, etc).
The side of each tube is numerically labeled and you should use only the four tubes assigned to your group. The teaching faculty will turn in the strips at the Genewiz company drop-off box for sequencing.
| T/R | Tubes | W/F |
|---|---|---|
| Red | 1-4 | Red |
| Orange | 5-8 | Orange |
| Yellow | 9-12 | Blue |
| Green | 13-16 | Pink |
| Blue | 17-20 | Purple |
| Pink | 21-24 | |
| Purple | 25-28 |
Reagents
Next day: Journal club II
Previous day: Journal club I