Bryan Hernandez/20.109/Lab notebook/Module 1/Day 4

Contents
Examine Candidate Clones
--|Bryanh 17:07, 21 February 2007 (EST)
Purpose:we want to verify that our clones worked. in other words, we need to make sure that our experiment worked at that we actually put the new insert into the m13k07 backbone with the engineered myc site that is contained in it.
Protocol
Sometime before you leave today you should count or estimate the number of colonies that arose from your transformation reactions. If the number of colonies is high, you can sector the plate (using a Sharpie to draw sections that are 1/4 or 1/8th of the area) and count only the colonies in a sector, then multiplying to determine the total.
calculations:
dense sector: 209
sparse sector: 34
average:121.5
8 sectors x 121.5 colonies/sector = 972 colonies
Part 1: Plasmid miniprep
One of the teaching faculty has set up four overnight LB + kan cultures of bacteria for you to work with. If your reactions were unsuccessful then you have been provided with candidates from other reactions.
- Label four eppendorf tubes (1, 2, 3 or 4). Vortex the bacteria then pour some into the appropriate eppendorf tube so that the tubes are almost full. If you are nervous about pouring the liquid, you can use your P1000 to pipet 750 ul into each eppendorf twice. Either way, the eppendorf should be quite full when you try to close the cap. You can wear gloves to keep the bacteria from splashing your skin or you can wash your hands after closing all the caps.
- Return any remaining volume of cells to the teaching faculty, who will store them for you for next time.
- Balance the eppendorf tubes in the microfuge, and then spin them for one minute.
- Aspirate the supernatant, as shown, removing as few cells as possible.
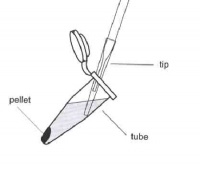 Aspirate the supernatant, as shown, removing as few cells as possible.
- Resuspend the cells in 100 ul of Solution I, changing tips between samples.
- Prepare Solution II by mixing 500 ul of 2% SDS with 500 ul of 0.4M NaOH in an eppendorf tube. Add 200 ul of Solution II to each sample and invert the tubes five or six times to mix. In some cases the samples may appear to "clear" but don't worry if you don't see a big change. Place the tubes on ice for five minutes.
- Add 150 ul of Solution III to each tube and immediately vortex each tube for 10 seconds with your vortex set at the highest setting. White clumps should appear in the solution after you vortex it. Place the tubes in the room temperature microfuge and spin them for 4 minutes.
- While the tubes are spinning, label another set of eppendorf tubes with the plasmid names and your team color.
- A white pellet should be visible when you remove your tubes from the microfuge. Use your P1000 to transfer 400 ul of each supernatant to the appropriate clean eppendorf tube. It's OK to leave some of the supernatant behind. Avoid transferring any of the white pellet.
- Add 1000 ul of room temperature 100% ethanol to each new tube. The tubes will be quite full. Close the caps and invert the tubes at least five times to thoroughly mix the contents.
- Microfuge the samples for 2 minutes. It is important to orient your tubes in the microfuge this time since the pellets from this spin will be barely visible.
- Remove the supernatants using your P1000 or the aspirator, but be careful not to disturb the pellet of plasmid DNA that is at the bottom of the tube. Remove as much of the supernatant as possible but you do not need to remove every drop since you will be washing the pellet in the next step.
- Add 500 ul of 70% ethanol to each pellet. Spin the samples one minute, orienting the tubes in the microfuge so you will know where to find the pellet. Immediately remove the supernatant with your P1000, making sure to keep the tip on the side of the tube that doesn't have your pellet. Remove as much liquid as possible, using your P200 set to 100 ul, to remove the last few droplets.
- To completely dry the pellets, place your rack in the hood with the caps open for a few minutes. When the pellets are completely dry, add 50 ul of sterile water to each sample and vortex each tube for 2 X 30 seconds to completely dissolve the pellets. The liquid can be brought back to the bottom of the tubes by spinning them in the microfuge for a few seconds. Store the DNA on ice.

Part 2: Diagnostic digests
You will perform two diagnostic digests on each of the plasmids you have prepared to see if any have the PCR insert. Use information from the lab manual, the NEB catalog and the plasmid maps you���ve drawn to choose the enzymes you���ll use. The following table may be helpful as you plan your work.
| Digest 1 | Digest 2 | |
|---|---|---|
| Plasmid DNA | 5 uL | 5 uL |
| 10X NEB buffer | 2.5 ul of buffer# 2 | 2.5 ul of buffer# 2 |
| Enzyme | 0.25 ul of BbsI | 0.25 ul of PstI |
| 2nd Enzyme | 0.25 ul of HindIII | 0.25 ul of HindIII |
| H2O | 17uL H2O | |
- Prepare two reaction cocktails with water, buffer and enzyme. Prepare enough of each cocktail for 5 digests. Leave the cocktails on ice.
- Aliquot 5 ul of plasmids into well labeled eppendorf tubes. The labels should include the plasmid name, the enzymes to be added and your team color.
- Add 20 ul of each cocktail to each tube. Flick the tubes to mix the contents then incubate the tubes at 37°C, for 30 minutes. When your samples are digesting, you should re-read the Refactoring T7 paper that we will discuss, focusing on one aspect of the article (figure 1, 2, 3 or 4, Supplementary Table 2, Supplementary Figure 1) that you will be assigned and that you will present to the class.
- Add 2 ul of loading dye to each of the digests you have assembled.
Part 3: Agarose Gel Electrophoresis
Load your samples on a 1% TAE agarose gel in the following order
| Lane | Sample | Volume to load |
|---|---|---|
| 1 | 1 kb Marker | 5 ul |
| 2 | Candidate 1, diagnostic digest 1 | all of reaction volume (~30ul) |
| 3 | Candidate 2, diagnostic digest 1 | all of reaction volume (~30ul) |
| 4 | Candidate 3, diagnostic digest 1 | all of reaction volume (~30ul) |
| 5 | Candidate 4, diagnostic digest 1 | all of reaction volume (~30ul) |
| 6 | empty | |
| 7 | Candidate 1, diagnostic digest 2 | all of reaction volume (~30ul) |
| 8 | Candidate 2, diagnostic digest 2 | all of reaction volume (~30ul) |
| 9 | Candidate 3, diagnostic digest 2 | all of reaction volume (~30ul) |
| 10 | Candidate 4, diagnostic digest 2 | all of reaction volume (~30ul) |
Once all the samples are loaded, the power will be applied (100V for 45 minutes) and the gel will be photographed. While you are waiting, the class will discuss the T7 paper.
red(btm)WF.jpg)
summary/interpretation
- The previous gel is kind of hard to interpret. for a positive result we'd expect the first four lanes (after the ladder) to have two bands: 2.7kb and 6kb. There are three bands in the first three lanes. These three clones look to be identical since each has three identical bands. From largest to smallest, these appear to be: singly cut plasmid, doubly cut backbone, and insert. This would be a positive result if the negative control came out negative, but it didnt. The corresponding negative control lanes (7-9) come up positive as they look nearly identical to the positive control lane with three bands. This most likely means that there are both BbsI and PstI sites still in the plasmid, which is not good.
We are going to go ahead with clone #3 (lane 4) since it is the brightest and is at least partiallyl consistent to what we were expecting.
For next time
- Prepare a table with the results of your ligations and transformations. Calculate your transformation efficiency (# colonies/μg plasmid DNA) based on the transformation you performed with M13K07. In three or four sentences, interpret the ligation results.
ligations/transformation results
| bkb, no ligase | bkb, ligase | bkb, insert, ligase | m13k07 positive control | ||
|---|---|---|---|---|---|
| colonies | 0 | 2 | 3 | 972 |
transformation efficiency:
$ \emph (5*10^-3ug DNA)/(972colonies)=194400colonies/ug DNA $
- bkb, no ligase: this negative control was successful. we expected no colonies and got no colonies, which confirms that that we actually cut the bkb.
- we only got a few colonies here which means that the parent vector content was probably pretty low. This might be why our experiment clones werent that successful.
- this ligation was poor. we only got 3 colonies. I feel very doubtful that these clones are correct, in fact. I'm thinking that the backbone simply closed back on itself or more probably, we did not have enough backbone.
- positive control was successful because it showed a high transformation efficiency. This means that there was probably nothing wrong with out competent cells or transformation process. I'm guessing that the digestion and ligation steps are where this protocol could be optimized the most.
- Refactor the M13K07 genome from the unique HpaI site in gene II through the unique BamHI site in gene III, guided by the algorithm described in the Refactoring T7 paper Supplementary Figure 1. Start by making a new part of this region on the Registry of Standard Biological Parts (note: allowed names for new parts from our class must fall between BBa_M30000 to BBa_M31999) and then fully annotating the M13K07 sequence across this region. Include component descriptions for all genetically encoded functions. Be sure to separately specify any new parts(s) that can be used to define the M13.1 sequence. If there are particular aspects of the M13K07 sequence that cannot be edited, start a table to list these, describing the design impass in sufficient detail that someone unfamiliar with our work might understand enough to help. Finally, describe the refactoring work you've done in paragraph and table form, ideally working from your wiki user page, to hand in next time. The table should include information about your annotated M13K07 entry as well as any new part(s) you've designed.
Reagents list
- Solution I
- 25 mM Tris pH8
- 10 mM EDTA pH8
- 5 mM Glucose
- Solution II
- 1% SDS
- 0.2M NaOH
- Solution III
- 3M KAc, pH 4.8