20.109(S23):M2D3

Contents
Introduction
In the previous laboratory session, you performed the procedure used to generate the Fet4_mutant plasmids. Today, we will confirm that the mutagenesis worked and transform the mutated plasmids into our W303α yeast to test the functionality of the mutated transporter. We are able to move our mutated Fet4 between organisms because we are using a "shuttle vector" to express the DNA. The shuttle vector has features that allow it to be selectively expressed in both bacteria and yeast.
In order to identify mutations and create purified plasmid for yeast transformation, we need to isolate Fet4_mutant plasmids from the E. coli system used to amplify a single plasmid clone generated during the last class. To purify the plasmid, we will perform a mini-prep. This plasmid preparation protocol uses alkaline lysis to separate the plasmid DNA from the chromosomal DNA and cellular debris, allowing the plasmid DNA to be studied further. The key difference between plasmid DNA and chromosomal DNA is size and this difference is what is used to separate the two components.

In this protocol the media is removed from the cells by centrifugation. The cells are first resuspended in a solution that contains Tris, to buffer the cells, and EDTA to bind divalent cations in the lipid bilayer, thereby weakening the cell envelope. Second, an alkaline lysis buffer containing sodium hydroxide and the detergent sodium dodecyl sulfate (SDS) is added. The base denatures the cell’s DNA, both chromosomal and plasmid, while the detergent dissolves the cellular proteins and lipids. Third. the pH of the solution is returned to neutral by adding a mixture of acetic acid and potassium acetate. At neutral pH the SDS precipitates from solution, carrying with it the dissolved proteins and lipids. The DNA strands renature at neutral pH. The chromosomal DNA, which is much longer than the plasmid DNA, renatures as a tangle that gets trapped in the SDS precipitate. The smaller plasmid DNA renatures normally and stays in solution, effectively separating plasmid DNA from the chromosomal DNA and the proteins and lipids of the cell. At this point the solution is spun at a high speed and soluble fraction, including the plasmid, is kept for further purification and the insoluble fraction, the macromolecules and chromosomal DNA is pelleted and thrown away. Following these steps there are several more washes to purify the plasmid DNA but the major purification work, separating the plasmid from the chromosomal DNA and cell lysate, is completed by the three steps shown in the figure.
Protocols
Part 1: Mini-prep Fet4_mutant clones
The procedure for DNA isolation using small volumes is commonly termed "mini-prep," which distinguishes it from a “maxi-prep” that involves a larger volume of cells and additional steps of purification. The overall goal of each prep is the same -- to separate the plasmid DNA from the chromosomal DNA and cellular debris. In the traditional mini-prep protocol, the media is removed from the cells by centrifugation. The cells are resuspended in a solution that contains Tris to buffer the cells and EDTA to bind divalent cations in the lipid bilayer, thereby weakening the cell envelope. A solution of sodium hydroxide and sodium dodecyl sulfate (SDS) is then added. The base denatures the DNA, both chromosomal and plasmid, while the detergent dissolves the cellular proteins and lipids. The pH of the solution is returned to neutral by adding a mixture of acetic acid and potassium acetate. At neutral pH the SDS precipitates from solution, carrying with it the dissolved proteins and lipids. In addition, the DNA strands renature at neutral pH. The chromosomal DNA, which is much longer than the plasmid DNA, renatures as a tangle that gets trapped in the SDS precipitate. The plasmid DNA renatures normally and stays in solution. Thus plasmid DNA got effectively separated from chromosomal DNA and proteins and lipids of the cell.
Today you will use a kit that relies on a column to collect the renatured plasmid DNA. The silica gel column interacts with the DNA while allowing contaminants to pass through the column. This interaction is aided by chaotropic salts and ethanol, which are added in the buffers. The ethanol dehydrates the DNA backbone allowing the chaotropic salts to form a salt bridge between the silica and the DNA.
For timing reasons, two colonies from the spread plates you prepared in the previous laboratory session were inoculated into LB/Amp and grown overnight at 37°C on a rotator.
- Retrieve your two cultures from the font laboratory bench. Label two eppendorf tubes to reflect your samples (Fet4_mutant#1 and Fet4_mutant#2).
- Vortex the bacterial cultures and pour ~1.5 mL of each into the appropriate eppendorf tube.
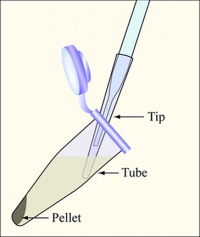 Diagram showing how to aspirate the supernatant. Be careful to remove as few cells as possible.
- Balance the tubes in the microfuge, spin them at maximum speed for 2 min, and remove the supernatants with the vacuum aspirator.
- Pour another 1.5 mL of each culture into the appropriate eppendorf tube (add the culture to the pellet previously collected), and repeat the spin step. Repeat until you use up the entire volume of culture.
- Resuspend each cell pellet in 250 μL buffer P1.
- Buffer P1 contains RNase so that we collect only our nucleic acid of interest, DNA.
- Add 250 μL of buffer P2 to each tube, and mix by inversion until the suspension is homogeneous. About 4-6 inversions of the tube should suffice. You may incubate here for up to 5 minutes, but not more.
- Buffer P2 contains sodium hydroxide for lysing.
- Add 350 μL buffer N3 to each tube, and mix immediately by inversion (4-10 times).
- Buffer N3 contains acetic acid, which will cause the chromosomal DNA to messily precipitate; the faster you invert, the more homogeneous the precipitation will be.
- Buffer N3 also contains a chaotropic salt in preparation for the silica column purification.
- Centrifuge for 10 minutes at maximum speed. Note that you will be saving the supernatant after this step.
- Meanwhile, prepare 2 labeled QIAprep columns, one for each candidate clone, and 2 trimmed eppendorf tubes for the final elution step.
- Transfer the entire supernatant to the column and centrifuge for 1 min. Discard the eluant into a tube labeled 'Qiagen waste'.
- Add 0.5 mL PB to each column, then spin for 1 min and discard the eluant into the Qiagen waste tube.
- Next wash with 0.75 mL PE, with a 1 min spin step as usual. Discard the ethanol in the Qiagen waste tube.
- After removing the PE, spin the mostly dry column for 1 more minute.
- It is important to remove all traces of ethanol, as they may interfere with subsequent work with the DNA.
- Transfer each column insert (blue) to the trimmed eppendorf tube you prepared (cut off lid).
- Add 30 μL of distilled H2O pH ~8 to the top center of the column, wait 1 min, and then spin 1 min to collect your DNA.
- Cap the trimmed tube or transfer elution to new eppendorf tube.
- Alert the Instructor when you are ready to measure the concentration of DNA in your mini-prep.

In your laboratory notebook, complete the following:
- Record the concentration for each of the mini-prep you prepared.
- Record the 260/280 ratio for of the mini-preps you prepared. What does this value indicate about the purity of the DNA in your mini-preps?
Part 2: Transform mutated plasmid into W303α yeast cells
Following DNA production by competent bacteria, the next step is moving the plasmid to our yeast model system for experimentation. To do this, we create competent W303α cells and use a proprietary chemical transformation procedure to insert our newly created mutations. Yeast that have successfully been transformed are selected by utilizing plates that are made with synthetic dropout media, allowing only yeast expressing our plasmid to survive.
During transformation, a plasmid enters a competent yeast, then replicates and expresses the encoded genes. Following the transformation procedure, a mixed population of cells exists as shown in the figure to the right: some cells did not uptake the plasmid (light blue cells) while others contain the plasmid that carries the cassette allowing for uracil production (dark blue cells), Because the agar plate used for selection does not contain a uracil supplement, only bacterial cells that harbor the plasmid survive and reproduce to form a colony.
Most yeast do not usually exist in a “transformation ready” state, referred to as competence. Instead yeast cells are incubated with LiAc to promote competency by making the cells permeable to plasmid DNA uptake. Competent cells are extremely fragile and should be handled gently, specifically the cells should be kept cold and not vortexed. The transformation procedure is efficient enough for most lab purposes, but much lower than bacterial transformation efficiency. Bacterial efficiencies can be as high as 109 transformed cells per microgram of DNA, while yeast transformation using lithium cations tends to peak at 106 transformed cells per microgram of DNA.
You will transform each of your mini-prepped Fet4 mutant plasmids into W303α yeast, which is the strain we will use to examine the effect of your approach on cadmium uptake.
- Label two 1.5 mL eppendorf tubes with your team information and clone designation (Fet4_mut#1 and Fet4_mut#2).
- Acquire an aliquot of the competent W303α yeast (prepared by the Instructors) from the front laboratory bench.
- Pipet 50 μL of the W303α competent cells into each labeled eppendorf tube.
- Remember: it is important to keep the competent cells on ice! Also, avoid over pipetting and vortexing!
- Add 5 μL of each Fet4 mutant candidate clone mini-prep to the appropriate eppendorf tube.
- Add 500 μL Solution 3 and mix gently by flicking the tube.
- Incubate your transformation mixes at 30 °C for 45 min, gently mixing 2-3 times throughout the incubation.
- Once you have begun the incubation, retrieve and label one SD-U plate for each transformant. Be sure to include transformant number, your team/section, and the date on each plate.
- Retrieve your transformations from the incubator and alert the teaching faculty that you are ready to plate your samples.
- Plate 150μL of each co-transformation onto an appropriately labeled SD-U agar plate.
- The teaching faculty will demonstrate how you should 'spread' your co-transformation onto the SD-U agar plates. You should include this procedure in your laboratory notebook.
- Incubate your spread plates in the 30 °C incubator for 2-4 days.
Part 3: Prepare Fet4 mutant clones for sequencing analysis
DNA sequencing will be used to confirm that the site-directed mutagenesis is correct. The invention of automated sequencing machines has made sequence determination a relatively fast and inexpensive process. The method for sequencing DNA is not new but automation of the process is recent, developed in conjunction with the massive genome sequencing efforts of the 1990s and 2000s. At the heart of sequencing reactions is chemistry worked out by Fred Sanger in the 1970s which uses dideoxynucleotides, or chain-terminating bases. These chain-terminating bases can be added to a growing chain of DNA but cannot be further extended. Performing four reactions, each with a different chain-terminating base, generates fragments of different lengths ending at G, A, T, or C. The fragments, once separated by size, reflect the DNA sequence due to the presence of fluorescent dyes, one color linked to each dideoxy-base. The four colored fragments can be passed through capillaries to a computer that can read the output and trace the color intensities detected.

Just as amplification reactions require a primer for initiation, primers are also needed for sequencing reactions. Legible readout of the gene typically begins about 40-50 bp downstream of the primer site, and continues for ~1000 bp at most. Thus, multiple primers must be used to fully view genes > 1 kb in size. Though the target sequence for your point mutation is shorter than 1000 bp, we will sequence with both a forward and reverse primer to double-check that the sequence is correct (i.e. free of unwanted mutations).
Because the Fet4 sequence cannot be fully encompassed by a single Sanger sequencing reaction, we have created a series of primers that flank different regions of the sequence. You will be able to see the placement of the primers on our Fet4 plasmid in this Snapgene file. The sequences are also listed below. Locate the region of your putative mutation in the Fet4 sequence and identify an appropriate forward and reverse primer that will allow you to sequence the region containing your mutation.
The sequences for the primers you will use to confirm your Fet4_mutant insert are below:
| Primer | Sequence |
|---|---|
| Fet4 Sequencing primer 1_Fwd | 5' - CCT CTA TAC TTT AAC GTC AAG GAG - 3' |
| Fet4 Sequencing primer 2_Fwd | 5' - CAA CAG TTG ATG AGT ACG C - 3' |
| Fet4 Sequencing primer 2_Rev | 5' - GCG TAC TCA TCA ACT GTT G - 3' |
| Fet4 Sequencing primer 3_Fwd | 5' - GGG CTA GAC ATG ATT ATT TCA CG - 3' |
| Fet4 Sequencing primer 3_Rev | 5' - CGT GAA ATA ATC ATG TCT AGC CC - 3' |
| Fet4 Sequencing primer 4_Fwd | 5' - ACT ATT GGT TAC AGA ACA TCC C - 3' |
| Fet4 Sequencing primer 4_Rev | 5' - GGG ATG TTC TGT AAC CAA TAG - 3' |
| Fet4 Sequencing primer 5_Rev | 5' - GAA TCG AGA CCG AGG AG - 3' |
Because you will examine the Fet4 sequence in your using both a forward and a reverse primer, you will need to prepare two reactions for each mini-prep. Thus you will have a total of four sequencing reactions. For each reaction, combine the following reagents in a clearly labeled eppendorf tube:
- 12 μL nuclease-free water
- 8 μL of your plasmid DNA candidate
- 10 μL of the primer stock from the front laboratory bench (the stock concentration is 5 pmol/μL)
In your laboratory notebook, complete the following:
- Calculate the quantity (in ng) of DNA in each of the sequencing reactions.
- Calculate the final concentration of sequencing primer in each reaction.
Reagents list
- QIAprep Spin Miniprep Kit (from Qiagen)
- buffer P1
- buffer P2
- buffer N3
- buffer PB
- buffer PE
- Frozen-EZ Yeast Transformation II Kit (from Zymo Research)
- Solution 3
- Chemically competent W303α (genotype: MATa/MATα {leu2-3,112 trp1-1 can1-100 ura3-1 ade2-1 his3-11,15} [phi+])
- SD-U plates
- Synthetic dropout - uracil (SD-U) media: 0.17% yeast nitrogen base without amino acid and ammonium sulfate (BD Bacto), 0.5% ammonium sulfate (Sigma), 0.192 % amino acid mix lacking uracil (Sigma), 2% glucose (BD Bacto), 0.1% adenine hemisulfate (Sigma)
- Plates prepared by adding 2% agar (BD Bacto) to SD media
Next day: Determine transporter mutation and expression experiment