20.109(F08): Phage nanowires
pic.jpg)
Contents
Introduction
The metal iridium has an interesting history as much for the things it hasn���t done as for the things it has. As one of the most corrosion-resistant metals known, it was forged with platinum into the bar that stood for years as the meter standard. In addition, iridium is one of the most brittle materials known, making it a suitable hardening agent for that platinum meter bar but also making pure iridium nearly impossible to machine. Finally, iridium is awfully hard to get unless you catch space dust. It is thought to be concentrated in the earth���s molten core but is only rarely found in the earth���s crust. Interestingly, there is a 30-fold enriched for iridium in the layer of clay that marks the end of the planet���s Cretaceous period. This enrichment led the father and son team of Luis and Walter Alvarez to suggest in the 1970s that the dinosaurs died when a giant asteroid struck the earth, releasing an iridium-dense cloud that blocked the sunlight before settling over time. The enrichment of iridium in this clay layer could also be explained by a massive volcanic eruption (or series of them) that released iridium from the molten core. When Jurassic Park opens for real, perhaps there will be a way to find out from the dinosaurs themselves how the iridium came to rest in this clay layer.

The name iridium is derived from the latin word for rainbow, iris, and it���s the colorful properties of this uncorrosive, unmachinable, dinosaur killing metal that���s relevant for our work in this module. Iridium, when oxidized to IrO2, has a d-orbital conductance band [1] rather than the usual s or p-orbital band that is associated with other oxides, such as indium tin oxide (ITO). The populated d-orbital makes this chemical species electrochromic, that is it will change color from purple to colorless when charge is applied. The particular usefulness of IrO2 over other inorganic electrochromic oxides is its switch speed, which is on the order of 10 msec for sputtered IrO2. And while faster switch speeds and greater contrast may be needed for future applications such as electronic paper [2], nature has given a good starting substrate to optimize.


One optimization strategy is to organize the IrO2 into crystals. Such a nanoscale highly ordered structure could improve the natural switch speed. Growing crystals in the lab requires as much art as it does skill. This is because odds are very low that two molecules might collide with the precise energy needed to nucleate the crystal formation and only select conditions enable crystals to grow from that newly formed nucleus. Think of that on the next snowy day. There are two tricks we will use to order IrO2 into semi-crystalline nanowires. First is the use of M13 as a template. The ordered and polyvalent p8 coat protein provides ~900 nm of real estate for ordered iridium binding to occur. Second is the use of charge pulses to ���activate��� the iridium salt into charged iridium ions. Neither treatment alone would be expected to yield measurable quantities of IrO2 nanowires, but combined there are sufficient events to be detected���as you will see by TEM next time.
Protocols
Part 1: Dilute the 3-12 phage stock
Calculate the concentration of phage in your purified sample from the data on the titering plates you prepared last time. (If you need reminding how to do this, check out your "for next time" assignment from | the genome engineering module). Express the concentration as PFU/ul.
You can decide on the concentration of phage to be reacted with iridium III chloride. A working stock from 10^9 to 10^7 PFU/ul have been seen to work. Prepare in sterile water at least 100 ul of the phage concentration you decide to work with and be sure to add this data to your list of experimental variables.
Part 2: Nucleate nanowires
- In an eppendorf, mix 40 ul of your dilute phage with 760 ul of the Iridium Chloride you prepared last time.
- Get an electroporation cuvette from the teaching faculty. These come individually wrapped with a sipper for moving samples in and out as well as the cuvette which has a plastic cap and two metal sides.
- The lab has only one electopulser so you and your classmates will have to take turns but when you and it are ready, take your sample to the machine and confirm that it is set at 1.05 kV (if it is not you should toggle the switch to "manual" then increase the voltage to the proper setting). The voltage is not an experimental parameter that has been widely varied, but if you are feeling brave, you can try another setting. Be sure to record this change in your notebook and on the experimental variables page as well. It will be helpful if you can view "act V" as the second readout, since this will indicate the actual number of volts delivered to your sample.
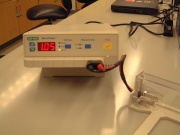 Electropulser
- Move 400 ul of your sample to the cuvette, cover the cuvette with its lid, and insert the cuvette into the plastic electropulser holder so the cuvette's plastic "nub" on the side is facing forward.
- Slide the holder into the guides so that the metal plates of the cuvette are sandwiched between the metal clips of the electropulser.
- Hold the "pulse" button until you hear the buzz that indicates the pulse is done. Repeat the pulses as many times as you want but be sure to record the number of pulses on the experimental variables page. You should use the same number of pulses for the second 1/2 of your sample.
- After pulsing the sample, it will be warm to the touch and the Iridium Chloride solution may have (but won't necessarily have) changed from a brown to blue color.
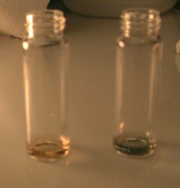 Before and after electropulser
 - Use the dropper to slowly move the sample from the cuvette to a clean eppendorf. If you squirt the sample back too fast it will splash out (not good).
- Repeat the electropulse treatment with the other half of your sample and the same cuvette.
- Pool the pulsed samples into one eppendorf to grow the nanowires. Most commonly this is done by placing the samples on a foil covered nutator at room temperature for two hours. You can vary this treatment but record your variation.
-20.109(F07)_Mod3_ECD-Mod3F07_wiki_images-micropulser.JPG)
-20.109(F07)_Mod3_ECD-Mod3F07_wiki_images-EPcolors.JPG)
Part 3: Research proposal
Writing a research proposal requires that you identify an interesting topic, spend lots of time learning about it, and then design some clever experiments to advance the field. It also requires that you articulate your ideas so any reader is convinced of your expertise, your creativity and the significance of your findings, should you have the opportunity to carry out the experiments you���ve proposed. To begin you must identify your research question. This may be the hardest part and the most fun. Fortunately you started by finding a handful of topics to share with your lab partner. Today you should discuss and evaluate the topics you���ve gathered. Consider them based on:
- your interest in the topic
- the availability of good background information
- your likelihood of successfully advancing current understanding
- the possibility of advancing foundational technologies or finding practical applications
- if your proposal could be carried out in a reasonable amount of time and with non-infinite resources
It might be that not one of the topics you���ve identified is really suitable, in which case you should find some new ideas. It���s also possible that through discussion with your lab partner, you���ve found something new to consider. Both of these outcomes are fine but by the end of today���s lab you should have settled on a general topic or two so you can begin the next step in your proposal writing, namely background reading and critical thinking about the topic.
A few ground rules that are 20.109 specific:
- you should not propose any research question that has been the subject of your UROP or research experience outside of 20.109. This proposal must be original.
- you should keep in mind that this proposal will be presented to the class, so try to limit your scope to an idea that can be convincingly presented in a ten minute oral presentation.
Once you and your partner have decided on a suitable research problem, it���s time to become an expert on the topic. This will mean searching the literature, talking with people, generating some ideas and critically evaluating them. To keep track of your efforts, you should start a wiki catalog on your OpenWetWare user page. How you format the page is up to you but check out the |���yeast rebuild��� or the | ���T7.2��� wiki pages on OpenWetWare for examples of research ideas in process. As part of your ���for next time assignment��� you will have to print out your wiki page specifying your topic, your research goal and at least five helpful references that you���ve read and summarized.
Part 4: Dialysis
- As you near the end of the time you want the nanowires to grow, you should prepare the tubing you'll need for dialysis. We will use dialysis tubing with a molecular weight cutoff of 12,000-14,000) in order to remove unreacted Iridium Chloride from the solution while retaining inside the bag all the phage and the nanowires that may have grown on them. You should always wear gloves when handling the dialysis tubing.
- Cut a length of tubing that is 7 cm long.
- Soak the tubing in 50 ml of very clean water (distilled, deionized) in a falcon tube. It is recommended that the tubing soaks for 20 minutes, but a shorter time is fine too.
- Clips for the tubing are numbered in pairs and you should note which pair you have. Next time, this number will be the only way to distinguish your sample from the others.
- Open both clips. Remove the tubing from the water with a gloved hand and close one end with a clip, leaving ~0.5 cm overhang.
- Use a P1000 to transfer the Iridium/phage solution to the tubing, being careful not to drop the tubing (it's slippery!) or let the liquid squirt out (so fill the tubing slowly with the tip low in the tubing).
- Clamp the other end and dialyze the bag in 1 liter of 10mM NaOH with the other samples from the class. You may need to tie some teflon tape around the end of one of your clips and secure the other end of the teflon tape out of the liquid in order to keep your tubing from getting bashed around by the magnetic stir bar. Tomorrow, one of the teaching faculty will refresh the beaker with clean NaOH but then the samples will remain in the beaker at room temperature until you return to lab.
DONE!
For next time
- In preparation for your time at the TEM facility please learn a little about how these amazing microscopes work. Watch the video about STEM that describes the instrument available at the Brookhaven National Lab. Based on the information in that video, please fill in the blanks or answer the following questions in one or two sentences.
- While light microscopes use light to view samples, TEM uses _____.
- How is the electron beam focused on the sample to be viewed by STEM?
- What does the electron beam interact with in the sample?
- What is the greatest magnification possible with a light microscope?
- What is the greatest magnification possible with a TEM?
- What are some of the difference between cryoEM, STEM and TEM?
- Sign up for time on the TEM. There is a signup chart on the discussion page of | this lab. You must coordinate this time with your lab partner and be sure you can both arrive in lab at least one hour before your slot to prepare your samples. Two groups can sign up for each time slot.
- Define your research proposal by making a wiki page to collect your ideas and resources (you can do this on one page with your partner or split the effort and each turn in an individual page). Keep in mind that your presentation to the class will need:
- a brief project overview
- sufficient background information for everyone to understand your proposal
- a statement of the research problem and goals
- project details and methods
- predicted outcomes if everything goes according to plan and if nothing does
- needed resources to complete the work
You can organize your wiki page along these lines or however you feel is most helpful. Print your user page(s) for next time, making sure it defines your topic, your idea and some references you've collected and summarized.