Difference between revisions of "Lab Manual: SLA 3D-Printed Microfluidic Device Master Mold"
| Line 2: | Line 2: | ||
== Mold Dimensions and Specifications == | == Mold Dimensions and Specifications == | ||
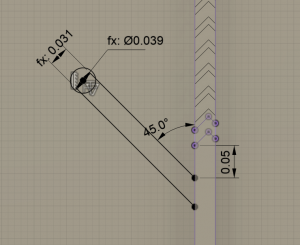
| + | Here are some specification images of the chip's current version (as of Spring 2024). You can find the exported files in the 20.309 Dropbox under "Kevin's Old Stuff". | ||
| + | |||
| + | [[File:Mixing-chip-1.png|300px|thumb|center|Top-view of the chip]] | ||
| + | |||
| + | [[File:Mixing-chip-2.png|300px|thumb|center|Herringbone dimensions]] | ||
| + | |||
| + | [[File:Mixing-chip-3.png|300px|thumb|center]] | ||
| + | |||
| + | [[File:Mixing-chip-parameter-table.png|500px|thumb|center]] | ||
| Line 8: | Line 17: | ||
1. Do several short washes in the Form Wash | 1. Do several short washes in the Form Wash | ||
| − | Instead of one long 10-minute wash, consider interleaving shorter 5-minute washes with compressed air drying. The uncured resin likes to stick between the herringbone ridges and along the length of the channel. Hold the mold at an angle and blow all the uncured resin into one corner of the mold so that the excess drips off onto a napkin. | + | Instead of one long 10-minute wash, consider interleaving shorter 5-minute washes with compressed air drying. The uncured resin likes to stick between the herringbone ridges and along the length of the channel. Hold the mold at an angle and blow all the uncured resin into one corner of the mold so that the excess drips off onto a napkin. I do about 3 to 4 washes, each one about 4 minutes. |
Pro tip: when printing and drying multiple molds at once, don't let the other molds just sit with stagnant IPA on them — this will make the molds dissolve and goopy again. Instead, do a quick dry to flash off the IPA, and then come back to each mold to blow off the excess resin. | Pro tip: when printing and drying multiple molds at once, don't let the other molds just sit with stagnant IPA on them — this will make the molds dissolve and goopy again. Instead, do a quick dry to flash off the IPA, and then come back to each mold to blow off the excess resin. | ||
Latest revision as of 19:35, 22 April 2024
Now that we have 3D-printers in the 20.309 lab, we can print our own in-house master molds to customize the PDMS microfluidic chips.
Mold Dimensions and Specifications
Here are some specification images of the chip's current version (as of Spring 2024). You can find the exported files in the 20.309 Dropbox under "Kevin's Old Stuff".
Cleaning Protocol
Leftover, uncured resin on the molds will prevent the PDMS chips from crosslinking and hardening — you'll end up with goopy chips. To ensure all uncured resin is washed off, consider the following advice and cleaning steps:
1. Do several short washes in the Form Wash Instead of one long 10-minute wash, consider interleaving shorter 5-minute washes with compressed air drying. The uncured resin likes to stick between the herringbone ridges and along the length of the channel. Hold the mold at an angle and blow all the uncured resin into one corner of the mold so that the excess drips off onto a napkin. I do about 3 to 4 washes, each one about 4 minutes.
Pro tip: when printing and drying multiple molds at once, don't let the other molds just sit with stagnant IPA on them — this will make the molds dissolve and goopy again. Instead, do a quick dry to flash off the IPA, and then come back to each mold to blow off the excess resin.
2. Let the parts soak in DI water overnight According to this protocol from Cell Press, this should help. It has indeed helped.
3. UV cure the prints at 60ºC.


