Difference between revisions of "Lab Manual: Measuring DNA Melting Curves"
(→Instrument) |
|||
| (58 intermediate revisions by 3 users not shown) | |||
| Line 4: | Line 4: | ||
{{Template:20.309}} | {{Template:20.309}} | ||
| − | [[Image:Example Melting Curve.jpg| | + | {| class="wikitable" style="margin: 1em auto 1em auto;" |
| − | + | |- | |
| + | | width="325px" |[[Image:DNA_Excitation.JPG|300px]] | ||
| + | | width="325px" |[[Image:Example Melting Curve.jpg|300px|]] | ||
| + | |- | ||
| + | | width="325px" |Temperature cycling fluorometer apparatus. | ||
| + | | width="325px" |Example DNA melting curves showing the effect of varying ionic strength. | ||
| + | |} | ||
==Overview== | ==Overview== | ||
| − | + | [[Image:DNA_strands_in_solution.gif|thumb|right|300 px|Annealing reaction of two complementary olives. See the [[DNA Melting Thermodynamics|this wiki page]] for a review of the temperature-dependent equilibrium between single-stranded and double-stranded DNA in solution. Several web-based tools are available to predict melting melting curves, including [http://mfold.rna.albany.edu/?q=DINAMelt/Hybrid2 DINAMelt Web Server] and [http://www.basic.northwestern.edu/biotools/OligoCalc.html Oligocalc]. ]] | |
| + | Short strands of DNA from about 10-50 base pairs in length are called "oligonucleotides" or just "oligos." In solution, DNA oligos exist in a temperature-dependent equilibrium that consists predominantly of double-stranded helicies and single-stranded random coils. The forward reaction in which two complementary, single stranded DNA (ssDNA) molecules combine to form double-stranded DNA (dsDNA) is called annealing. The reverse process is called thermal denaturation or melting. You can learn a lot about DNA oligos by melting them.<ref>Ririe KM, Rasmussen RP, Wittwer CT. Product differentiation by analysis of DNA melting curves during the polymerase chain reaction. Anal Biochem 1997;245: 154–60.</ref> | ||
| − | The | + | Double-stranded DNA predominates at low temperatures. As temperature increases, the equilibrium shifts from dsDNA to ssDNA. The equilibrium concentrations of single- and double-stranded DNA depend on several characteristics of the oligos and the solution, including the length of the oligos; the concentration of salt ions in solution; the percentage of AT versus GC base pairs; and the degree of complementarity.<ref>Breslauer et al., [http://www.pnas.org/content/83/11/3746.full.pdf Predicting DNA duplex stability from the base sequence] PNAS 83: 3746, 1986</ref> The reaction can be characterized by a DNA melting curve, which is a plot of dsDNA concentration versus temperature. DNA melting curves are the basis of several experimental and clinical techniques. High-resolution melting (HRM) analysis uses melting curves to measure features of DNA oligos such as differences in sequence, purity of PCR products, or even methylation state.<ref>[https://www3.appliedbiosystems.com/cms/groups/mcb_marketing/documents/generaldocuments/cms_070933.pdf ]</ref> |
| − | [[ | + | Fluorescent dyes with a quantum efficiency that dramatically increases when they are bound to dsDNA are available, such as [http://en.wikipedia.org/wiki/SYBR_Green_I SYBR Green] and [https://lifescience.roche.com/shop/products/lightcycler14301-480-high-resolution-melting-dye ResoLight]. These dyes glow about 1000x more intensely when they are bound to dsDNA. In this lab, you will build an instrument called a temperature-cycling fluorometer that measures the change in fluorescence over a range of temperatures to generate melting curves for several DNA oligos. From the melting curves you measure, you will estimate the thermodynamic parameters of the DNA annealing reaction: ''ΔH°'', ''ΔS°'' and the melting temperature. You will use your instrument to examine the effect of varying oligo length, ion concentration, or degree of complementarity on the thermodynamic parameters and to identify an unknown sample. |
| − | + | ||
| − | + | If you haven't studied DNA thermodynamics before (or if it has been a while since you have), see this review of [[DNA Melting Thermodynamics]] before you go on. | |
| − | + | ||
| − | + | ||
| − | + | ||
| − | + | ||
| − | + | ==Instrument== | |
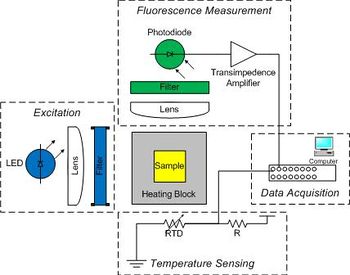
| + | Raw data from the instrument consists of two voltages: one proportional to fluorescence, and another that depends on temperature. You will digitize the voltages with a computer data acquisition system and process the raw signals to produce DNA melting curves. The instrument has five major subsystems: | ||
| − | + | [[Image:DNA Melting Block Diagram.jpg|thumb|350 px|DNA melting apparatus block diagram.]] | |
| + | [[Image:TEC_picture.jpg|thumb|right|Current flowing through a [https://en.wikipedia.org/wiki/Thermoelectric_cooling Peltier device], also called a thermoelectric cooler (TEC), causes heat to flow from one surface of the device to the other. The direction of heat flow depends on the direction of the current. The DNA melter utilizes a Peltier device to heat and cool the sample.]] | ||
| − | The sample | + | * Sample |
| − | + | ** The sample consists of 30 μM complementary DNA oligos in solution with NaCl and a fluorescent dye. | |
| − | + | ** The absorption peak of the dye is 497 nm and the emission peak is 520 nm. | |
| − | + | * Optical excitation | |
| − | + | ** A blue LED excites the sample. | |
| − | A | + | ** The LED produces a broad spectrum of light with a peak intensity around 475 nm. |
| + | ** A band-pass optical filter eliminates wavelengths below 450 and above 490 nm. | ||
| + | * Temperature measurement and control | ||
| + | ** The sample container is placed in an aluminum heating block to control its temperature. | ||
| + | ** The heating block has holes drilled in it to allow optical access to the sample while it is being heated. | ||
| + | ** Electric current drives a Peltier device to pumps heat in to or out of the heating block, depending on the direction flow. | ||
| + | ** Temperature measured by a temperature-sensitive resistor called a resistance temperature detector (RTD) embedded in the heating block. | ||
| + | * Fluorescence detection | ||
| + | ** A photodiode placed at 90° to the LED source detects light emitted by the fluorescent dye in the sample. | ||
| + | ** A long-pass emission filter with a cutoff of 515 nm eliminates light from the LED. | ||
| + | ** Since the photodiode produces a very small amount of current, you will construct a high-gain amplifier to provide a measurable voltage. | ||
| + | * Data Acquisition | ||
| + | ** Data will be recorded by a computer DAQ (data acquisition) system. | ||
| + | ** A program is provided to record these fluorescence and temperature signals over time and save the data to a file. | ||
==How to do this lab== | ==How to do this lab== | ||
| − | + | [[Image:DNA Melting Lab Part 1.png|700 px]] | |
| − | + | ||
| − | + | ||
| − | + | ||
| − | + | ||
| − | + | ||
| − | + | ||
| − | + | ||
| − | + | ||
| − | + | ||
| − | + | ||
| − | + | ||
| − | + | ||
| + | # Refresh your understanding of [[DNA Melting Thermodynamics]]. | ||
| + | # Complete the Simulating DNA Melting homework using [[DNA Melting: Simulating DNA Melting - Basics]] and learn more about the signals you will observe in the lab and how to start to analyze them. | ||
| + | # Follow the guidelines in [[DNA Melting Part 1: Measuring Temperature and Fluorescence|Part 1]] of the lab to build a system for exciting, heating, measuring fluorescence, and measuring temperature of a DNA sample. | ||
| + | # Troubleshoot and optimize your instrument. | ||
| + | # Measure the signal to noise ratio. | ||
| + | # Generate melting curves for a known sample. | ||
| + | # Estimate the melting temperature of the known sample. Turn in [[DNA Melting Report Requirements for Part 1|Part 1 of your lab report]]. | ||
| + | # Improve your simulation of DNA Melting results by adding the modeled effects described in [[DNA Melting: Model function and parameter estimation by nonlinear regression]]. | ||
| + | # Improve your instrument by adding temperature control and lock-in signal processing, as outlined in [[DNA Melting Part 2: Lock-in Amplifier and Temperature Control|Part 2]] of the lab. | ||
| + | # Verify the performance of your instrument with known samples. | ||
| + | # Measure your unknown samples. | ||
| + | # Attend the tutorial on multi-parameter, nonlinear regression to further improve your model toward even better estimates of ''ΔH°'', and ''ΔS°'', and use to analyze your data from Part 2. Your goal is to identify the unknown sample. | ||
| + | # Turn in [[DNA Melting Report Requirements for Part 2|Part 2 of your lab report]]. In this final report submission include Part 2 only, but note any significant revisions to hardware, software or methods that you may have made since Part 1. | ||
==Objectives and learning goals== | ==Objectives and learning goals== | ||
| Line 68: | Line 86: | ||
*[[DNA Melting: Simulating DNA Melting - Basics]] | *[[DNA Melting: Simulating DNA Melting - Basics]] | ||
*[[DNA Melting Part 1: Measuring Temperature and Fluorescence]] | *[[DNA Melting Part 1: Measuring Temperature and Fluorescence]] | ||
| − | |||
*[[DNA Melting Part 2: Lock-in Amplifier and Temperature Control]] | *[[DNA Melting Part 2: Lock-in Amplifier and Temperature Control]] | ||
| − | |||
==Suggested readings and references== | ==Suggested readings and references== | ||
Latest revision as of 03:39, 13 April 2016
|
|
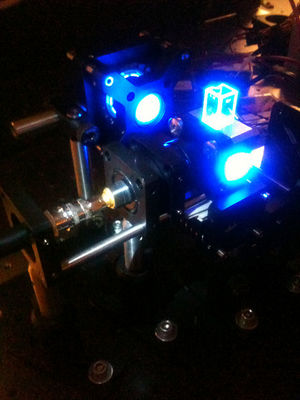
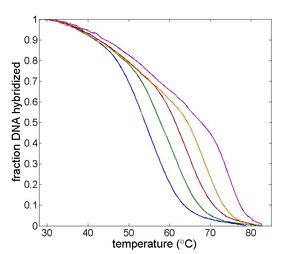
| Temperature cycling fluorometer apparatus. | Example DNA melting curves showing the effect of varying ionic strength. |
Overview
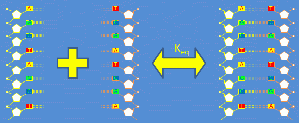
Short strands of DNA from about 10-50 base pairs in length are called "oligonucleotides" or just "oligos." In solution, DNA oligos exist in a temperature-dependent equilibrium that consists predominantly of double-stranded helicies and single-stranded random coils. The forward reaction in which two complementary, single stranded DNA (ssDNA) molecules combine to form double-stranded DNA (dsDNA) is called annealing. The reverse process is called thermal denaturation or melting. You can learn a lot about DNA oligos by melting them.[1]
Double-stranded DNA predominates at low temperatures. As temperature increases, the equilibrium shifts from dsDNA to ssDNA. The equilibrium concentrations of single- and double-stranded DNA depend on several characteristics of the oligos and the solution, including the length of the oligos; the concentration of salt ions in solution; the percentage of AT versus GC base pairs; and the degree of complementarity.[2] The reaction can be characterized by a DNA melting curve, which is a plot of dsDNA concentration versus temperature. DNA melting curves are the basis of several experimental and clinical techniques. High-resolution melting (HRM) analysis uses melting curves to measure features of DNA oligos such as differences in sequence, purity of PCR products, or even methylation state.[3]
Fluorescent dyes with a quantum efficiency that dramatically increases when they are bound to dsDNA are available, such as SYBR Green and ResoLight. These dyes glow about 1000x more intensely when they are bound to dsDNA. In this lab, you will build an instrument called a temperature-cycling fluorometer that measures the change in fluorescence over a range of temperatures to generate melting curves for several DNA oligos. From the melting curves you measure, you will estimate the thermodynamic parameters of the DNA annealing reaction: ΔH°, ΔS° and the melting temperature. You will use your instrument to examine the effect of varying oligo length, ion concentration, or degree of complementarity on the thermodynamic parameters and to identify an unknown sample.
If you haven't studied DNA thermodynamics before (or if it has been a while since you have), see this review of DNA Melting Thermodynamics before you go on.
Instrument
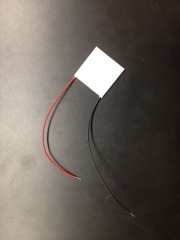
Raw data from the instrument consists of two voltages: one proportional to fluorescence, and another that depends on temperature. You will digitize the voltages with a computer data acquisition system and process the raw signals to produce DNA melting curves. The instrument has five major subsystems:
- Sample
- The sample consists of 30 μM complementary DNA oligos in solution with NaCl and a fluorescent dye.
- The absorption peak of the dye is 497 nm and the emission peak is 520 nm.
- Optical excitation
- A blue LED excites the sample.
- The LED produces a broad spectrum of light with a peak intensity around 475 nm.
- A band-pass optical filter eliminates wavelengths below 450 and above 490 nm.
- Temperature measurement and control
- The sample container is placed in an aluminum heating block to control its temperature.
- The heating block has holes drilled in it to allow optical access to the sample while it is being heated.
- Electric current drives a Peltier device to pumps heat in to or out of the heating block, depending on the direction flow.
- Temperature measured by a temperature-sensitive resistor called a resistance temperature detector (RTD) embedded in the heating block.
- Fluorescence detection
- A photodiode placed at 90° to the LED source detects light emitted by the fluorescent dye in the sample.
- A long-pass emission filter with a cutoff of 515 nm eliminates light from the LED.
- Since the photodiode produces a very small amount of current, you will construct a high-gain amplifier to provide a measurable voltage.
- Data Acquisition
- Data will be recorded by a computer DAQ (data acquisition) system.
- A program is provided to record these fluorescence and temperature signals over time and save the data to a file.
How to do this lab
- Refresh your understanding of DNA Melting Thermodynamics.
- Complete the Simulating DNA Melting homework using DNA Melting: Simulating DNA Melting - Basics and learn more about the signals you will observe in the lab and how to start to analyze them.
- Follow the guidelines in Part 1 of the lab to build a system for exciting, heating, measuring fluorescence, and measuring temperature of a DNA sample.
- Troubleshoot and optimize your instrument.
- Measure the signal to noise ratio.
- Generate melting curves for a known sample.
- Estimate the melting temperature of the known sample. Turn in Part 1 of your lab report.
- Improve your simulation of DNA Melting results by adding the modeled effects described in DNA Melting: Model function and parameter estimation by nonlinear regression.
- Improve your instrument by adding temperature control and lock-in signal processing, as outlined in Part 2 of the lab.
- Verify the performance of your instrument with known samples.
- Measure your unknown samples.
- Attend the tutorial on multi-parameter, nonlinear regression to further improve your model toward even better estimates of ΔH°, and ΔS°, and use to analyze your data from Part 2. Your goal is to identify the unknown sample.
- Turn in Part 2 of your lab report. In this final report submission include Part 2 only, but note any significant revisions to hardware, software or methods that you may have made since Part 1.
Objectives and learning goals
- Build an optical system for exciting the sample with blue light and gathering the fluorescence output on the photodiode.
- Measure light intensity with a photodiode.
- Build a heating system to reliably heat and cool your sample.
- Measure temperature with an RTD and an appropriate transfer function.
- Implement a high gain transimpedance amplifier.
- Use a lock-in amplifier to reduce noise.
- Record dsDNA concentration versus temperature curves for several samples.
- Analyze the data to find the dsDNA fraction as a function of temperature.
- Estimate Tm from your data.
- Compare the measured curves with theoretical models.
- Identify unknown DNA samples.
Lab manual sections
- Lab Manual:Measuring DNA Melting Curves
- DNA Melting: Simulating DNA Melting - Basics
- DNA Melting Part 1: Measuring Temperature and Fluorescence
- DNA Melting Part 2: Lock-in Amplifier and Temperature Control
Suggested readings and references
A more complete DNA melting and PCR resource list is available on this wiki. Please improve the page by adding relevant, high-quality sources.
Cite error: <ref> tags exist, but no <references/> tag was found

