20.109(S22):M2D3
Contents
Introduction
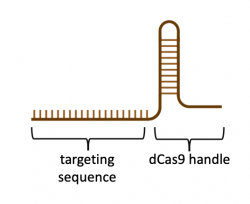
In the previous laboratory session you learned how to best target genes of interest by designing sgRNA sequences that bind within the host genome. The sgRNA sequence is what enables the CRISPRi system to specifically target the promoter or coding region of a gene, and thereby regulate gene expression. Thus far, we have described the sgRNA as only containing sequence complementary to the targeted gene in the genome, but this is only half of the full sgRNA used in CRISPR-based technologies. The second half of the sgRNA is a 'handle' that binds dCas9 (or Cas9 in the native CRISPR system). As shown in the image to the right, the targeting sequence and the dCas9 handle together compose the sgRNA. To synthesize the full sgRNA, the basepair sequence was submitted to IDT-DNA, a commercial company that specializes in DNA synthesis chemistry. To generate the full sgRNA, the basepair sequences for the targeting sequence and the dCas9 handle were simply submitted as a single DNA strand.Before we continue, we should review the process used to generate actual primers that are used to amplify DNA. Current oligonucleotide, or primer, synthesis uses phosphoramidite monomers, which are simply nucleotides with protection groups added. The protection groups prevent side reactions and promote the formation of the correct DNA product. The DNA product synthesis starts with the 3'-most nucleotide and cycles through four steps: deprotection, coupling, capping, and stabilization. First, deprotection removes the protection groups. Second, during coupling the 5' to 3' linkage is generated with the incoming nucleotide. Next, a capping reaction is completed to prevent uncoupled nucleotides from forming unwanted byproducts. Lastly, stabilization is achieved through an oxidation reaction that makes the phosphate group pentavalent. For a more detailed description of this process, read this article from IDT DNA.
Protocols
Part 1: Research sgRNA expression plasmid
After identifying the sgRNA_target sequence that is best for targeting the gene of interest in the host genome, the sgRNA_target is inserted into an expression plasmid. This is achieved using primers and PCR in the procedure described in Part 2. Before you review the approach used to insert the sgRNA sequence, first familiarize yourself with the important features of the expression plasmid. The expression plasmid used for regulating gene expression via the CRISPRi system is described in the following article:
Larson et al. "CRISPR interference (CRISPRi) for sequence-specific control of gene expression." Nature. (2013) 8:2180-2196.
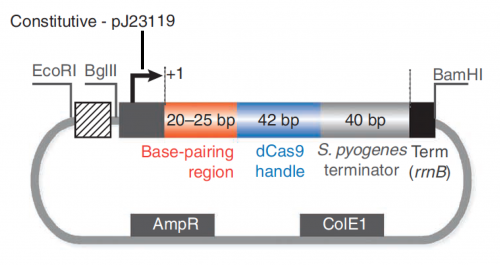
In this exercise, you will explore the features present in the plasmid that are necessary to express the sgRNA_target sequence (see plasmid map below).
In your laboratory notebook, complete the following:- Review the details provided in the caption for Fig. 1B of the Larson et. al. article.
- Describe the purpose / role for each of the following features that are present in the bacterial sgRNA plasmid. Please note: you many need to reference resources outside of the article!
- Constitutive - pJ23119
- Base-pairing region
- dCas9 handle
- S. pyogenes terminator
- Term (rrnB)
- AmpR
- ColE1
- +1
- restriction enzyme recognition sequences: EcoRI, BglII, and BamHI
Part 2: Prepare sgRNA_target oligo
While you were away the sequences for the gRNA you designed were submitted to Genewiz. Genewiz synthesized the DNA oligo then lyophilized (dried) it to a powder. Follow the steps below to resuspend your oligo.
- Centrifuge the tube containing your lyophilized gRNA oligo for 1 min.
- Calculate the amount of water needed to give a stock concentration of 100 μM.
- Resuspend each primer stock in the appropriate volume of sterile water, vortex, and centrifuge.
- Calculate the volume of your stock that is required to prepare a 20 μL of solution that contains your gRNA oligo at a concentration of 10 μM.
- Try the calculation on your own first. If you get stuck, ask the teaching faculty for help.
- Recall from the M2D1 exercise that an amplification reaction requires two primers. The gRNA oligo will serve as the forward primer in the insertion and amplification reaction and a universal CRISPRi oligo will be the reverse primer.
- Obtain an aliquot of the CRISPRi reverse primer (resuspended at a concentration of 100 μM) from the front bench.
- Prepare a primer mix that contains both your gRNA oligo (or 'primer') and the CRISPRi reverse primer at a final concentration of 10 μM in 20 μL of sterile water.
- Be sure to change tips between primers!
- Return the rest of your sgRNA_target oligo stock, plus your primer specification sheet, to the front bench.
Part 3: Insert sgRNA_target sequence into expression plasmid
The Q5 Site Directed Mutagenesis Kit from NEB was used to insert the sgRNA_target sequence into the expression plasmid. For this, a reaction was prepared with the following: the sgRNA_target primer, a universal CRISPRi primer, and the expression plasmid.
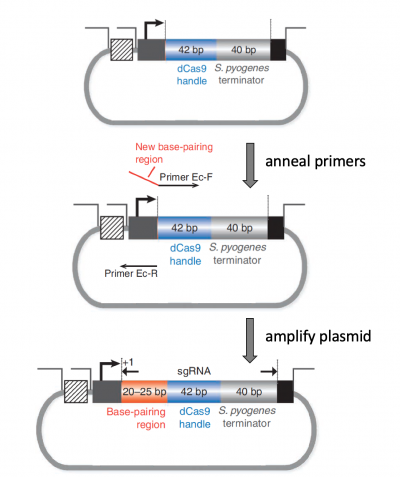
As shown in the figure to the right, the steps used to insert the sgRNA_target sequence into the expression vector are based on the principles of PCR. The expression plasmid is the template in this amplification reaction. For amplification to occur, a forward primer and a reverse primer are required. In this reaction, the forward primer (labeled Primer Ec-F in the figure) is the full sgRNA_target that consists of the targeting sequence and the dCas9 handle. The dCas9 handle part of the primer anneals to the complementary sequence in the expression plasmid. The targeting sequence does not anneal to the expression plasmid, instead this part of the primer is incorporated into the amplification product during PCR. The reverse primer (labeled Primer Ec-R in the figure) anneals to a complementary sequence in the expression plasmid and reads away from the forward primer. The product from each of these primers is a single-stranded DNA molecule. Because these single-stranded products are complementary, the strands will anneal and form a double-stranded product.In your laboratory notebook, complete the following:
- Draw the single-stranded product (5' - 3') that is generated from the forward primer. Draw the product generated from the reverse primer.
- Include the features that are in each product.
- The single-stranded products will anneal to form a double-stranded product. Is this double-stranded product linear or circular? Why?
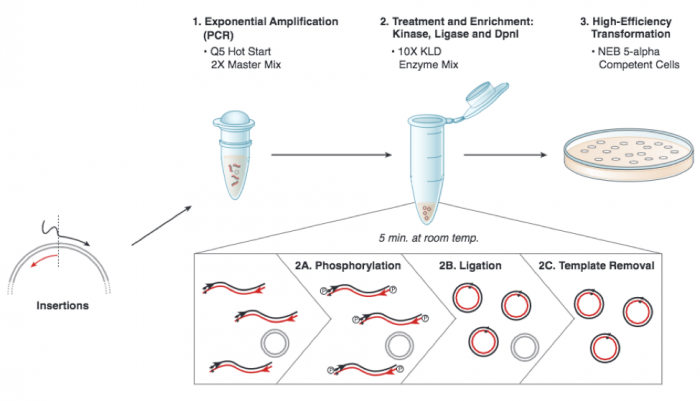
A more technical depiction of the protocol you will use to insert an sgRNA_target sequence into the expression plasmid is included below. Briefly, in Step 1 DNA polymerase copies the plasmid using the sgRNA_target primer to insert the target sequence. Following PCR amplification the product is a linear DNA fragment. In Step 2 circular plasmids that carry the sgRNA_target sequence are generated when the double-stranded DNA is phosphorylated (Step 2A) and then ligated (Step 2B). Following the amplification reaction, the expression plasmid template that does not contain insert is present in the reaction product. To ensure that only the sgRNA_target-containing expression plasmid is used in the next steps, the parental DNA is selectively digested using the DpnI enzyme (Step 2C). The underlying selective property is that DpnI only digests methylated DNA. Because DNA is methylated during replication in host cells, DNA that is synthetically made via an amplification reaction using PCR is not methylated. Lastly, in Step 3 the sgRNA_target-containing expression plasmid is transformed into competent cells that propagate the plasmid.
Each group will set up one reaction. Meanwhile, the teaching faculty will set up a single positive control reaction, to ensure that all the reagents are working properly. You should work quickly but carefully, and keep your tube in a chilled container at all times. Please return shared reagents to the ice bucket(s) from which you took them as soon as you are done with each one.
- Retrieve one PCR tube from the front laboratory bench and label the top with your team color and lab section (write small!).
- Add 10.25 μL of nuclease-free water.
- Add 1.25 μL of your primer mix (each primer should be at a concentration of 10 μM).
- Add 1 μL of psgRNA plasmid DNA (concentration of 25 ng/μL).
- Lastly, use a filter tip to add 12.5 μL of Q5 Hot Start High-Fidelity 2X Master Mix - containing buffer, dNTPs, and polymerase - to your tube.
- Once all groups are ready, we will begin the thermocycler, under the following conditions:
| Segment | Cycles | Temperature | Time |
|---|---|---|---|
| Initial denaturation | 1 | 98 °C | 30 s |
| Amplification | 25 | 98 °C | 10 s |
| 55 °C | 30 s | ||
| 72 °C | 2 min | ||
| Final extension | 1 | 72 °C | 2 min |
| Hold | 1 | 4 °C | indefinite |
After the cycling is completed, you will complete the KLD reaction (which stands for "kinase, ligase, DpnI").
- Add the following reagents:
- 1 μL of your amplification product
- 5 μL 2X KLD Reaction Buffer
- 1 μL KLD Enzyme Mix
- 3 μL nuclease-free water
- Incubate the reaction for 5 min at room temperature.
- Then, use 5 μL of the KLD reaction product to complete a transformation into an E. coli strain (NEB 5α cells of genotype fhuA2 Δ(argF-lacZ)U169 phoA glnV44 Φ80 Δ(lacZ)M15 gyrA96 recA1 relA1 endA1 thi-1 hsdR17).
- The transformed cells will amplify the plasmid such that you are able to confirm the appropriate insertion (or 'mutation') was incorporated.
- Transform the cells using the following procedure:
- Add 5 μL of KLD mix to 50 μL of chemically-competent NEB 5α.
- Incubate on ice for 30 min.
- Heat shock at 42 °C for 30 s.
- Incubate on ice for 5 min.
- Add 950 μL SOC and gently shake at 37 °C for 30 min.
- Spread 50 μL onto LB+Amp plate and incubate overnight at 37 °C.
Reagents list
- Q5 Site Directed Mutagenesis Kit (from NEB)
- Q5 Hot Start High-Fidelity 2X Master Mix: propriety mix of Q5 Hot Start High-Fidelity DNA Polymerase, buffer, dNTPs, and Mg2+
- 2X KLD Reaction Buffer
- 10X KLD Enzyme Mix: proprietary mix of kinase, ligase, and DpnI enzymes
- Universal CRIPSRi reverse primer 5' - ACT AGT ATT ATA CCT AGG ACT GAG CTA GC - 3'
- SOC medium: 2% tryptone, 0.5% yeast extract, 10 mM NaCl, 2.5 mM KCl, 10 mM MgCl2, 10 mM MgSO4, and 20 mM glucose
- LB+Amp plates
- Luria-Bertani (LB) broth: 1% tryptone, 0.5% yeast extract, and 1% NaCl
- Plates prepared by adding 1.5% agar and 100 μg/mL ampicillin (Amp) to LB
Next day: Confirm gRNA sequence in psgRNA expression plasmid


