Difference between revisions of "20.109(S21):M3D1"
Noreen Lyell (Talk | contribs) (→Part 1: PCR amplification and restriction enzyme digestion of IPC insert) |
Noreen Lyell (Talk | contribs) (→Introduction) |
||
| Line 18: | Line 18: | ||
'''Restriction enzyme digest''' | '''Restriction enzyme digest''' | ||
| − | |||
| − | [[ | + | Review the information provided on [[20.109(S21):M1D1#Restriction_enzyme_digest_of_pCTcon2_backbone|M1D1]] regarding restriction enzyme digests.Similar to Mod 1, restriction enzymes. When generating the scFV library restriction enzymes were used to prepare the expression vector such that the mutated scFv sequences could be incorporated via homologous recombination in the yeast cells. Here we will use restriction enzymes to generate compatible sticky ends such that the correct cloning product is generated in a ligation reaction. |
| − | + | ||
| − | + | ||
| − | + | ||
| − | + | ||
| − | + | ||
| − | + | ||
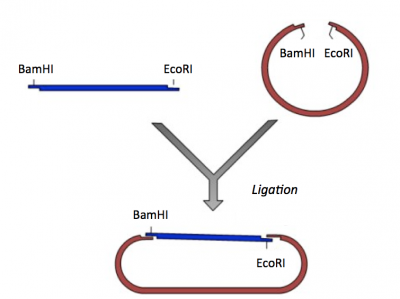
'''Ligation''' | '''Ligation''' | ||
Revision as of 00:32, 11 April 2021

Introduction
Though the theme of Module 3 is protein engineering, today will focus on a few key techniques used in DNA engineering. Because the sequence of proteins is determined by the sequence of the genes that encode them, learning how to manipulate DNA is an important first step. Today you will review the cloning steps used to generate a protein expression vector that contains the gene that encodes inverse pericam (IPC), a calcium sensing protein. To generate pRSET-IPC three common DNA engineering techniques were used: PCR amplification, restriction enzyme digestion, and ligation.

Polymerase chain reaction (PCR)
The applications of PCR are widespread, from forensics to molecular biology to evolution, but the goal of any PCR is the same: to generate many copies of DNA from a single or a few specific sequence(s) (called the “template”). In addition to the template, PCR requires only three components: primers to bind sequence flanking the target, dNTPs to polymerize, and a heat-stable polymerase to catalyze the synthesis reaction over and over and over. DNA polymerases require short initiating pieces of DNA called primers to copy DNA. In PCR amplification, forward and reverse primers that target the non-coding and coding strands of DNA, respectively, are separated by a distance equal to the length of the DNA to be copied. To amplify DNA, the original DNA segment, or template DNA, is denatured using heat. This separates the strands and allows the primers to anneal to the template. Then polymerase extends from the primer to copy the template DNA. How many cycles of PCR are required to achieve the desired double-stranded amplification product?

To amplify a specific sequence of DNA, you first need to design primers -- one primer that anneals at the start of the sequence of interest (the 5' end) and a second primer that anneals at the end of the sequence of interest (the 3' end). The primer that anneals at the start of the sequence is referred to as the 'forward' primer. The forward primer anneals to the non-coding DNA strand and reads toward, or into, the gene of interest. The 'reverse' primer anneals to the coding DNA strand at the end of the sequence and reads back into the sequence. Primers can also be useful in adding sequence to sequences upon amplification via the polymerase chain reaction. Several features are important to consider when designing primers for PCR. Primers that are too short may lack requisite specificity for the desired sequence, and thus amplify an unrelated sequence. The longer a primer is, the more favorable are its energetics for annealing to the template DNA, due to increased hydrogen bonding. On the other hand, longer primers are more likely to form secondary structures such as hairpins, leading to inefficient template priming. Two other important features are G/C content and placement. Having a G or C base at the end of each primer increases priming efficiency, due to the greater energy of a GC pair compared to an AT pair. The latter decrease the stability of the primer-template complex. Overall G/C content should ideally be 50 +/- 10%, because long stretches of G/C or A/T bases are both difficult to copy. The G/C content also affects the melting temperature. PCR is a three-step process (denature, anneal, extend) and these steps are repeated 20 or more times. After 30 cycles of PCR, there could be as many as a billion copies of the original template sequence.
Restriction enzyme digest
Review the information provided on M1D1 regarding restriction enzyme digests.Similar to Mod 1, restriction enzymes. When generating the scFV library restriction enzymes were used to prepare the expression vector such that the mutated scFv sequences could be incorporated via homologous recombination in the yeast cells. Here we will use restriction enzymes to generate compatible sticky ends such that the correct cloning product is generated in a ligation reaction.
Ligation

In a ligation reaction, DNA ends are covalently attached to one another via the ligase enzyme. The efficiency of the reaction is related to type of DNA ends: compatible sticky ends will ligate more efficiently than blunt ends, and non-compatible sticky ends will not be ligated due to the lack of hydrogen bonding between the basepairs. To initiate the ligation reaction, hydrogen bonds are formed between the compatible overhangs of DNA fragments. The ligase enzyme then forms a covalent phosphodiester bond between the 3' hydroxyl end of the 'acceptor' nucleotide and the 5' phosphodiester end of the 'donor' nucleotide.
The first step in this process is the addition of AMP (adenylation) to a lysine residue within the active site of DNA ligase, which releases a pyrophosphate. Next, the AMP is transferred to the 5' phosphate of the donor nucleotide resulting in the formation of a pyrophosphate bond. Lastly, a phosphodiester bond is formed between the 5' phosphate of the donor nucleotide and the 3' hydroxyl of the 3' acceptor nucleotide.
Protocols
Because DNA engineering at the benchtop can take days, if not weeks, you will clone the expression plasmid in silico today. You can use any DNA manipulation software you choose to complete the protocols, but the instructions provided are for SnapGene. Please note that if you use a different program the Instructors may not be able to assist you.
To use SnapGene software off campus you must log into a VPN connection prior to opening the SnapGene. Here is the link to the VPN download and installation instructions. Also you will need to update the SnapGene license number if you have not opened the application since March. The new license information can be found here.
Part 1: PCR amplification and restriction enzyme digestion of IPC insert
To amplify a specific sequence of DNA, you first need to design primers -- one primer that anneals at the start of the sequence of interest and a second primer that anneals at the end of the sequence of interest. Today you will design a 'forward' primer that anneals to the non-coding DNA strand and reads toward the IPC gene and a 'reverse' primer that anneals to the coding DNA strand at the end of the IPC gene and reads back into it. Each primer will consist of two parts: the 'landing sequence' will anneal to the sequence of interest and the 'flap sequence' will be used to add a restriction enzyme recognition sequence to your IPC insert.

- Open the word document with the IPC sequence (linked here).
- Open SnapGene. From the options, select 'New DNA File...'.
- Copy and paste the sequence from the .docx file above.
- Enter "IPC" for the File Name (in the lower, right corner), select 'linear' for the topology (in the lower, left corner), then click 'OK'.
- A new window will open with a map of IPC showing the unique restriction enzyme sites within the sequence.
- In later steps you will generate a map of the IPC insert cloned into the pRSET expression vector. To make the map more visually useful, create a feature that defines the IPC insert.
- Click 'Sequence' from the options at the bottom of the window.
- Highlight the entire sequence in the window.
- From the toolbar, select 'Features' → 'Add Feature...'
- In the new window name, type "IPC" into the 'Feature:' box.
- Select gene from the dropdown in the 'Type:' box and select the right facing arrowhead (this denotes the directionality of the insert).
- Then click 'OK'.
- Next you will use the sequence information to design primers that will amplify the IPC insert.
- Because we want to amplify the entire sequence, the landing sequence of the forward primer will begin with the first basepair of the sequence.
- Record the first 20 basepairs of the IPC gene sequence in your notebook.
- To label the primer sequence, highlight the first 20 basepairs in the IPC insert sequence, then select 'Primers' --> 'Add Primer...' from the toolbar.
- A new window will open asking which strand should be used to make the primer. Before making your selection consider the direction in which DNA is synthesized and to which strand your primer should anneal such that the IPC insert is amplified during PCR.
- In the 'Primer:' text box, enter a specific name for your forward primer, then select 'Add Primer to Template'.
- The primer should be indicated on the sequence of the IPC insert by an arrow facing into the sequence.
- Click 'Primers' from the options at the bottom of the window.
- Use the following guidelines to evaluate your primer:
- length: 17-28 basepairs
- GC Content: 40-60%
- Tm: 60-65 °C
- Check for hairpins and complementation between primers by clicking on the name of your primer, then 'Primers' --> 'Analyze Selected Primer...' from the toolbar. Note: this will automatically open window to the IDT DNA OligoAnalyzer tool.
- If your primer does not fit the guidelines provided above, try altering the length. Remember that the 5’ end of the landing sequence must not change or you will delete basepairs from your gene.
- When you are satisfied with the landing sequence, be sure to update the primer labeled on the IPC seqeuence.
- Now that the landing sequence is defined, you will add a flap sequence that introduces a restriction enzyme recognition sequence.
- As shown in the schematic of our cloning strategy, we need to add a BamHI recognition sequence to our forward primer. Search the NEB list to find the BamHI recognition sequence. Record the recognition sequence and the cleavage location within the sequence.
- Add the recognition sequence for the BamHI restriction enzyme to the landing sequence. Consider the direction in which PCR amplification occurs to determine which end of your primer should contain the BamHI restriction enzyme recognition site.
- In the 'Primers' window, click on the name of your primer. Then select 'Primers' --> 'Edit Primer...' from the toolbar.
- Add the recognition sequence by typing into the text box at the top of the window that contains the primer sequence.
- For reasons that you will consider later, you must include an extra basepair between the BamHI recognition site and the landing sequence. Add a "T" at this location in your primer.
- Lastly, in addition to the recognition sequence, it is important to include a 6 basepair 'tail' or 'junk' sequence to ensure the restriction enzyme is able to bind and cleave the DNA. Learn more about why this is necessary from scientists at NEB. Add any sequence of 6 basepairs to your primer flap sequence. Carefully consider where this sequence should appear in your primer!
- Use the above process to design your reverse primer. Please keep the following notes in mind:
- Because you want to amplify the entire gene you should start with the last basepair of the sequence.
- Do NOT include a "T" between the enzyme recognition site and the landing sequence for the reverse primer.
- You will add an EcoRI restriction recognition site to your reverse primer.
- Remember that the reverse primer anneals to the coding DNA strand at the end of the IPC insert and reads back into it.
- In your laboratory notebook, complete the following:
- Record the full sequences for your forward and reverse primers. Indicate which parts of each primer are the landing sequence, flap sequence, and junk sequence.
- Record the length, GC content, and Tm for the landing sequences of your forward and reverse primers. Why is only the landing sequence considered when applying the primer design guidelines?
- Are your primers capable of forming hairpins or primer dimers?
- To generate the PCR amplicon of the IPC insert sequence that would result from amplification using your primers, select 'Actions' --> 'PCR' from the toolbar.
- A new window will open, in the text boxes at the bottom select your forward primer (Primer 1) and reverse primer (Primer 2). Then click 'PCR' and save the amplicon file with a specific name.
- In your laboratory notebook, complete the following:
- Record the length of the amplicon.
- Is the amplicon double-stranded or single-stranded? Is it a blunt end product or sticky end product?
- Now that you have your IPC PCR amplicon, you need to digest with BamHI and EcoRI to generate 'sticky ends' that will enable you to ligate the IPC insert into the pRSET expression vector.
- On the map of the IPC PCR amplicon, select the BamHI recognition site by clicking on the enzyme name. Then hold the shift key and select the EcoRI recognition site.
- This should highlight the area between the enzyme recognition sites.
- Click the drop-down arrow next to the 'Copy' icon at the top of the window.
- Select 'Copy Restriction Fragment.'
- Click the drop-down arrow next to the 'New' icon at the top of the window.
- Select 'New DNA File...'.
- Paste the restriction fragment from the previous step in the text box, then click 'OK'.
- A new window will open with the digested IPC insert.
- Save the insert file.
- In your laboratory notebook, complete the following:
- Record the length of the digested insert. How does the length of the insert compare to the length of the PCR amplicon.
- Is the digested insert double-stranded or single-stranded? Is it a blunt end product or sticky end product?
Part 2: Restriction enzyme digest of pRSET expression vector
For the ligation step, it is important to generate compatible 'sticky ends' on the insert and vector. Above, you digested your IPC insert with BamHI and EcoRI in a double-digest to prepare the insert for your cloning. Here you will digest the pRSET expression vector to create compatible ends that can be ligated.

- Open the word document with the pRSET vector sequence (linked here).
- Copy and paste the vector sequence into a New DNA File window and save this sequence.
- Be sure to select circular from the topology options.
- One very useful aspect of SnapGene is that the software is able to recognize features, or sequences that match known genes and binding sites, in DNA sequences. A window titled "Detect Common Features" should appear.
- In your laboratory notebook, complete the following:
- Include a summary of the details provided about features in the pRSET vector.
- Select 'Add Features'.
- A new window will open with a map of the vector showing the unique restriction enzyme sites and annotated features within the sequence.
- To generate the sticky ends that will enable you to ligate the IPC insert into the vector, view the map of your vector sequence.
- Select the BamHI recognition site by clicking on the enzyme name, then hold the shift key and select the EcoRI recognition site.
- Select 'Actions' --> 'Restriction and Insertion Cloning' --> 'Delete Restriction Fragment...' from the toolbar.
- In your laboratory notebook, complete the following:
- What is the length of the digested vector product?
- How many basepairs were removed (compared to the intact cloning vector)?
Part 3: Ligation of IPC insert and pRSET expression vector
Before you prepare a ligation, one very important step is to calculate the amounts of DNA that will be used in the reaction. Ideally, you should use a 3:1 molar ratio of insert to vector (note: it is a molar ratio, not a volumetric ratio!). You will use the steps below to calculate the volume amount (based on the molar ratio!) of the IPC insert and pRSET expression vector you would use to complete this ligation in the laboratory.

Use the following information to calculate the volume of insert and vector needed to prepare a ligation with a 3:1 molar ratio (insert:vector).
- Concentration of IPC insert solution = 25 ng/uL
- Concentration of pRSET expression vector solution = 50 ng/uL
- Molecular weight of a basepair = 660 g/mol
- Sizes, in basepairs, of the insert and vector sequences (this was determined in the exercises above!)
Though there are are different strategies that can be used to complete the ligation calculations, it may be easier to break the math into the following steps:
- Determine the volume of vector that will be used in the ligation reaction.
- Typically, it is best to use 50 - 100 ng of vector.
- Calculate the moles of vector.
- Calculate the moles of insert.
- Remember, this number should be 3-fold more than the moles of vector to accomplish a 3:1 molar ratio.
- Calculate the volume of insert that contains the appropriate moles of insert.
- One additional consideration is the volume of the reaction. The total volume of the ligation reaction should not be greater than 15 μL. In this, the total volume of the insert and vector should not be greater than 13.5 μL as additional reagents are required in the reaction.
- If the insert and vector volume total greater than 13.5 μL, you should (1) scale down both DNA amounts, using less than 50 ng backbone and/or (2) stray from the ideal 3:1 molar ratio.
- You may ask the teaching faculty for advice during class if you are unsure what choice is best.
- In your laboratory notebook, calculate the volume of insert and volume of vector that should be used for a ligation reaction that contains a 3:1 molar ratio of insert:vector. Show all math!
- Feel free to take a picture of your hand-written work and embed the image in your notebook.
- Next you will complete this ligation in silico to generate a map, or visual representation, of the pRSET_IPC cloning product.

- To ligate the IPC insert into the pRSET expression vector, select 'Actions' --> 'Restriction and Insertion Cloning' --> 'Insert Fragment...'.
- A new window will open. In the bottom workspace of the window, a cloning schematic will appear showing a vector and insert icon.
- Click on the 'Vector' label. Then in the workspace at the the right of the window, select the vector file from the 'Vector:' drop-down.
- Select the restriction enzymes used to digest the expression vector from the drop-down boxes next to the text boxes that contain 'cut'.
- Next, click on the 'Insert' label at the bottom of the window and complete the steps as done for the expression vector.
- For the insert, use the IPC undigested file.
- Click 'Clone'.
- A new window will open with the cloned pRSET_IPC product!
- In your laboratory notebook, complete the following:
- What is the size of the plasmid? Does this make sense given the lengths of the insert and vector?
- Does your sequence still contain a BamHI recognition sequence? An EcoRI recognition sequence?
- Why were two different restriction enzymes used in the cloning strategy for pRSET-IPC?
- Recall the "T" you added between the landing sequence and BamHI recognition sequence in your forward primer. What was the purpose of this extra base? Is it important that a "T" was added? Could another base be added instead?
- Hint: When the IPC insert is cloned into the pRSET vector, you want to ensure the His tag sequence is attached to the IPC sequence when IPC is transcribed from pRSET-IPC. This is result in the translated IPC protein containing a His tag which will be used for protein purification. Think about the spacing between the His tag (CATCATCATCATCATCAT) and the first codon of the IPC gene in your plasmid map.
- Why was an extra base not added to the reverse primer?

Part 4: Confirmation digest of pRSET_IPC
To confirm the pRSET_IPC construct that we will use for this module, you will perform a 'diagnostic' or 'confirmation' digest. As discussed in prelab, this step is an important control -- you want to be sure that the products you use in your research are correct! This step is used to check products you clone yourself and, perhaps more importantly, those that you may receive from another researcher.
Ideally you will use a single enzyme that cuts once within the vector and once within your insert. Unfortunately, this is rarely an option and you instead need to select an enzyme that cuts once within the vector and a second, compatible enzyme that cuts once within the insert. Enzyme compatibility is determined by the buffer. If two enzymes are active, or able to cleave DNA, in the same buffer, they are compatible. The NEB double digest online tool will prove very helpful in identifying compatible enzyme combinations!
Use the information from prelab, the 20.109 list of enzymes (linked here), and the plasmid map you generated above to choose the enzymes you will use.
- To choose restriction enzymes for your confirmation digest, look at the plasmid map for your pRSET_IPC construct.
- Identify possible sites that will enable to you confirm the pRSET_IPC sequence.
- Remember the guidelines discussed in prelab!
- After you identify the enzymes that you will use for the confirmation digest, complete a virtual digest in using the pRSET_IPC map you generated above.
- On the map of pRSET_IPC, select the first recognition site by clicking on the enzyme name. Then hold the shift key and select the second recognition site.
- Select 'Tools' --> 'Simulate Agarose Gel' from the toolbar.
- In your laboratory notebook, complete the following:
- Record the expected fragment sizes from the confirmation digest.
- Are the fragments distinct or ambiguously close together?
- Now that you identified which enzyme(s) to use in your confirmation digest, consider which controls should be included to ensure the results are interpretable.
- In your laboratory notebook, explain why the following reactions are included as controls for the confirmation digest experiment:
- Undigested pRSET_IPC.
- Single digests of pRSET_IPC (each enzyme used alone in a digest with pRSET_IPC).
- Use the table below to calculate the volumes of each reagent that should be included in the confirmation digest reactions.
- The 20.109 enzyme stocks are always the "S" size and concentration when you search for them on the NEB website.
- To find the concentration of the enzyme(s) you choose, search the NEB site.
| Diagnostic digest (enzyme #1 AND enzyme #2) |
Enzyme #1 ONLY | Enzyme #2 ONLY | Uncut (NO enzyme) | |
|---|---|---|---|---|
| pRSET_IPC | 5 μL | 5 μL | 5 μL | 5 μL |
| 10X NEB buffer (buffer name:____________) |
2.5 μL | 2.5 μL | 2.5 μL | 2.5 μL |
| Enzyme #1 (enzyme name:____________) |
____ μL | ____ μL | ||
| Enzyme #2 (enzyme name:____________) |
____ μL | ____ μL | ||
| H2O | to a final volume of 25 μL | |||
To ensure the steps required for preparing a digest are clear, the Instructor will provide a live demonstration of this process. You should provide a written description of the procedure in your laboratory notebook!
In your laboratory notebook, complete the following:
- Provide a written overview / description of the the procedure used to prepare a restriction enzyme digest (from the live demonstration).
- For how long will the digests incubate and at what temperature?
Following a restriction enzyme digestion reaction, the DNA fragments are separated using gel electrophoresis. To review this method, look back at the information provided on M1D1!
Reagents list
- pRSET_IPC (concentration = 25 ng/μL) (a gift from the Jasanoff Laboratory)
- 10X buffer; the buffer will depend on the enzymes you use for your confirmation digest (from NEB)
- restriction enzyme(s); the concentration of each enzyme is listed on the product information page (from NEB)
- 1% agarose in 1X TAE (agarose from VWR)
- with 10% (v/v) μL SYBR Safe DNA stain (from Invitrogen)
- 1X TAE gel electrophoresis buffer: 40 mm Tris, 20 mM acetic acid, 1 mM EDTA (from BioRad)
- 6X gel loading dye, blue (from NEB)
- 1 kb DNA ladder (from NEB)
Next day: Examine IPC mutations