Difference between revisions of "20.109(S16):In situ cloning (Day1)"
Noreen Lyell (Talk | contribs) (→Part 5: Confirmation digest) |
Noreen Lyell (Talk | contribs) (→Part 1: Laboratory orientation quiz) |
||
| Line 58: | Line 58: | ||
Complete the laboratory quiz with your partner. Though you are working with your partner, each student should submit their written answers on the provided quiz. If you disagree with your partner on an answer, you should write what you think is the correct answer on your quiz. | Complete the laboratory quiz with your partner. Though you are working with your partner, each student should submit their written answers on the provided quiz. If you disagree with your partner on an answer, you should write what you think is the correct answer on your quiz. | ||
| + | |||
| + | Good Luck! | ||
===Part 2: PCR amplification and restriction enzyme digest of IPC insert=== | ===Part 2: PCR amplification and restriction enzyme digest of IPC insert=== | ||
Revision as of 21:14, 6 January 2016

Contents
Introduction
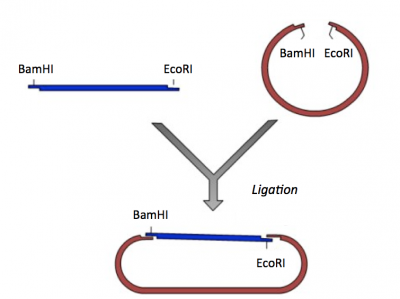
Though the theme of Module 1 is protein engineering, today will focus on a few key techniques used in DNA engineering. Because the sequence of proteins is determined by the sequence of the genes that encode them, learning how to manipulate DNA is an important first step. Today you will complete a cloning reaction to generate a protein expression vector that contains a gene that encodes a calcium-sensing protein. This process is illustrated in the schematic below. Later you will use this construct to engineer a new calcium-sensing protein.

The cloning vector we will use is pRSET. This vector has several features that make it ideal for cloning and protein expression -- both of which are important for this module. The calcium-sensing protein we will study this module is inverse pericam (IPC). We will discuss this protein in much more detail later, for now it is sufficient to know that is used to measure calcium concentrations. To generate your final product you will use three common DNA engineering techniques: PCR amplification, restriction enzyme digestion, and ligation.
PCR amplification
The applications of PCR are widespread, from forensics to molecular biology to evolution, but the goal of any PCR is the same: to generate many copies of DNA from a single or a few specific sequence(s) (called the “target” or “template”).
In addition to the target, PCR requires only three components: primers to bind sequence flanking the target, dNTPs to polymerize, and a heat-stable polymerase to carry out the synthesis reaction over and over and over. PCR is a three-step process (denature, anneal, extend) and these steps are repeated 20 or more times. After 30 cycles of PCR, there could be as many as a billion copies of the original target sequence.

Based on the numerous applications of PCR, it may seem that the technique has been around forever. In fact it is just over 30 years old. In 1984, Kary Mullis described this technique for amplifying DNA of known or unknown sequence, realizing immediately the significance of his insight.
"Dear Thor!," I exclaimed. I had solved the most annoying problems in DNA chemistry in a single lightening bolt. Abundance and distinction. With two oligonucleotides, DNA polymerase, and the four nucleosidetriphosphates I could make as much of a DNA sequence as I wanted and I could make it on a fragment of a specific size that I could distinguish easily. Somehow, I thought, it had to be an illusion. Otherwise it would change DNA chemistry forever. Otherwise it would make me famous. It was too easy. Someone else would have done it and I would surely have heard of it. We would be doing it all the time. What was I failing to see? "Jennifer, wake up. I've thought of something incredible." --Kary Mullis from his Nobel lecture; December 8, 1983
Restriction enzyme digest

Restriction endonucleases, also called restriction enzymes, cut (“digest”) DNA at specific sequences of bases. The restriction enzymes are named according to the prokaryotic organism from which they were isolated. For example, the restriction endonuclease EcoRI (pronounced “echo-are-one”) was originally isolated from E. coli giving it the “Eco” part of the name. “RI” indicates the particular version on the E. coli strain (RY13) and the fact that it was the first restriction enzyme isolated from this strain.
The sequence of DNA that is bound and cleaved by an endonuclease is called the recognition sequence or restriction site. These sequences are usually four or six base pairs long and palindromic, that is, they read the same 5’ to 3’ on the top and bottom strand of DNA. For example, the recognition sequence for EcoRI (see also figure at right) is
5’ GAATTC 3’
3’ CTTAAG 5’
Unlike EcoRI, some other restriction enzymes cut precisely in the middle of the palindromic DNA sequence, thus leaving no overhangs after digestion. The single-stranded overhangs resulting from DNA digestion by enzymes such as EcoRI are called sticky ends, while double-stranded ends resulting from digestion by enzymes such as HaeIII are called blunt ends. HaeIII recognizes
5’ GGCC 3’
3’ CCGG 5’
Ligation
During the ligation reactions, hydrogen bonds will form between the overhangs on the fragments, and then the ligase will repair the phosphate backbone, creating a stable circular plasmid (as shown in the figure below).

Protocols
Part 1: Laboratory orientation quiz
Complete the laboratory quiz with your partner. Though you are working with your partner, each student should submit their written answers on the provided quiz. If you disagree with your partner on an answer, you should write what you think is the correct answer on your quiz.
Good Luck!
Part 2: PCR amplification and restriction enzyme digest of IPC insert
Because DNA engineering at the benchtop can take days, if not weeks, you will generate your clone in silico today. You can use any DNA manipulation software you choose to complete the protocols, but the instructions provided are for APE (A Plasmid Editor, created by M. Wayne Davis at the University of Utah). The software can be downloaded free-of-charge (add site) onto your personal computer or you can use the teaching laboratory computers. Please note that if you use a different program the teaching faculty may not be able to assist you.
Be sure to document your work and answer all questions in your notebook as you progress through the exercises below.

To amplify a specific sequence of DNA, you first need to design primers -- one primer that anneals to the start of the sequence and a second primer that anneals to the end of the sequence. Today you will design a 'forward' primer that reads toward the IPC gene and a 'reverse' primer that anneals to the opposite DNA strand at the end of the IPC gene and reads back into it. Each primer will consist of two parts. The 'landing sequence' will anneal to the gene and the 'flap sequence' will be used to add restriction enzyme recognition sequences to your IPC insert.
- Find the IPC sequence attached here.
- Open APE then copy and paste the sequence into a new window.
- Because we want to amplify the entire gene, the forward primer will begin with the first basepair of the sequence.
- Record the first 20 basepairs of the IPC gene sequence in your notebook.
- Visually inspect this sequence and make notes based on the following guidelines for primer design:
- Length: 17-28 basepairs
- GC Content: 50-60%
- Tm: 60-65°C
- Avoid hairpins, complementation between primers, repetitive sequences
- Several websites are available to help you evaluate your primers more accurately.
- Copy and paste the 20 basepair sequence into Sequence box at the IDT website.
- Leave the defaults for stems and loops as they are and then click Analyze.
- If you primer does not fit the guidelines provided above, try altering the length. Remember that the 5’ end of the landing sequence must not change or you will delete basepairs from your gene.
- When you are happy with the landing sequence, use the Features tool to mark the sequence on your APE file (Features → New Feature).
- Now that you have your landing sequence you will add a flap sequence that introduces a restriction enzyme recognition sequence.
- We will use EcoRI in our cloning strategy (recognition sequence = GAATTC).
- Add the recognition sequence for the EcoRI restriction enzyme to the landing sequence. Consider how PCR amplification occurs to determine which end of your primer should carry the flap sequence.
- In addition to the recognition sequence, it is important to include a 6 basepair 'tail' or 'junk' sequence to ensure the restriction enzyme is able to bind and cut the DNA. Add CATTAG as the junk sequence. Carefully consider where this sequence should appear in your primer.
- Record the sequence (5' - 3') of your forward primer in your notebook.
- Use steps 2-5 to design your reverse primer.
- Because you want to amplify the entire gene you should start with the last basepair of the sequence.
- Remember that the reverse primer anneals to the opposite DNA strand at the end of the IPC gene and reads back into it. Keep this in mind when you add the flap sequence and when you record the sequence of your primer in your notebook.
- Create a new APE file that depicts the IPC product you would expect if you used your primers in a PCR amplification reaction.
- What has been added to the sequence?
- Add the sequence information to your notebook (it may be easiest to screen capture your work station in APE and embed the image in your notebook).
- Now that you have your amplified IPC insert, you need to digest with EcoRI to generate 'sticky ends' to prepare your gene for the ligation step.
- Search the NEB catalog to where EcoRI cuts within its recognition sequence.
- Create another new APE file that depicts your amplified IPC product following an EcoRI digest.
- What had been removed from the sequence?
Part 3: Restriction enzyme digest of pRSET vector
To ensure that the insert is able to ligate with the vector, it is important to generate compatible 'sticky ends' on both DNA fragments. Above, you prepared the IPC insert by digesting your amplicon (PCR amplification product) with EcoRI. In this exercise you will digest your pRSET vector to create compatible ends in preparation for the ligation reaction.

- Begin by finding the pRSET DNA sequence here (and link).
- Copy and paste the vector sequence in a new APE workspace.
- Commericially available cloning vectors are engineering to contain a Multiple Cloning Site (MCS). The MCS is a short segment of DNA that encodes several restriction enzyme recognition sites. These restriction enzyme recognition sites are provided for cloning purposes.
- Discuss why EcoRI was selected for this cloning approach with your partner. Be sure to write your thoughts in your notebook.
- Using the Feature tool, label basepairs 202-248 as the MCS.
- To locate the EcoRI recognition sequence within the MCS, go to Enzymes > Enzyme selector.
- Select EcoRI and click Graphic Map. An image of the plasmid should appear in a separate window. In addition, the recognition sequence should be highlighted within the pRSET sequence in your workspace.
- Using the feature tool, label the EcoRI recognition sequence.
- Save your labelled pRSET file.
Part 4: Ligation of IPC insert and pRSET vector
When completed a ligation at the bench, one important step is to calculate the amounts of DNA you will use in the reaction. Use the steps below to complete calculate the amount of IPC insert and pRSET vector you would use to complete this ligation in the laboratory.

- Calculate the concentration of backbone and of insert you would use in a ligation reaction based on the recovery gel posted on the right.
- Refer to the NEB marker definitions to determine the ng of DNA in each lane. Note that the ng listed are for 10 μL of ladder and in the gel shown we loaded 20 μL of ladder.
- Convert the mass concentration to a molar concentration, using the fact that a typical DNA base is 500 g/mol. This conversion will mostly cancel out between the insert and the backbone, except for the difference in number of bases. Feel free to either omit steps that will cancel if you are comfortable doing so, or to keep them if you follow the math better that way.
- Ideally, you will use 50-100 ng of backbone in the this ligation.
- Referring to the mass concentration, what volume of DNA will this amount require?
- Ideally, you will use a 4:1 molar ratio of insert to backbone.
- Referring to the molar concentrations, how much insert do you need per μL of backbone?
- A 15 μL scale ligation should not include more than 13.5 μL of DNA because you must leave enough volume to add buffer and the ligase enzyme.
- If your backbone and insert volumes total to greater than this amount, you must (1) scale down both DNA amounts, using less than 50 ng backbone and/or (2) stray from the ideal 4:1 molar ratio. You may ask the teaching faculty for advice during class if you are unsure what choice is best.
- Be sure to record all of your work for the ligation calculations in your notebook.
- Feel free to take a picture of your hand-written work and embed the image in your notebook.
- Next you will complete this ligation in silico to generate a plasmid map of your pRSET-IPC plasmid.
 Ligation of IPC insert and pRSET vector.
- To ligate your IPC fragment into your pRSET vector, copy the digested IPC sequence you generated above and paste it into your vector sequence.
- Recall where EcoRI cuts within its recognition sequence as you consider the exact basepairs between which you should paste your IPC insert.
- Hint: the IPC insert should be flanked by intact EcoRI recognition sequences in your final cloning product.
- Save the file of your pRSET-IPC and embed the plasmid map image in your notebook.

Part 5: Confirmation digest
To confirm the pRSET-IPC construct that we will use for this module, you will perform a 'diagnostic' or 'confirmation' digest. This is an important step used to check products you clone yourself and those that you may receive from another research.
Use information from the lab manual, the NEB catalog and the plasmid maps you generated above to choose the enzymes you will use. The following table may be helpful as you plan your work. Consider the following as you work:
- Each enzyme should be present in 2.5 U quantity. As an example, the XbaI vial contains 20,000 U/mL, or 20 U/μL, that is to say 8 times the desired working quantity in one microliter; therefore one reaction will require 0.125 μL.
- Because the lower limit of your pipet is 0.5 μL, you will need to dilute the enzyme in its appropriate buffer prior to adding it to your master mix.
- Note: we always buy the "S" size and concentration of enzymes.
| Diagnostic Digest | Enzyme 1 only | Enzyme 2 only | uncut | |
|---|---|---|---|---|
| pRSET-IPC | 5 μL | 5 μL | 5 μL | 5 μL |
| 10X NEB buffer | 2.5 μL of buffer#_____ | 2.5 μL of buffer#_____ | 2.5 μL of buffer#_____ | 2.5 μL of buffer#_____ |
| 1st Enzyme (2.5 U) | ____ μL of _____ | ____ μL of _____ | ||
| 2nd Enzyme (2.5 U) | ____ μL of _____ | _____ μL of _____ | ||
| H2O | for a total volume of 25 μL | |||
- Unlike the cloning steps you completed above, the diagnostic digest will be performed at the benchtop.
- Prepare a reaction cocktail for each of the above reactions (uncut, singly cut with enzyme 1, singly cut with enzyme 2 and doubly cut with enzyme 1 and enzyme 2) that includes water, buffer and enzyme.
- Aliquot 5 μL of pRSET-IPC into four well-labeled eppendorf tubes. The labels should include the plasmid name, the enzymes to be added, and your team color.
- Add 20 μL of the appropriate cocktail to each tube. Flick the tubes to mix the contents, short spin down, and then incubate the mixtures at 37 °C.
Next day: Design mutation primers
Previous day: Orientation