20.109(F17):Test role of biochemical factors in genomic stability (Day4)

Contents
Introduction
The Base Excision Repair (BER) pathway corrects DNA damage, specifically base lesions, that result from oxidation, alkylation, deamination, and depuriniation/depryrimidination. If base lesions are not repaired, non-canonical base pairing can occur, which may result in the incorporation of an incorrect base during replication. To prevent mutations and maintain integrity of the genome, the BER pathway evolved as a highly conserved repair mechanism in both E. coli and mammals.

The BER pathway repairs base lesions using either a short-patch or long-patch mechanism. In the short-patch BER pathway, a single nucleotide is removed in the repair process. In contrast, in the long-patch BER pathway at least two nucleotides are removed. Though both mechanisms of repair are utilized, the conditions that drive each are poorly understood.
As mentioned above, the first step in the BER pathway involves a DNA glycosylase enzyme. The specific enzymes that we are interested in for this module are oxoguanine DNA glycosylase (Ogg) and alkyladenine DNA glycosylase (Aag). In the biochemical testing experiments, we will use the Ogg1-/- mutant and the Aag-/- mutant MEF cell lines to probe the mechanisms of oxidative and alkylating DNA damaging agents, respectively. During the previous laboratory session, you selected a chemical treatment to use in your experiment. This will dictate which cell lines you use today!
Protocols
Part 1: Load CometChips to test biochemical factors
- You will load the CometChips you prepared during the previous laboratory session, but first need to calculate the volume of cell suspension to load using the following informaiton:
- For the cell number, you will use the value selected during the group discussion on M1D3.
- The cell suspensions (both wild type and mutant) prepared by the teaching faculty is at a density of 500,000 cells / mL.
- Retrieve your CometChips from the front laboratory bench.
- Obtain one glass plate, one 96-well bottomless plate, and four 1.5" binder clips from the front bench per CometChip.
- Each partner will complete the following steps for one of the CometChips such that both partners are completing the steps in parallel.
- Remove your CometChips from the 1x PBS and place it, gelbond side down, on the glass plate. Save the dish your CometChip was stored in for storage later.
- Press the 96-well bottomless plate onto the CometChip so that the wells line up with your labeling as shown in the diagram on the right.
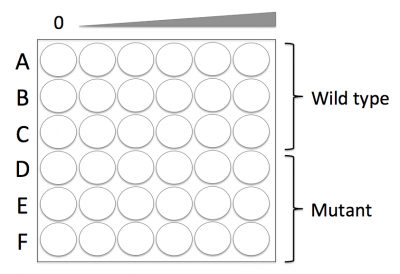 Plate map for biochemical testing experiment.
- Be sure to press the top of the 96-well bottomless plate onto the CometChip. If you are unsure which side is the top, please ask the teaching faculty.
- Do not move the 96-well bottomless plate while it is on the CometChip as you will damage the agarose and the microwells.
- Use the binder clips to secure the 96-well bottomless plate to the glass plate, thus creating a 'sandwich' with your CometChip in the center.
- Fasten the binder clips to the very edge of 96-well bottomless plate.
- Add the appropriate volume of your wild-type cell suspension (calculated in Step #1) to the wells in Rows A, B, and C.
- Add the appropriate volume of your mutant cell suspension (calculated in Step #1) to the wells in Rows D, E, and F.
- Incubate your CometChip in the 37 °C incubator in the main laboratory for 15 min.
- After the incubation, complete a wash step to remove excess cells that are not within the microwells of your CometChip.
- Carefully remove the binder clips and the 96-well bottomless plate.
- With the CometChip on the glass plate, 'waterfall' ~5 mL of 1x PBS over the wells, which are now imprinted onto the agarose.
- Hold the glass plate with the CometChip such that the letter labels are at the top to ensure you do not wash wild-type cells into the mutant Rows, or vice versa.
- To waterfall the 1x PBS, hold the glass plate at a 45° angle over a blue plastic dish, found at front bench.
- Pipet up ~5 mL of 1x PBS.
- Press the pipet tip onto the glass plate above your CometChip.
- As you expel the 1x PBS, quickly move the pipet tip from left-to-right.
- The 1x PBS should pass over the top of the CometChip and fall into the dish.
- Use a P200 tip attached to the pasteur pipet to aspirate the excess liquid from your CometChip wells.
- Lightly touch the tip to the bottom of each imprinted well on the CometChip and immediately lift the tip from the agarose.
- Retrieve one tube of molten 1% low melting point (LMP) agarose from the 42 °C waterbath.
- You will need to work quickly from this point as the LMP agarose will solidify as it cools.
- Using the P1000, pipet up 1000 μL of molten agarose from the tube.
- Hold the pipet tip over the top left well of your CometChip and as you expel the agarose move the pipet tip from left to right. Ensure that each row of your CometChip gets covered.
- The goal is to lightly cover the wells that contain cells, which will 'trap' the cells into the microwells.
- If the LMP agar 'fell' off the CometChip in any areas during this process, it is important to 'fill in' those portions of the CometChip. Please alert the teaching faculty if you experience any difficulties!
- Leave your CometChip undisturbed on the benchtop for 3 min then carefully move it to the 4 °C cooler for 5 min to ensure the LMP agarose solidifies.

Part 2: Induce DNA damage using H2O2 or MMS treatments
After you load the cells into the CometChip, you will induce DNA damage using either H2O2 or MMS. Each team will use the chemical treatment selected during the previous laboratory session.
Follow the appropriate protocol for damage induction based on the chemical you selected for your experiment.
DNA damaging agent: H2O2
You will use the following procedure to treat both of your CometChips.
- While the LMP agar is solidifying at 4 °C, calculate the dilutions of H2O2 that you will use for your experiment.
- The H2O2 stock solution is at a ~10 M concentration.
- You will add 100 μL per well to induce DNA damage.
- Calculate dilutions that result in doses of 0, 5, 10, 15, 20, and 25 μM.
- Retrieve your CometChip from the 4 °C and carefully replace the bottomless 96-well plate to recreate the wells that you used for cell loading.
- Secure the bottomless 96-well plate with binder clips as before.
- Obtain an aliquot of H2O2 and prepare the doses that you calculated in Step #1 using 1x PBS as the diluent in a 12-well reservoir as discussed in prelab.
- Be sure to keep the H2O2 on ice at all times!
- Using a multi-channel pipet, add the appropriate treatment doses of H2O2 to each well of your CometChip.
- The 0 μM treatment should be added to the wells at the far left and the 25 μM treatment should be added to the wells at the far right of the CometChip.
- Carefully transport your CometChip to the 4 °C cooler and incubate for exactly 20 min.
- Retrieve your CometChip from the 4 °C cooler and quickly remove the bottomless 96-well plate while holding the CometChip at an angle such that the low doses of H2O2 'run' over the wells with high doses.
- If the high doses of H2O2 run over the low dose wells, additional damage may be induced and confound the results.
- Rinse your CometChip using 1x PBS into the same dish used during the cell loading procedure.
- Complete a total of 3 washes.
DNA damaging agent: MMS
You will use the following procedure to treat both of your CometChips.
Please be very careful when using MMS as it is a mutagen. You should always wear flock-lined gloves, in addition to the standard laboratory gloves, when using MMS.
- While the LMP agar is solidifying at 4 °C, calculate the dilutions of MMS that you will use for your experiment.
- The MMS stock solution is at a ~12 M concentration.
- You will add 100 μL per well to induce DNA damage.
- Calculate dilutions that result in doses of 0, 0.1, 0.2, 0.5, 6, and 8 mM.
- Retrieve your CometChip from the 4 °C and carefully replace the bottomless 96-well plate to recreate the wells that you used for cell loading.
- Secure the bottomless 96-well plate with binder clips as before.
- Obtain an aliquot of MMS and prepare the doses that you calculated in Step #1 using DMEM media as the diluent in a 12-well reservoir as discussed in prelab.
- Work at the piece of diaper paper located at the front laboratory bench when preparing MMS solutions!
- Using a multi-channel pipet, add the appropriate treatment doses of MMS to each well of your CometChip.
- The 0 mM treatment should be added to the wells at the far left and the 8 mM treatment should be added to the wells at the far right of the CometChip.
- Carefully transport your CometChip to the 37 °C incubator for exactly 30 min.
- Retrieve your CometChip from the 37 °C incubator and quickly remove the bottomless 96-well plate while holding the CometChip at an angle such that the low doses of MMS 'run' over the wells with high doses.
- If the high doses of MMS run over the low dose wells, additional damage may be induced and confound the results.
- Rinse your CometChip using 1x PBS into the same dish used during the cell loading procedure.
- Complete a total of 3 washes.
Part 3: Complete cell lysis
- Use the same dish your CometChip was stored in at the start of lab and a 30 mL aliquot of alkaline lysis buffer from the front laboratory bench.
- Carefully move your CometChip into the dish.
- Add the aliquot of alkaline lysis solution by slowly pouring it into a corner of the dish rather than directly over the CometChip.
- Be sure the CometChip is completely submerged and not floating in the dish.
- Label the dish with your team and section information.
- Move your dish into the 4 °C cooler.
The teaching faculty will transfer your CometChip from the alkaline lysis solution into 1X PBS at ~24 hr.
Reagents list
Cell culture:
- Agg-/- MEF mutant and matched wild-type MEF cell lines (Samson Laboratory)
- Ogg1-/- MEF mutant and matched wild-type MEF cell lines (Samson Laboratory)
CometChip:
- MMS: methyl methanesulfonate (Sigma Aldrich)
- H2O2: hydrogen peroxide (Sigma Aldrich)
- Alkaline Lysis Solution (2.5M NaCl, 100mM Na2EDTA, 10mM Tris, 1% Trition-X)
Next day: Complete biochemical experiment and apply chemical treatments for sub-nuclear foci assay