20.109(F17):Complete biochemical experiment (Day5)
Contents
Introduction
To this point in the module we have been using the CometChip assay to study DNA damage in the context of the BER pathway. Specifically, we considered the role of oxidative stress in generating base lesions. It is important to remember that the data collected using the CometChip assay is not specific to base lesions and that the DNA damage observed may be the result of various types of DNA lesions, including base excisions, abasic sites, strand breaks, and crosslinks. The experimental work you complete in the next three laboratory classes will focus on a technique used to measure DNA double-strand breaks.
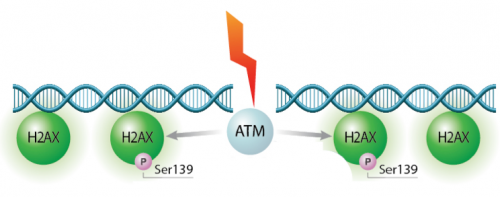
In eukaryotes, including humans, DNA is tightly wound around histone groups. H2AX is a member of the core group of histones that contributes to nucleosome formation and DNA structure. When a DNA double-strand break is introduced into the genome, the H2AX histones near the break are phosphorylated by the ATM kinase at residue Ser-139. Upon phosphorylation H2AX is referred to as gamma-H2AX. Given that only H2AX histones near the site of DNA damage are phosphorylated, γH2AX is a useful target when determining the abundance and location of double-strand breaks.In your γH2AX assay experiment, you will assess the effects of H2O2 and MMS on double-strand break abundance in the cell lines used for the CometChip assay. In your analysis you will interrogate the consistency of the results from these two approaches. Furthermore, you will craft a hypothesis concerning the repair efficiency of the cell lines and use the γH2AX assay to test your research question.
Protocols
Part 1: BE Communication Lab workshop
Our communication instructors, Dr. Sean Clarke and Dr. Prerna Bhargava, will join us today for a workshop on writing impactful abstracts and titles.
Part 2: Complete enzyme treatments for biochemical test experiments
Each team will use the enzyme that corresponds to the chemical treatment selected during the previous laboratory session.
Follow the appropriate protocol for damage induction based on the chemical you selected for your experiment.
DNA damaging agent: H2O2
One CometChip will be a 'no enzyme treatment' control and the other will be the 'treatment' experimental with enzyme.
- Prepare 1X complete reaction buffer.
- You will need 80 mL for each CometChip.
- Calculate the amount of BSA dry stock required for a final concentration of 0.2 mg/mL.
- Add the appropriate amount of BSA dry stock to a milk bottle, then add the 1X reaction buffer to the correct volume.
- Allow the buffer to reach room temperature and the BSA to completely dissolve before use.
- Obtain your CometChips from the front laboratory bench.
- Rinse your CometChips with neutralization buffer.
- Pour the 1X PBS from the dishes that contain your CometChips.
- Add enough neutralization buffer to submerge the CometChips.
- Pour the neutralization buffer from the dishes.
- Equalize your CometChips with the 1X complete reaction buffer you prepared in Step #1.
- Submerge the CometChips in 15 mL of neutralization buffer for 15 min.
- Pour the neutralization buffer from the dish.
- Repeat for a total of three times.
- Place the CometChips on paper towels and allow to dry for 3 min.
- Obtain a glass plate, bottomless 96-well plate, and four binder clips for each CometChip and assemble a 'sandwich' as done previously.
- Prepare enzyme reaction solution.
- Dilute Fpg enzyme 1:10,000 in 2.5 mL of 1X complete reaction buffer.
- In the 'no enzyme treatment' control CometChip, add 50 μL of 1X complete reaction buffer to each well that was loaded and treated during the previous laboratory session.
- In the 'treatment' experimental CometChip, add 50 μL of 1X complete reaction buffer containing enzyme that you prepared in Step #7 to each well that was loaded and treated during the previous laboratory session.
- Incubate both CometChips at 37 °C for 20 min.
- To stop the reaction, remove the bottomless 96-well plate and submerge the CometChips in 30 mL of cold 1X PBS.
- Immediately transfer the CometChips to 30 mL of cold alkaline unwinding buffer.
- Move the dishes with your CometChips to the 4 °C cooler and incubate for 1 h.
DNA damaging agent: MMS
One CometChip will be a 'no enzyme treatment' control and the other will be the 'treatment' experimental with enzyme.
- Prepare 1X complete reaction buffer.
- You will need 80 mL for each CometChip.
- Calculate the volume of Triton X-100 required for a final concentration of 0.1%.
- Add the appropriate volume of Triton X-100 to a milk bottle, then add the 1X reaction buffer to the correct volume.
- Allow the buffer to reach room temperature and the Triton X-100 to completely mix before use.
- Obtain your CometChips from the front laboratory bench.
- Rinse your CometChips with neutralization buffer.
- Pour the 1X PBS from the dishes that contain your CometChips.
- Add enough neutralization buffer to submerge the CometChips.
- Pour the neutralization buffer from the dishes.
- Equalize your CometChips with the 1X complete reaction buffer you prepared in Step #1.
- Submerge the CometChips in 15 mL of neutralization buffer for 15 min.
- Pour the neutralization buffer from the dish.
- Repeat for a total of three times.
- Place the CometChips on paper towels and allow to dry for 3 min.
- Obtain a glass plate, bottomless 96-well plate, and four binder clips for each CometChip and assemble a 'sandwich' as done previously.
- Prepare enzyme reaction solution.
- Dilute hAAG enzyme 1:400 in 2.5 mL of 1X complete reaction buffer.
- In the 'no enzyme treatment' control CometChip, add 50 μL of 1X complete reaction buffer to each well that was loaded and treated during the previous laboratory session.
- In the 'treatment' experimental CometChip, add 50 μL of 1X complete reaction buffer containing enzyme that you prepared in Step #7 to each well that was loaded and treated during the previous laboratory session.
- Incubate both CometChips at 37 °C for 15 min.
- To stop the reaction, remove the bottomless 96-well plate and submerge the CometChips in 30 mL of cold 1X PBS.
- Immediately transfer the CometChips to 30 mL of cold alkaline unwinding buffer.
- Move the dishes with your CometChips to the 4 °C cooler and incubate for 1 h.
Part 3: Separate CometChip 'tails' using gel electrophoresis
- Remove your CometChip from the lysis solution and use a kimwipe to dry the gelbond side.
- Carefully transport your CometChip to the gel electrophoresis station in the 4 °C cold room.
- The teaching faculty will escort you.
- Place your CometChip on the raised center region of an electrophoresis box.
- Double-sided tape was applied to the gel electrophoresis box. Be sure you lay your CometChip on the tape strips and lightly press down with a pipet tip to ensure it is secure.
- Add enough of the alkaline electrophoresis buffer to the gel electrophoresis box to cover your CometChip.
- Your CometChip will incubate in the electrophoresis buffer for 40 min to promote unwinding of the DNA.
- To separate the damaged DNA into 'comets' it is important that the electrophoresis occur at 300 mA. To maintain the appropriate current, the volume of electrophoresis buffer may need to be adjusted. The teaching faculty will assist you in adding/removing electrophoresis buffer such that this value is reached.
- The electrophoresis will continue for 30 min (at 16 V, or 1 V/cm).
- Carefully remove your CometChip from the electrophoresis box and place it in a dish.
- Obtain an aliquot of neutralization buffer from the front laboratory bench.
- Wash your CometChip by adding enough neutralization buffer to cover and incubate for 5 min at room temperature.
- Repeat this step a total of 3 washes.
- Add the SYBR gold DNA stain to your CometChip and carefully move it to the 4 °C cooler.
The teaching faculty will image your CometChip after ~16 hr and provide the images to you in the next laboratory section.
Part 4: Treat cells for sub-nuclear foci assay
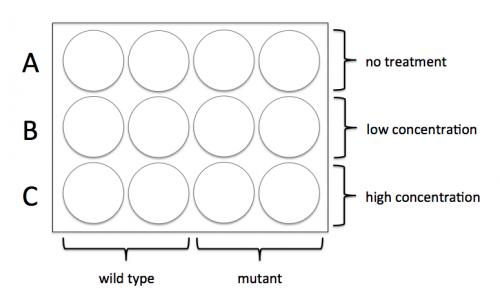
For timing reasons, the teaching faculty seeded 12-well plates with wild-type and mutant cells that you will treat with the same chemical you used for the biochemical testing experiment. Each group will work with two plates: one will be used to assess the level of damage following treatment with the DNA damaging agent and the second will be used to assess repair following treatment.
Before you enter the tissue culture room, sign up for the treatment concentrations that you will use in your experiment and confirm your calculations with the teaching faculty. Each team will test two concentrations (in addition to completing 'no treatment' control samples).
- Choose which concentrations of DNA damaging agent you will test.
- For H2O2, select from 5, 10, 15, 20, and 25 μM.
- For MMS, select from 0.1, 0.2, 0.5, 6, 8 mM.
- Calculate your dilutions.
- For H2O2, the stock concentration is 10 M. Use two dilutions to prepare a 100 μM solution that will be used to prepare your treatment concentrations.
- For MMS, the stock concentration is 12 M. The teaching faculty prepared a 12 mM solution that will be used to prepare your treatment concentrations.
- Alert the teaching faculty when you are ready to enter the tissue culture room.
Reagents list
Next day: Examine sub-nuclear foci abundance to measure DNA damage


