20.109(F16):Test comet chip loading variables (Day2)

Contents
Introduction
Today you will load cells into the comet chip you prepared during the previous laboratory class. Cell loading refers to the process by which the cells are added to the comet chip. Briefly, you will add media containing cells over the agarose-based comet chip and gravity will pull the cells down and 'load' them into the comet chip. The details of this process will be the basis of the experiments you design and perform during this laboratory meeting.
Experimental design is
Protocols
Part 1: BE Communication Lab workshop
Our communication instructors, Dr. Diana Chien and Dr. Sean Clarke will join us today for a workshop on designing effective figures and captions.
Part 2: Design experiment to optimize comet chip loading
You will design two experiments that test variables or conditions associated with loading cells into the microwells of your comet chip. In the first experiment you will consider the role of cell number. Specifically, how many cells should be added to each well to ensure the majority of the microwells are loaded? In addition, how many cells should be loaded into each microwell? The second experiment will interrogate the length of time needed for loading.
In the comet chip that you prepared during the previous laboratory class there is space for you to complete two experiments, each with two conditions. Your experiments will address the questions above and the conditions will provide data that will, hopefully, answer your research questions.

Experiment 1: Cell number

- How many cells should be loaded into each microwell?
- Consider the amount of DNA that is carried by a single mammalian cell and the detection limit provided by the SYBR gold DNA stain that will be used in your experiments. Also, use the data you collected during the Orientation exercise to determine how many cells can fit into a single microwell based on the dimensions provided above.
- Be sure to include any calculations or thoughts in your laboratory notebook!
- When you know how many cells you want to load into each microwell, move on to the next question.
- How many cells should be added to each well such that the desired number of cells are loaded into the microwells?
- Consider the likelihood that every cell you add to the well will fall into a microwell. Perhaps calculate the surface area of the bottom of a well (of diameter 6.35 mm) and compare this to the size of the cells as you consider this question.
- Now that you have an idea as to the number of cells that are ideal for loading, consider the conditions you will use in your experiment.
- If you and your partner are in agreement on how many cells are ideal, you can load the ideal number of cells for Condition A and then either too few or too many for Condition B. Or you can load slightly more than the ideal number of cells for Condition A and slightly less for Condition B.
- If you and your partner are not in agreement, you can each load the number of cells you determine to be ideal as Condition A and Condition B.
- Again, all information concerning your experimental design choices should be recorded in your laboratory notebook!
Experiment 2: Loading time
After adding the cells to the wells, gravity causes the cells to fall or settle into the bottom of the well. The second experiment will examine the amount of time required for the cells to fall into the microwells.
- How long might it take for cells to fall to the bottom of the well?
- Consider the benefits and drawbacks of the loading time. Too little time and the cells will remain in the media; however, if you wait too long the agarose-based comet chip may dry out in the incubator.
- Record the conditions you will use for this experiment in your laboratory notebook!
As you decide on the conditions you will test for the two experiments, check-in with the teaching faculty to ensure that your experimental design choices are feasible given the laboratory constraints on supplies and time.
Part 3: Load comet chip
You will load your comet chip in a biosafety cabinet; however, it is important that you consider the following details before entering the tissue culture room.
- The volume of cells you will load into each well is 100 μL and you will load 3 wells for each experimental condition.
- Calculate the concentration of cells per μL that you will need to load for Experiment 1. Note that this value will be different for Condition A and Condition B.
- You will also load cells into the wells for Experiment 2. For Experiment 2, you will load the same number of cells in all of the wells (remember from the introduction that each experiment should only contain a single variable). Select either Condition A or Condition B from Experiment 1 for loading here. If you and your partner are unable to agree on which Condition to use, consult the teaching faculty.
- The loading time will dictate when you add the cells to the wells of your comet chip.
- You will first add 100 μL of cells to the wells with the longest loading time, then add 1x PBS to the wells you will use to test shorter loading times.
- Incubate your comet chip at 37 °C until the time difference between Condition A and Condition B has elapsed. For example, if Condition A is a 30 min incubation and Condition B is a 5 min incubation, load 100 μL of cells into the wells labeled for Condition A and 100 μL of 1x PBS into the wells labeled for Condition B. Move the comet chip to the 37 °C incubator and wait 25 min (30 min - 5 min = 25 min). Retrieve your comet chip from the incubator, aspirate the 1x PBS and add 100 μL of cells to the wells labeled for Condition B. Return the comet chip to the incubator for 5 min.
- In Experiment 2 you will add the same number of cells to all wells. As above, select the number of cells used for either Condition A or Condition B of Experiment 1 and/or consult the teaching faculty for advice.
Now that you have a plan, alert the teaching faculty. Because there are not enough biosafety cabinets for all the groups you may be asked to wait until another team has finished. Please be patient.
- Obtain the flask of TK6 cells that you seeded in the previous laboratory class from the 37 °C incubator.
- Determine the density of the TK6 culture (cells per mL) using a hemacytometer as done previously during the Orientation exercise. As a brief reminder:
- Transfer 90 μL of the TK6 cell culture to a 1.5 mL eppendorf tube.
- Carry the tube to the center microscope bench and add 10 μL of trypan blue cell stain.
- Carefully pipet 10 μL of the stained cells between the hemacytometer and glass cover slip.
- Count the cells that fall within the corner squares of the 4x4 pattern and then multiply by 10,000 to determine the number of cells/mL.
- Centrifuge, resuspend in correct volume for loading number.
- Retrieve your comet chip from the 4 °C cooler.
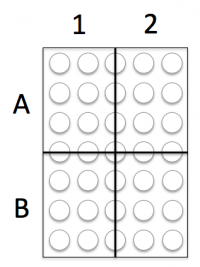 Comet chip diagram showing well alignment.
- You will also need to gather one glass plate, one 96-well bottomless plate, and four 1.5" binder clips from the front bench.
- Remove your comet chip from the 1x PBS and place it, gelbond side down, on the glass plate.
- Press the 96-well bottomless plate onto the comet chip so that the wells line up with your labeling as shown in the diagram on the right.
- Be sure to press the top of the 96-well bottomless plate onto the comet chip. If you are unsure which side is the top, please ask the teaching faculty.
- Do not move the 96-well bottomless plate while it is on the comet chip as you will damage the agarose and the microwells.
- Use the binder clips to secure the 96-well bottomless plate to the glass plate, thus creating a 'sandwich' with your comet chip in the center.
- Fasten the binder clips to the very edge of 96-well bottomless plate as shown in the image below.
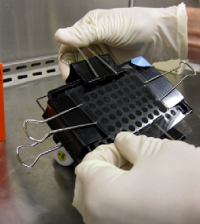 Binder clip placement for comet chip sandwich.
- Fasten the binder clips to the very edge of 96-well bottomless plate as shown in the image below.
- Add 100 μL of cells into the wells that will incubate for the longest loading time.
- Add 100 μL of 1x PBS to the empty wells.
- Incubate your comet chip at 37 °C for the appropriate length of time.
- Retrieve your comet chip.
- Remove the 1x PBS by aspirating off the liquid, gently, with a yellow pipet tip attached to the pasteur pipet.
- Be very careful not to damage the agarose!
- Press the pipet tip to the side of the well rather than poking down in the center of the well.
- Remove the pipet tip as soon as the 1x PBS is aspirated.
- Add 100 μL of cells into the appropriate wells and incubate at 37 °C for the length of time specified by your experimental condition.
- After the cells are loaded, complete a wash step to remove excess cells that are not within the microwells of your comet chip.
- Carefully remove the binder clips and the 96-well bottomless plate.
- With the comet chip on the glass plate, 'waterfall' ~5 mL of 1x PBS over the wells, which are now imprinted onto the agarose.
- To waterfall the 1x PBS, hold the glass plate at a 45° angle over the dish that you used to store your comet chip.
- Pipet up ~5 mL of 1x PBS.
- Press the pipet tip onto the glass plate above your comet chip.
- As you expel the 1x PBS, quickly move the pipet tip from left-to-right.
- The 1x PBS should pass over the top of the comet chip and fall into the dish.
- Use a yellow tip attached to the pasteur pipet to aspirate the excess liquid from your comet chip wells.
- Lightly touch the tip to the bottom of each imprinted well on the comet chip and immediately lift the tip from the agarose.
- Now that the cell loading procedure is complete, you can take your comet chip to the main laboratory.
- Be very careful as you transport your comet chip.
- Read through Steps #15-20 before continuing with the procedure.
- Retrieve one tube of molten 1% low melting point (LMP) agarose from the front laboratory bench.
- You will need to work quickly from this point as the 1% LMP agarose will solidify as it cools.
- Using the P1000, pipet up 1000 μL.
- Hold the pipet tip over the top left well of your comet chip and as you expel the agarose move the pipet tip from left to right. Complete this process for every row of your comet chip.
- The goal is to lightly cover the wells that contain cells, which will 'lock' the cells into the microwells.
- Leave your comet chip undisturbed on your bench for 3 min, then move it to the 4 °C cooler for 3 min.
- Collect your comet chip from the 4 °C cooler and place it into a fresh dish.
- Add enough of the alkaline lysis solution to the dish to cover your comet chip.
- Be sure the comet chip is completely submerged and not floating.
- Move the dish with your comet chip to the 4 °C cooler.


Your comet chip will remain in the alkaline lysis solution overnight and tomorrow the teaching faculty will image each well. These data will be used to assess your loading strategy during the next laboratory meeting.
Reagents
Next day: Measure DNA damage with comet chip
Previous day: Prepare comet chips