20.109(F08): Mod 3 Day 4 Phage by design
pic.jpg)
Contents
Introduction

Protocols
Part 1: Pattern for phage deposition
There are two dangerous parts in today's lab. You will be working with an Exact-O knife to carefully cut a pattern onto your slide. These knives are extremely sharp and everyone should show the greatest care in handling these or you will end up at MIT medical. The second danger is the concentrated acid treatment needed to pattern the slides. You must, must, must wear lab coat, closed-toed shoes, gloves (perhaps double gloves), and goggles when you are dealing with the HCl, HNO3 solution. In today's lab it will be the teaching faculty who suit up to do this.
- Collect an ITO slide from the teaching faculty, touching the slide with a gloved hand and only on the edges. ITO stands for "indium tin oxide" and it will serve as a transparent electrode in our electrochromic devices.
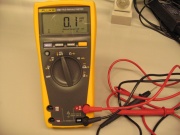 multimeter set to measure current rather than resistance as you should be doing
- It will not be obvious which side of the slide has ITO so you will have to measure the conductance of each surface. To do this, you should put a Chemwipe down on your bench and rest the slide on it. Use the multimeter to measure the conductance of both surfaces. Hold the probes a set distance from one another and measure resistance (in ohms). If the material that you are touching is unable to conduct a current, the resistance will read "0L." The side of the slide with ITO should give a numerical reading, depending on how far apart the probes are held.
- Clean the ITO slide by placing it into a 50 ml falcon tube with 1% Liquinox. Sonicate for 2 minutes. Remove the slide from the Liquinox solution with gloves or with tweezers and briefly rinse in Millipore H2O. Place the slide in a 50 mL Falcon tube with methanol. Sonicate for 2 minutes. Remove the slide and then let it air-dry on a paper towel on the bench. Do not wipe the ITO surface. Save the tubes of Liquinox and methanol for the end of lab.
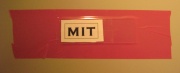
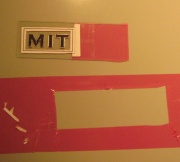
- While the slide is drying, decide on your ECD design. What you choose should fit into a 1 inch by 1 inch box, as shown in the figure that is on the "talk" page of today's lab. As you think about what image to choose note that the area of your image that you want dark (i.e. visible) should remain under tape and you will cut out the areas that you want clear. Also note that current must be able to flow across to the image when we finally hook it up, so make sure that you leave your image connected to the rest of the ITO, unlike the "MIT" example shown in today's protocols. Print out three copies of your image: one for the slide and one for each of your notebooks.
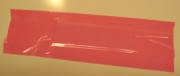
- When your slide is dry, place it ITO side up onto the bench and fully cover it with a strip of red 3M tape. Press the air-bubbles out.
- Cover the end that you'll pattern with double-sided scotch tape and then tape your printed image to the slide.
- Cut the pattern you've chosen, running the knife-blade back and forth a few times on each cut to insure that all the tapes have been cut.
- Peel off the paper, scotch-tape and red tape to expose the areas of the slide where the ITO is to be removed (i.e. where no phage will bind, i.e. where no color will form). The silver tweezers in your drawer should be useful for this step. Use the Exact-O knife as needed also.
- One of the teaching faculty will place your slide, pattern down, into the acid wash solution that is gently mixing on a stir plate in the hood. Balance your slide on the edge of the beaker, so the red tape remains outside the acidic solution. It should be possible to balance 4 slides in each beaker.
- Incubate the slide in the acid solution for 20 minutes.
- Wash the slide by swirling it three times in the 1L beaker of H2O that is in the hood. Be very careful not to drip any of the acid wash solution as you move the slide.
- Clean the slide by placing it back in the falcon tube with MeOH, then allow the slide to air dry on a paper towel on the bench.
- Before fully removing the tape that remains on the slide, verify that the ITO has been removed from the exposed regions. Peel back a small corner of the red tape that remained outside the acid solution. Use the multimeter to compare the conduction when the probes are
-20.109(F07)_Mod3_ECD-Mod3F07_wiki_images-multimeter.jpg)


| mV | |
| both touching bench top or glass slide | |
| both touching metal | |
| both touching untreated area | |
| both touching treated area | |
| touching treated/untreated area |
14. Remove the tape from the surface. If there are bits of glue left on the slide, you can clean them off with a cotton-tipped applicator that you dip in methanol. You must remove all glue and tape from the slide before depositing the nanowires.
Part 2: M13.1
As a class we will be comparing the production of phage (M13K07 and M13.1) from a "standard" lab strain, namely MG1655, and a "minimal" strain from the MDS collection. Four of these minimal strains (MDS12, MDS41, MDS 42, MDS43) are described in a 2006 Science article from Fred Blattner's group. A fifth strain, MDS60, is an unpublished strain with additional genomic deletions. We will make the strains competent for transformation using the protocol described by Inoue, Nojima and Okayama in their 1990 publication.
| Team Color | NB# | MDS# |
|---|---|---|
| everyone | NB258 | MG1655 |
| Green | NB259 | MDS12 |
| Purple | NB260 | MDS41 |
| Red | NB261 | MDS42 |
| Blue | NB262 | MDS43 |
| Pink | NB263 | MDS60 |
| Yellow | NB263 | MDS60 |
- Collect the wild type strain (MG1655) and the MDS you will work with, as listed on the table above. Describe in your lab notebook the deletions that the strain includes. Note that MDS60 is an unpublished strain provided by Fred Blattner's group to our lab. It is F- lambda- ilvG- rfb-50 rph-1 plus >15.27% deletion.
- Move 5 ml of log phase cells (MG1655 and the MDS) and to 15 ml falcon tubes.
- Spin your tubes (balanced against another) in the clinical centrifuge, 3000 RPM for five minutes.
- Pour off the supernatant from the pellets.
- Resuspend the bacterial pellets in 1 ml ice cold "TB". Move the cells to an eppendorf tube and leave on ice for 10 minutes.
- Spin the cells in a microfuge for 30 seconds at full speed.
- Aspirate the supernatant from the pellets.
- Resuspend the pellet in 150 ul ice cold "TB".
- Add 10.5 ul DMSO to the suspensions of cells and flick the tubes to mix.
- For each strain you should move 75 ul of cells to a new eppendorf with 5 ul of M13K07 DNA.
- For each strain you should move another 75 ul of cells to another new eppendorf with 5 ul of M13.1 DNA.
- Incubate the six tubes (no DNA, +M13K07, +M13.1) on ice for 5 minutes.
- Heat shock the six tubes at 42° for 90 seconds exactly.
- Add 500 ul of LB to each tube and incubate at 37° for at least 30 minutes. Prewarm and dry 6 LB+Kan plates at this time as well.
- Invert the tubes to mix the contents and spread 200 ul of each transformation mix on an LB+Kan plate.
- Incubate 37° overnight.
- Before leaving lab, you should innoculate 4 sterile glass tubes with 2.5 ml LB+Kan, labeling the top of the tubes with your team color and the contents of the tube (e.g. M13K07 in MG1655, M13.1 in MDS#). These will be used to grow transformants for you for next time.
Part 3: Research Proposal
You should be on your way to becoming an expert on your research topic. You should have been reading and thinking a lot about it and you may feel
(a) like there's too much to read
(b) like you have too many ideas and no way to map or prioritize them
(c) like you don't understand what you're reading
(d) all of the above.
One of the best ways to help frame the problem for yourself is to discuss it with someone new. While your slides are in the acid bath, you will have time to talk with another lab group. That group will offer you a fresh ear to consider your proposal. Try to describe your research problem to them. Articulate why it's important. Tell them about some recent, relevant data. Describe what you're proposing to do and what the findings from your experiments might reveal. Throughout your discussion, keep careful track of the questions they ask since these will point you to the confusing concepts or fuzzy parts of your explanation or understanding.
Then be a good listener to hear the proposal that they've been working on. Ask lots of questions. No questions are dumb. You are there to offer a naive ear and seek complete explanations. You will have time at the very end of class to reconvene with your own lab partner to hear how their conversation went. Try to identify repeated questions or concerns since these are probably the holes in the project as it stands. You can rework your proposal based on the conversations you've had.
DONE!
For next time
- Refer to the ring feature map that appears in the introduction to today's lab to answer the following questions about MG1655 and the MDS strain you are using. Consult the text and any online resources associated with it.
- How many basepairs are associated with MG1655 and with your MDS?
- How many genes have been deleted from MG1655 in your MDS?
- What do the grey rings in the center of Figure 1 represent?
- What color is used in Figure 1 to represent the deletions of your MDS?
- Interestingly, a Material Transfer Agreement ("MTA") was needed to enable us to use the MDS strains today. The agreement was brokered by MIT's Office of Intellectual Property Counsel and the sole commercial source for the deletion strains, a company called Scarab Genomics, founded by Prof. Blattner and others involved in the MDS project. To secure the right to purchase these strains for $650, the teaching faculty agreed to keep the strains in our lab (i.e. not share them), to modify them only in ways specified as "OK by Scarab," grant Scarab non-exclusive license to discoveries made with the strains and not use the strains for commercial purposes. Check out the pdf associated with the MTA link (above) and then comment.
- Outline your research proposal presentation. Recall that you will need to present
- a brief project overview (1 slide)
- sufficient background information for everyone to understand your proposal (1-3 slides)
- a statement of the research problem and goals (1 slide)
- project details and methods (3-5 slides)
- predicted outcomes if everything goes according to plan and if nothing does (3-5 slides)
- needed resources to complete the work (1 slide)
- societal impact if all goes well (1 slide)
Suggested numbers of slides are listed here but the number may vary depending on the particulars of your proposal. You will have time to work on the presentation in lab next time as well as ask questions about the format, but you should begin to prepare, in powerpoint or similar presentation program, the materials you need.
Reagents list
Acid wash solution ("aqua regia")
Beaker for acid solution: VWR 100x50 Cat No: 89000-290
100 mL H2O
85 mL HCl
30 mL HNO3