Difference between revisions of "20.109(F07): Phage by design, pt2"
(→Part 2: Phage deposition onto patterned slide) |
MAXINE JONAS (Talk | contribs) m (23 revisions: Transfer 20.109(F07) to HostGator) |
||
| (16 intermediate revisions by 2 users not shown) | |||
| Line 1: | Line 1: | ||
{{Template:20.109(F07)}} | {{Template:20.109(F07)}} | ||
==Introduction== | ==Introduction== | ||
| − | [[Image: | + | Electrodeposition is a commonly used technique in which current is applied to layer one material, usually a metal, onto another.[[Image:200px-1937-Wheat-Penny-Front-Back.jpg|thumb|left|Wikipedia's image of an all-copper penny from 1937]] Modern pennies may be the most pervasive example of electrodeposition though older ones tucked away in piggy banks are not. Pennies used to be made of pure or nearly pure copper, but in 1982 when the price of copper increased and an all-copper penny had more than a penny���s worth of copper in it, a new kind of cent coin was minted. Post-1982 pennies are made with an inexpensive metal (zinc) that is covered with a thin copper-coat. [[Image:EarFlaresWithCondors giltcopper.jpg|thumb|right|Pair of earflares with condors from Loma Negra, Pirua Valley, 2nd-3rd century, The Metropolitan Museum of Art photo credit:web.site@metmuseum.org.]]The coating is applied using the positive terminal of a power supply to oxidize the material on the anode (a lump of copper in the case of pennies), allowing it to react with anions in solution. At the cathode, the material gets reduced (i.e. gains electrons), regains its zero valence state and is deposited on the cathode surface (i.e. zinc if we���re still talking pennies). The electrolytes solution that carries the anode material to the cathode is often made from very nasty chemicals like cyanides since these are great conductors and prevent corrosion of the anode. An active search for ���friendlier��� electrolytes continues, as does optimization of ���electroless��� deposition. Even without batteries, which Volta invented in the 1800s, incredible artifacts with decorative patterns of metal are found among some ancient ruins ([http://www.lablaa.org/blaavirtual/publicacionesbanrep/bolmuseo/1996/jldi41/jldi08a.htm e.g. in Loma Negra Peru]). Replacement plating was used as much as [http://www.jstor.org/view/00778958/ap050032/05a00080/0 2000 years ago to inlay the reactive element copper with less reactive silver and gold]. |
| + | |||
| + | Successful electrodeposition requires that the cathode surface be extremely clean. Hydrophobic oils only molecules thick can inhibit deposition and cathode surfaces must be extensively cleaned with solvents, detergents, sonication (which uses sound waves to remove dirt) and/or acidic baths. Technical standards for cleaning, testing and assessing electrodeposited materials are described by [http://www.astm.org/cgi-bin/SoftCart.exe/index.shtml?L+mystore+hoqt3793+1196134766 the American Society for Testing and Materials]. Their guide for cleaning metals prior to electroplating has directions for precleaning, intermediate and final-cleaning as well as trouble shooting! [http://www.astm.org/cgi-bin/SoftCart.exe/DATABASE.CART/REDLINE_PAGES/B322.htm?L+mystore+hoqt3793+1196136492]. | ||
| + | |||
| + | [[Image:ITOphage tangle.png]] Today you will start to assemble your electrochromic device by electrodepositing IrO2 nanowires that formed on the specialize M13 phage. The IrO2 wires have a slight negative charge. Consequently they can be directed toward the patterned ITO slide if the slide is attached to the positive terminal of a power supply. The circuit is completed by attaching a platinum mesh to the ground terminal of a power supply. After this deposition, you will have a tangle of nanowires adhering to the areas of your slide that were not etched away last time. Next time you will finish building the electrochromic device, adding the Li+-layer of electrolytes and a second, unpatterned ITO slide to serve as the other conductive surface. A preview of the assembled ECD is found [http://openwetware.org/wiki/Image:ECD_off.png here] | ||
| + | |||
==Protocols== | ==Protocols== | ||
===Part 1: M13.1 titers=== | ===Part 1: M13.1 titers=== | ||
| − | The strains you transformed last time with M13K07 and M13.1 were inoculated into LB+Kan and grown overnight. If the two forms of the phage are equally robust, then the phage titer in the liquid surrounding the cells should be approximately the same. Ditto if the wild type strain, MG1655, and the MDS strain are equally capable of phage production. You will compare the PFU/ul of each culture to determine if this is true. The titering protocol is identical to the one from [ | + | The strains you transformed last time with M13K07 and M13.1 were inoculated into LB+Kan and grown overnight. If the two forms of the phage are equally robust, then the phage titer in the liquid surrounding the cells should be approximately the same. Ditto if the wild type strain, MG1655, and the MDS strain are equally capable of phage production. You will compare the PFU/ul of each culture to determine if this is true. The titering protocol is identical to the one from [http://openwetware.org/wiki/20.109(F07):_Agarose_gel_electrophoresis #Protocols| module 1]. Since you don't know if the phage production will be improved or diminished by any of the variations, you will titer a wider-than-usual range of concentrations. |
<center> | <center> | ||
{| border="1" | {| border="1" | ||
| Line 35: | Line 40: | ||
===Part 2: Phage deposition onto patterned slide=== | ===Part 2: Phage deposition onto patterned slide=== | ||
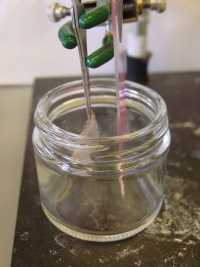
| − | + | [[Image:Deposition set up.JPG|thumb|right|200px|How to set up the ringstand for the deposition of the nanowires onto the ITO slide.]] | |
#Clean the ITO slide by placing it into a 50 ml falcon tube with 1% Liquinox. Sonicate for 2 minutes. Remove the slide from the Liquinox solution with gloves or with tweezers and briefly rinse in Millipore H2O. Place the slide in a 50 mL Falcon tube with methanol. Sonicate for 2 minutes. Remove the slide and then let it air dry on a paper towel on the bench. Do not wipe the ITO surface. | #Clean the ITO slide by placing it into a 50 ml falcon tube with 1% Liquinox. Sonicate for 2 minutes. Remove the slide from the Liquinox solution with gloves or with tweezers and briefly rinse in Millipore H2O. Place the slide in a 50 mL Falcon tube with methanol. Sonicate for 2 minutes. Remove the slide and then let it air dry on a paper towel on the bench. Do not wipe the ITO surface. | ||
#Plasma clean the slide for 5 minutes. One of the teaching faculty will show you how to use the plasma cleaner. | #Plasma clean the slide for 5 minutes. One of the teaching faculty will show you how to use the plasma cleaner. | ||
| Line 41: | Line 46: | ||
#Fill the beaker with 45 mL of Millipore H2O. Add 5 mL of the nanowire solution and mix with a pipette. | #Fill the beaker with 45 mL of Millipore H2O. Add 5 mL of the nanowire solution and mix with a pipette. | ||
#Lower the platinum mesh into the solution. Try to get as much of the platinum into the solution WITHOUT letting the tweezers touch the solution. | #Lower the platinum mesh into the solution. Try to get as much of the platinum into the solution WITHOUT letting the tweezers touch the solution. | ||
| − | #Lower the ITO slide into the solution with the ITO side facing the platinum. Make sure that your pattern is fully immersed in the solution (or else you | + | #Lower the ITO slide into the solution with the ITO side facing the platinum. Make sure that your pattern is fully immersed in the solution (or else you won���t get deposition on your entire pattern), but do not let the tweezers touch the solution. [[Image:ECD_set_up_close_up.JPG|thumb|left|200px|Your platinum mesh and ITO slide should be parallel to each other.]] |
| − | #The platinum electrode should be about | + | #The platinum electrode should be about �� inch away from the ITO slide with the ITO side facing the platinum. Try to have the slide and the platinum parallel to each other. |
#Before you turn on the power supply, turn the voltage and the current all the way down (counter clockwise). | #Before you turn on the power supply, turn the voltage and the current all the way down (counter clockwise). | ||
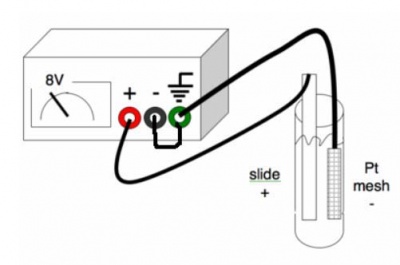
| − | #Attach the slide and the platinum mesh to the power supply using alligator clips. The negative should be hooked up to the platinum and the positive should be hooked up to the ITO. Also, the negative should be grounded on the power supply. See the figure. | + | #Attach the slide and the platinum mesh to the power supply using alligator clips. The negative should be hooked up to the platinum and the positive should be hooked up to the ITO. Also, the negative should be grounded on the power supply. See the figure. [[Image:Power_supply_set_up.jpg|thumb|right|400px|Make sure your connections match those in the graphic.]] |
#Turn on the power supply and slowly turn the voltage up to about 7.5 V. Keep an eye on the current. The current should not be above 0.01 amps. If the current is higher than that, turn down the current knob. If the current knob is all the way down, turn down the voltage. Use the multimeter to confirm that the charge is flowing by measuring the voltage difference between the two tweezers. | #Turn on the power supply and slowly turn the voltage up to about 7.5 V. Keep an eye on the current. The current should not be above 0.01 amps. If the current is higher than that, turn down the current knob. If the current knob is all the way down, turn down the voltage. Use the multimeter to confirm that the charge is flowing by measuring the voltage difference between the two tweezers. | ||
#After 10 minutes, look at the solution. You should see a dark cloud collecting near the ITO slide. Turn off the voltage and slowly lift the ITO slide out of the solution. Use a 1 mL pipette to mix the solution. | #After 10 minutes, look at the solution. You should see a dark cloud collecting near the ITO slide. Turn off the voltage and slowly lift the ITO slide out of the solution. Use a 1 mL pipette to mix the solution. | ||
| Line 52: | Line 57: | ||
==For next time== | ==For next time== | ||
| − | # | + | [[Image:ITOboundphage.png|thumb|left|image provided by Yoon Sung Nam]] |
| − | # | + | #Consider [http://www.astm.org/cgi-bin/SoftCart.exe/STORE/filtrexx40.cgi?U+mystore+hoqt3793+-L+ELECTRODEPOSITION+/usr6/htdocs/astm.org/DATABASE.CART/REDLINE_PAGES/B734.htm this page] with standards described for electroplating. What would a biological engineering equivalent look like if you were writing for "the American Society for Biological Engineering Standards" (not currently in existance). Describe 3 specifications you think are necessary details for a lab protocol you're familiar with like transformation or growing phage? |
| + | # The deposition of the nanowires onto the patterned slide is driven by current, resulting in an uneven tangle of IrO<sub>2</sub>wires on the ITO. As a biological engineer, use your understanding of M13 biology to engineer a more densely packed and uniform surface of nanowires on the ITO, like the idealized cartoon shown in the image below. | ||
| + | # Your oral presentations of your research proposals will be given one week from today. You should be well on your way to preparing the presentation materials themselves and should be working on the wording you will use to describe your idea. Reconsult the [[20.109(F07): Module 3 oral presentations| specific directions for what you'll need]] as well as the more general [[20.109(F07):Guidelines for oral presentations| guidelines for all oral presentations]]. | ||
| + | |||
==Reagents list== | ==Reagents list== | ||
Latest revision as of 15:54, 15 June 2015

Contents
Introduction
Electrodeposition is a commonly used technique in which current is applied to layer one material, usually a metal, onto another.

Successful electrodeposition requires that the cathode surface be extremely clean. Hydrophobic oils only molecules thick can inhibit deposition and cathode surfaces must be extensively cleaned with solvents, detergents, sonication (which uses sound waves to remove dirt) and/or acidic baths. Technical standards for cleaning, testing and assessing electrodeposited materials are described by the American Society for Testing and Materials. Their guide for cleaning metals prior to electroplating has directions for precleaning, intermediate and final-cleaning as well as trouble shooting! [1].
 Today you will start to assemble your electrochromic device by electrodepositing IrO2 nanowires that formed on the specialize M13 phage. The IrO2 wires have a slight negative charge. Consequently they can be directed toward the patterned ITO slide if the slide is attached to the positive terminal of a power supply. The circuit is completed by attaching a platinum mesh to the ground terminal of a power supply. After this deposition, you will have a tangle of nanowires adhering to the areas of your slide that were not etched away last time. Next time you will finish building the electrochromic device, adding the Li+-layer of electrolytes and a second, unpatterned ITO slide to serve as the other conductive surface. A preview of the assembled ECD is found here
Protocols
Part 1: M13.1 titers
The strains you transformed last time with M13K07 and M13.1 were inoculated into LB+Kan and grown overnight. If the two forms of the phage are equally robust, then the phage titer in the liquid surrounding the cells should be approximately the same. Ditto if the wild type strain, MG1655, and the MDS strain are equally capable of phage production. You will compare the PFU/ul of each culture to determine if this is true. The titering protocol is identical to the one from #Protocols| module 1. Since you don't know if the phage production will be improved or diminished by any of the variations, you will titer a wider-than-usual range of concentrations.
| phage = M13K07, strain = MG1655 | phage = M13K07, strain = MDS | phage = M13.1, strain = MG1655 | phage = M13.1, strain = MDS | |
| 10-6 | ||||
| 10-8 | ||||
| 10-10 |
You should also include a no phage control plate for confidence that the number of plaques you see next time arise as a result of your experiment.
Part 2: Phage deposition onto patterned slide

- Clean the ITO slide by placing it into a 50 ml falcon tube with 1% Liquinox. Sonicate for 2 minutes. Remove the slide from the Liquinox solution with gloves or with tweezers and briefly rinse in Millipore H2O. Place the slide in a 50 mL Falcon tube with methanol. Sonicate for 2 minutes. Remove the slide and then let it air dry on a paper towel on the bench. Do not wipe the ITO surface.
- Plasma clean the slide for 5 minutes. One of the teaching faculty will show you how to use the plasma cleaner.
- While the slide is drying, set up the ringstand. Look at the figure to see how it should be set up. Hold the platinum electrode and the slide with metal tweezers which you can then fix using clamps.
- Fill the beaker with 45 mL of Millipore H2O. Add 5 mL of the nanowire solution and mix with a pipette.
- Lower the platinum mesh into the solution. Try to get as much of the platinum into the solution WITHOUT letting the tweezers touch the solution.
- Lower the ITO slide into the solution with the ITO side facing the platinum. Make sure that your pattern is fully immersed in the solution (or else you won���t get deposition on your entire pattern), but do not let the tweezers touch the solution.
 Your platinum mesh and ITO slide should be parallel to each other.
- The platinum electrode should be about �� inch away from the ITO slide with the ITO side facing the platinum. Try to have the slide and the platinum parallel to each other.
- Before you turn on the power supply, turn the voltage and the current all the way down (counter clockwise).
- Attach the slide and the platinum mesh to the power supply using alligator clips. The negative should be hooked up to the platinum and the positive should be hooked up to the ITO. Also, the negative should be grounded on the power supply. See the figure.
 Make sure your connections match those in the graphic.
 - Turn on the power supply and slowly turn the voltage up to about 7.5 V. Keep an eye on the current. The current should not be above 0.01 amps. If the current is higher than that, turn down the current knob. If the current knob is all the way down, turn down the voltage. Use the multimeter to confirm that the charge is flowing by measuring the voltage difference between the two tweezers.
- After 10 minutes, look at the solution. You should see a dark cloud collecting near the ITO slide. Turn off the voltage and slowly lift the ITO slide out of the solution. Use a 1 mL pipette to mix the solution.
- Carefully return the ITO slide to the solution. Make sure that the tweezers are not touching the liquid. Turn the voltage back on. Check the voltage again using the multimeter.
- After another 10 minutes, you should see a dark cloud collecting near the ITO slide. Turn off the voltage and slowly lift the ITO slide out of the solution. Look at the pattern. You should see a homogenous covering across the patterned part of the slide. If it is not fully covered, put the slide back in the solution for another 10 minutes. If it is covered, carefully set the slide, pattern side up, on a paper towel to dry for at least 1 hour.
- Look at the slide and if there is any additional liquid on it, you can carefully wick away the liquid using the tip of a Kimwipe.


For next time

- Consider this page with standards described for electroplating. What would a biological engineering equivalent look like if you were writing for "the American Society for Biological Engineering Standards" (not currently in existance). Describe 3 specifications you think are necessary details for a lab protocol you're familiar with like transformation or growing phage?
- The deposition of the nanowires onto the patterned slide is driven by current, resulting in an uneven tangle of IrO2wires on the ITO. As a biological engineer, use your understanding of M13 biology to engineer a more densely packed and uniform surface of nanowires on the ITO, like the idealized cartoon shown in the image below.
- Your oral presentations of your research proposals will be given one week from today. You should be well on your way to preparing the presentation materials themselves and should be working on the wording you will use to describe your idea. Reconsult the specific directions for what you'll need as well as the more general guidelines for all oral presentations.